
Identity & Access Management
Azure AD
Azure AD
Azure AD: Overview and capabilities
Integrate Atomicwork with Microsoft Azure to streamline user authentication and access management, ensuring a secure and seamless login experience for your team. This integration enhances security protocols while simplifying access, allowing your team to focus on their work without worrying about credentials. This reduces the risk of unauthorized access by ensuring that only the right people have access to the right resources at all times.
This is how you can setup the integration and here are all the capabilities you can unlock with the Atomicwork - Azure integration:
- Employee data sync: Employee data from Azure AD will be synced with Atomicwork, enabling enabling the Assistant use these attributes to deliver personalized responses.
- Atom skill: Self-service password reset: Enable your employees to reset their Azure AD passwords themselves without needing an administrator's intervention.
- Atom skill: Provision apps: Enable your employees to request and obtain application access, without waiting for an administrator to intervene. The Assistant grants access by adding the employee to the right Azure AD group.
- Azure actions in journeys and workflows: Automate actions in Azure, such as creating accounts, managing group memberships, and suspending or deactivating accounts, through workflows and journeys.
- Azure Resource Manager assets sync: Syncing Azure Resource Manager assets with Atomicwork provides IT teams with a centralized, dynamic view of all organizational assets, enabling streamlined operations, improved decision-making, and better service delivery.
Azure AD: Permissions and setup
This article covers connecting Atomicwork with Azure, registering an Atomicwork app in Azure and the permissions the app needs to trigger relevant actions in Atomicwork. These permissions include Azure Resource Manager, user management and workflow actions.
Setup
Phase 1: Registering Atomicwork app
To integrate your Atomicwork account with Azure, you need to first register an app in your Azure tenant so you can retrieve the Client ID and Client Secret.
- Log into the Azure Portal. Please make sure to sign in with admin credentials.
- Go to Microsoft Entra ID (Azure AD is now Entra ID)

- Select App Registration on the left pane.
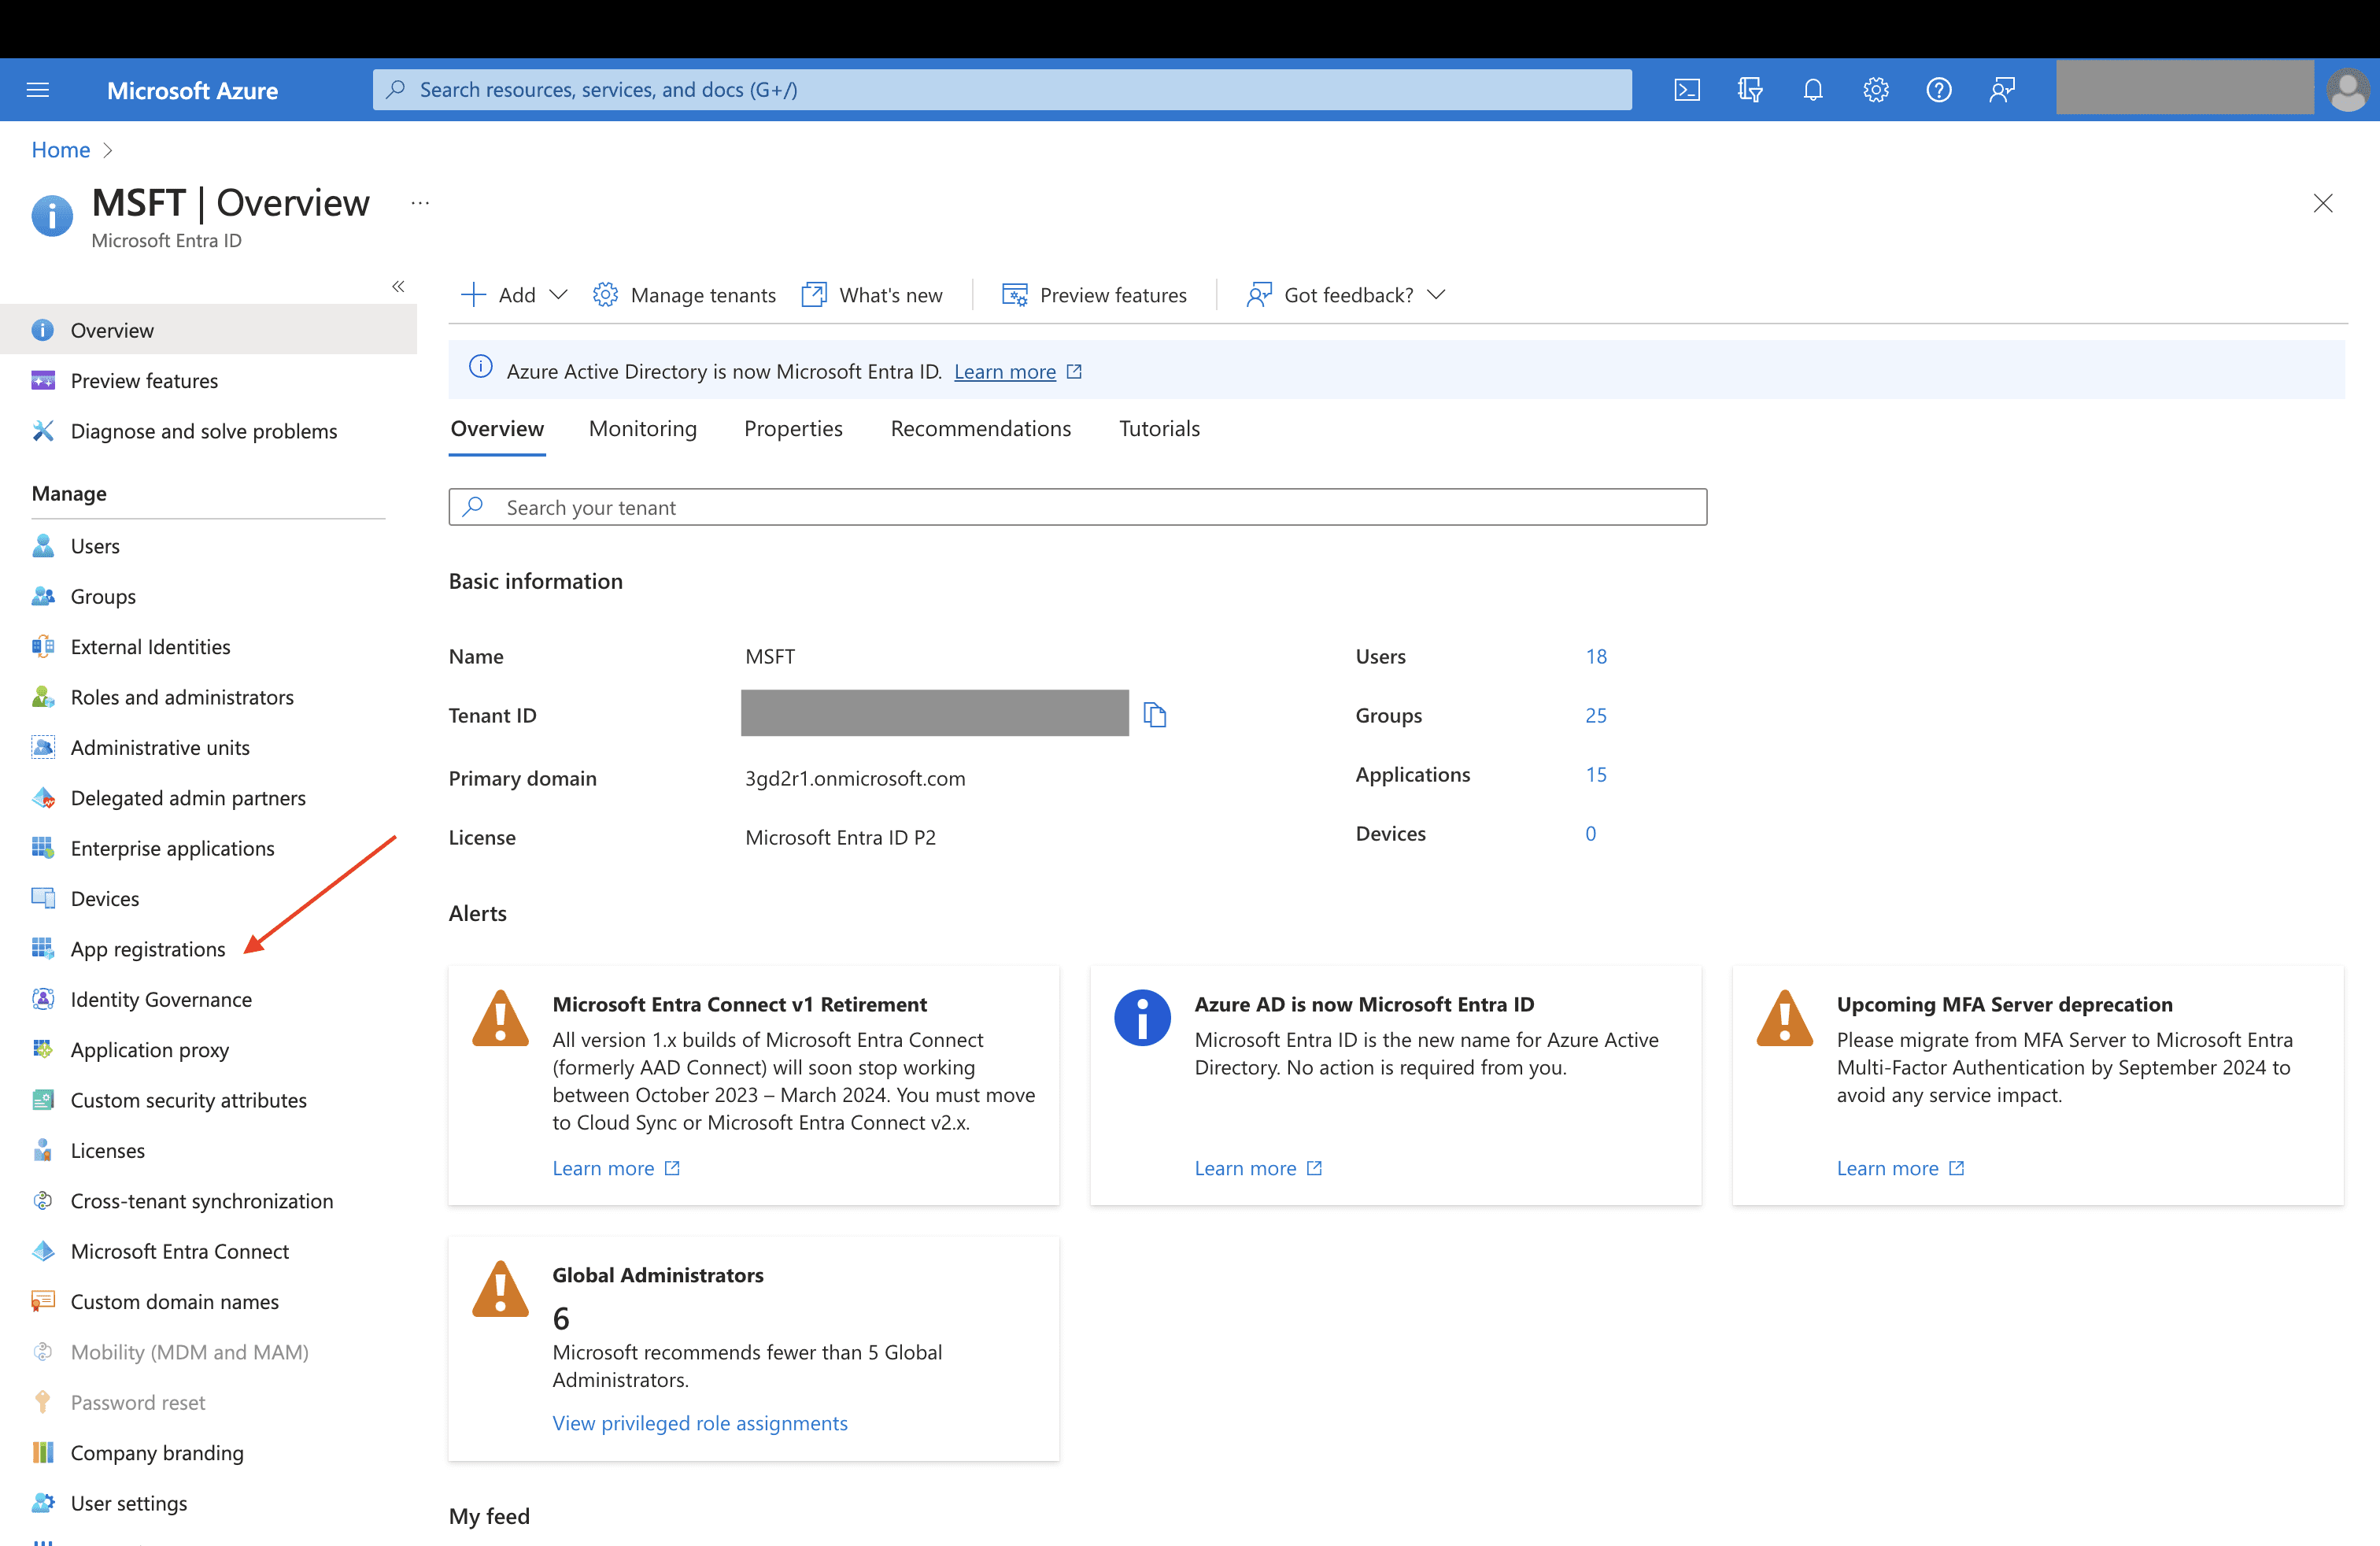
- Select New Registration

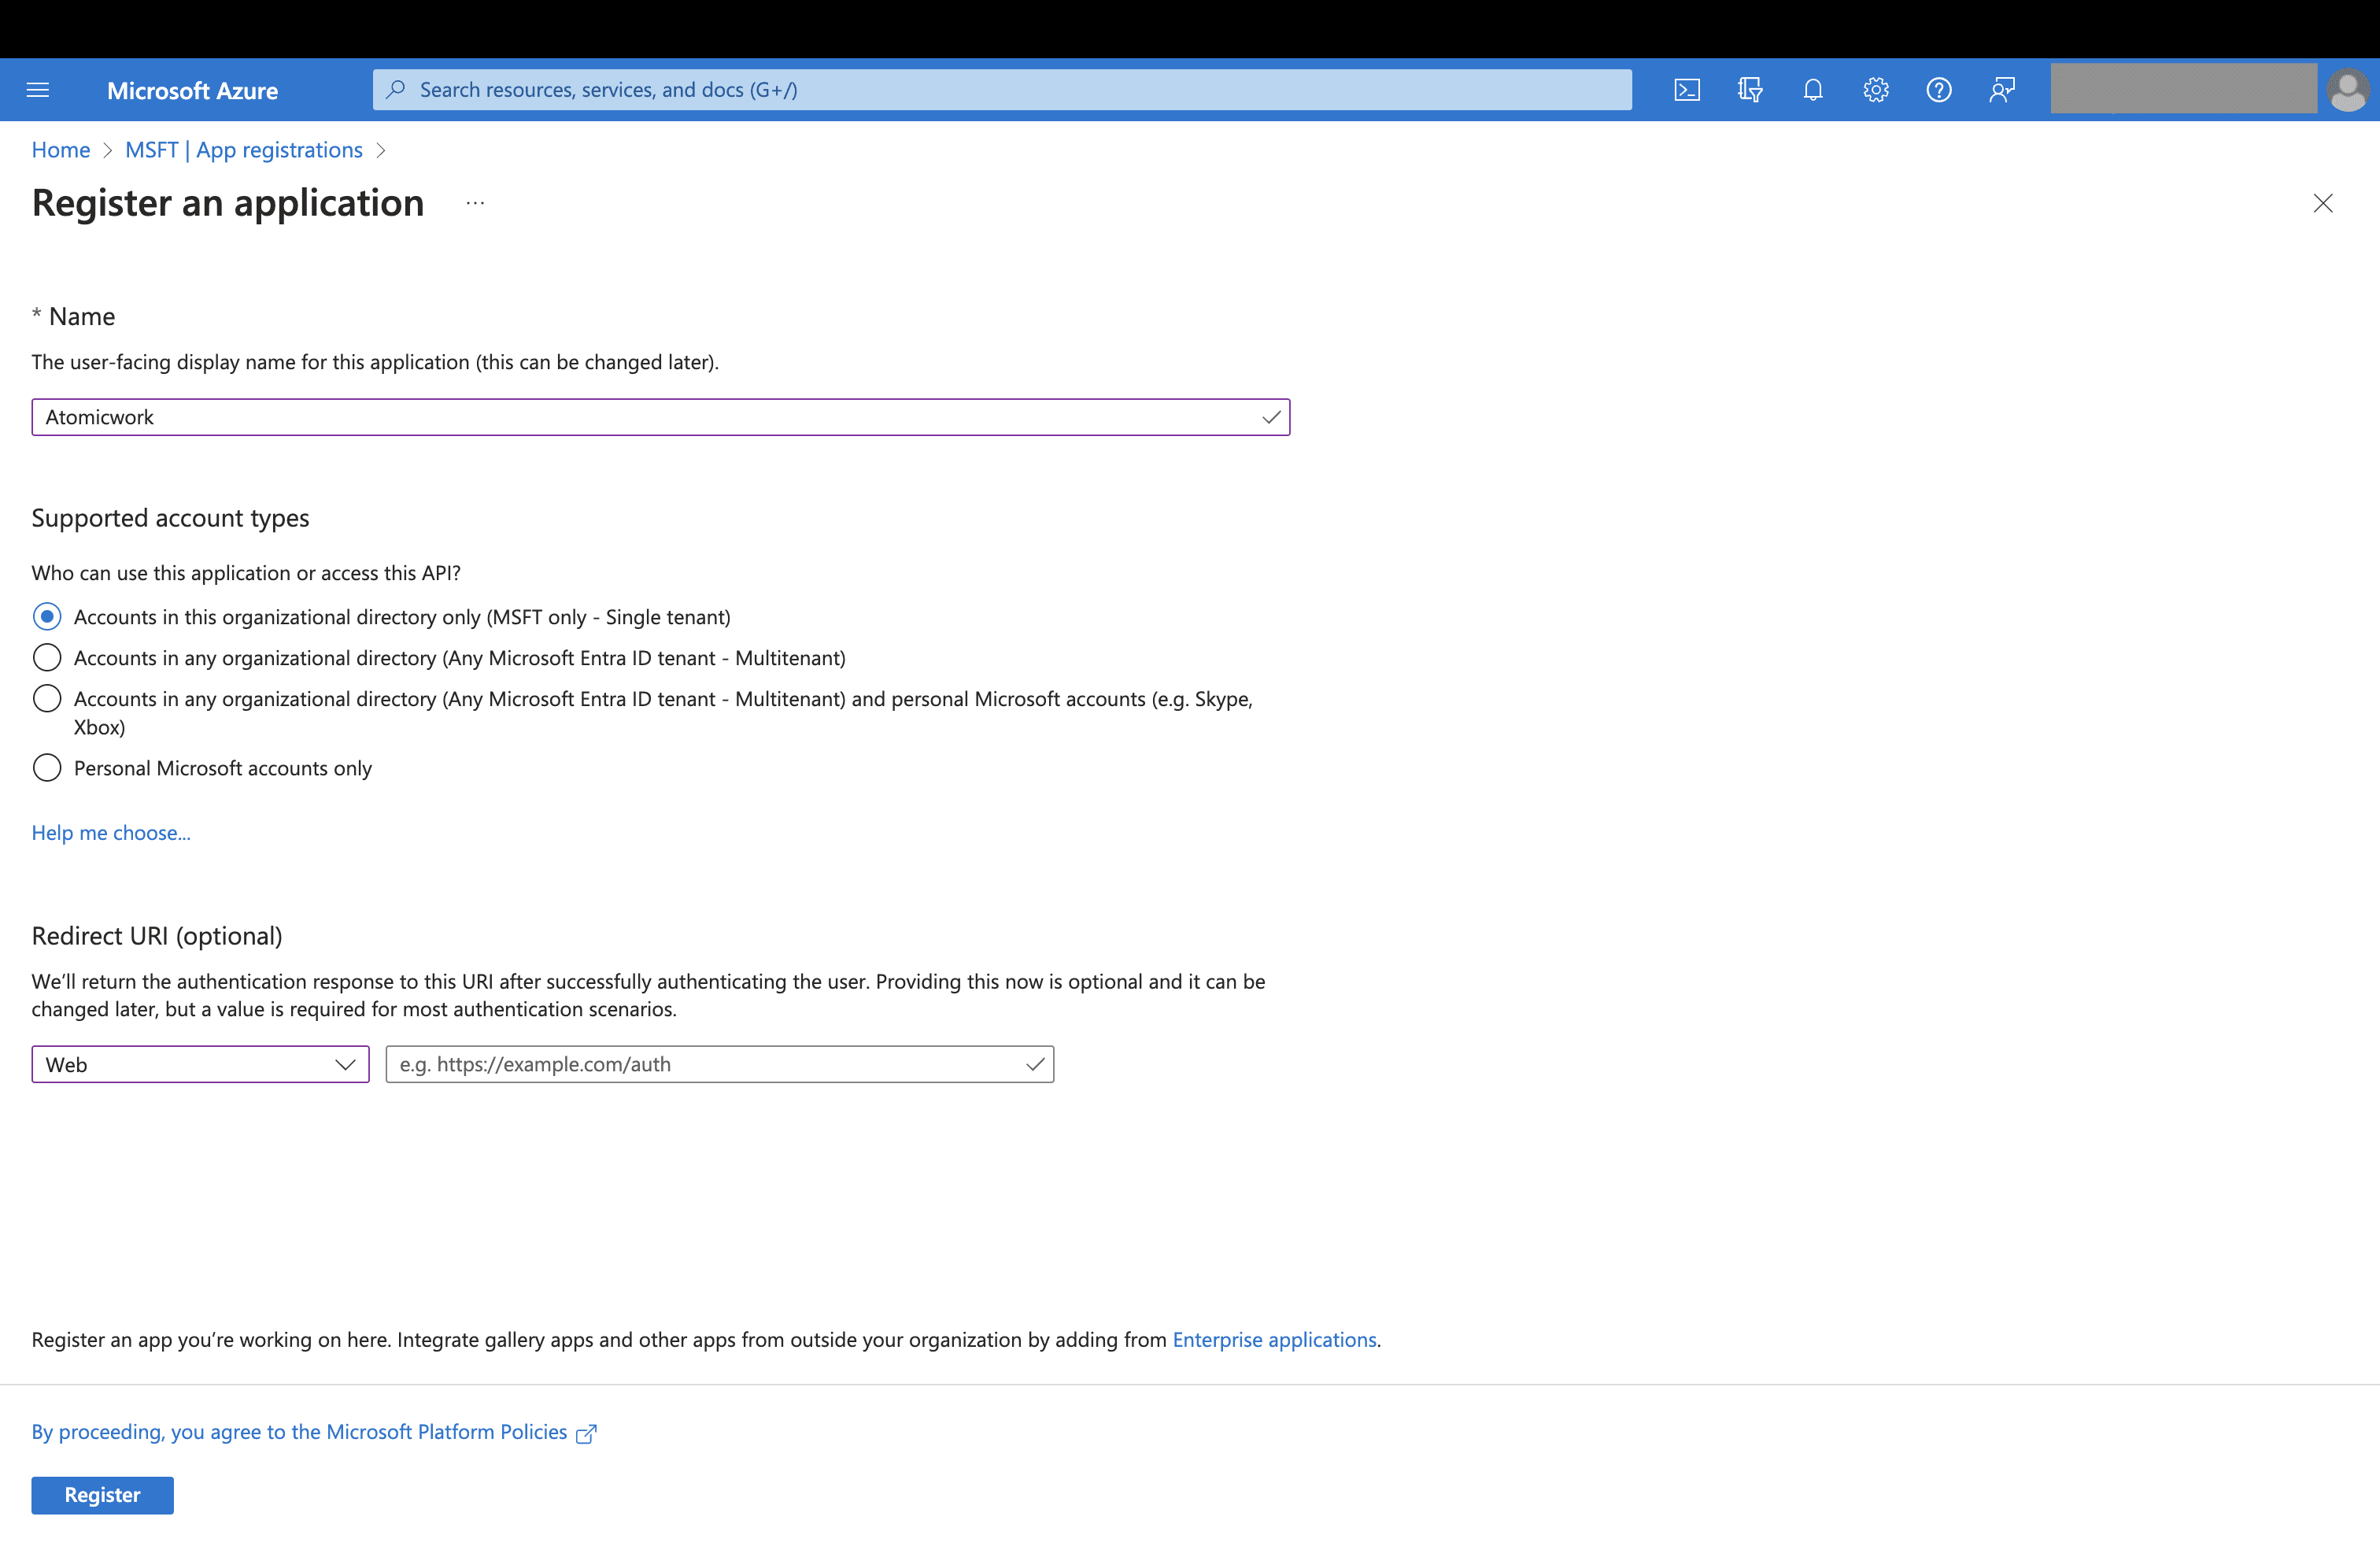
- Enter a meaningful application name for your users and choose who can use this application based on your environment. Click Register.
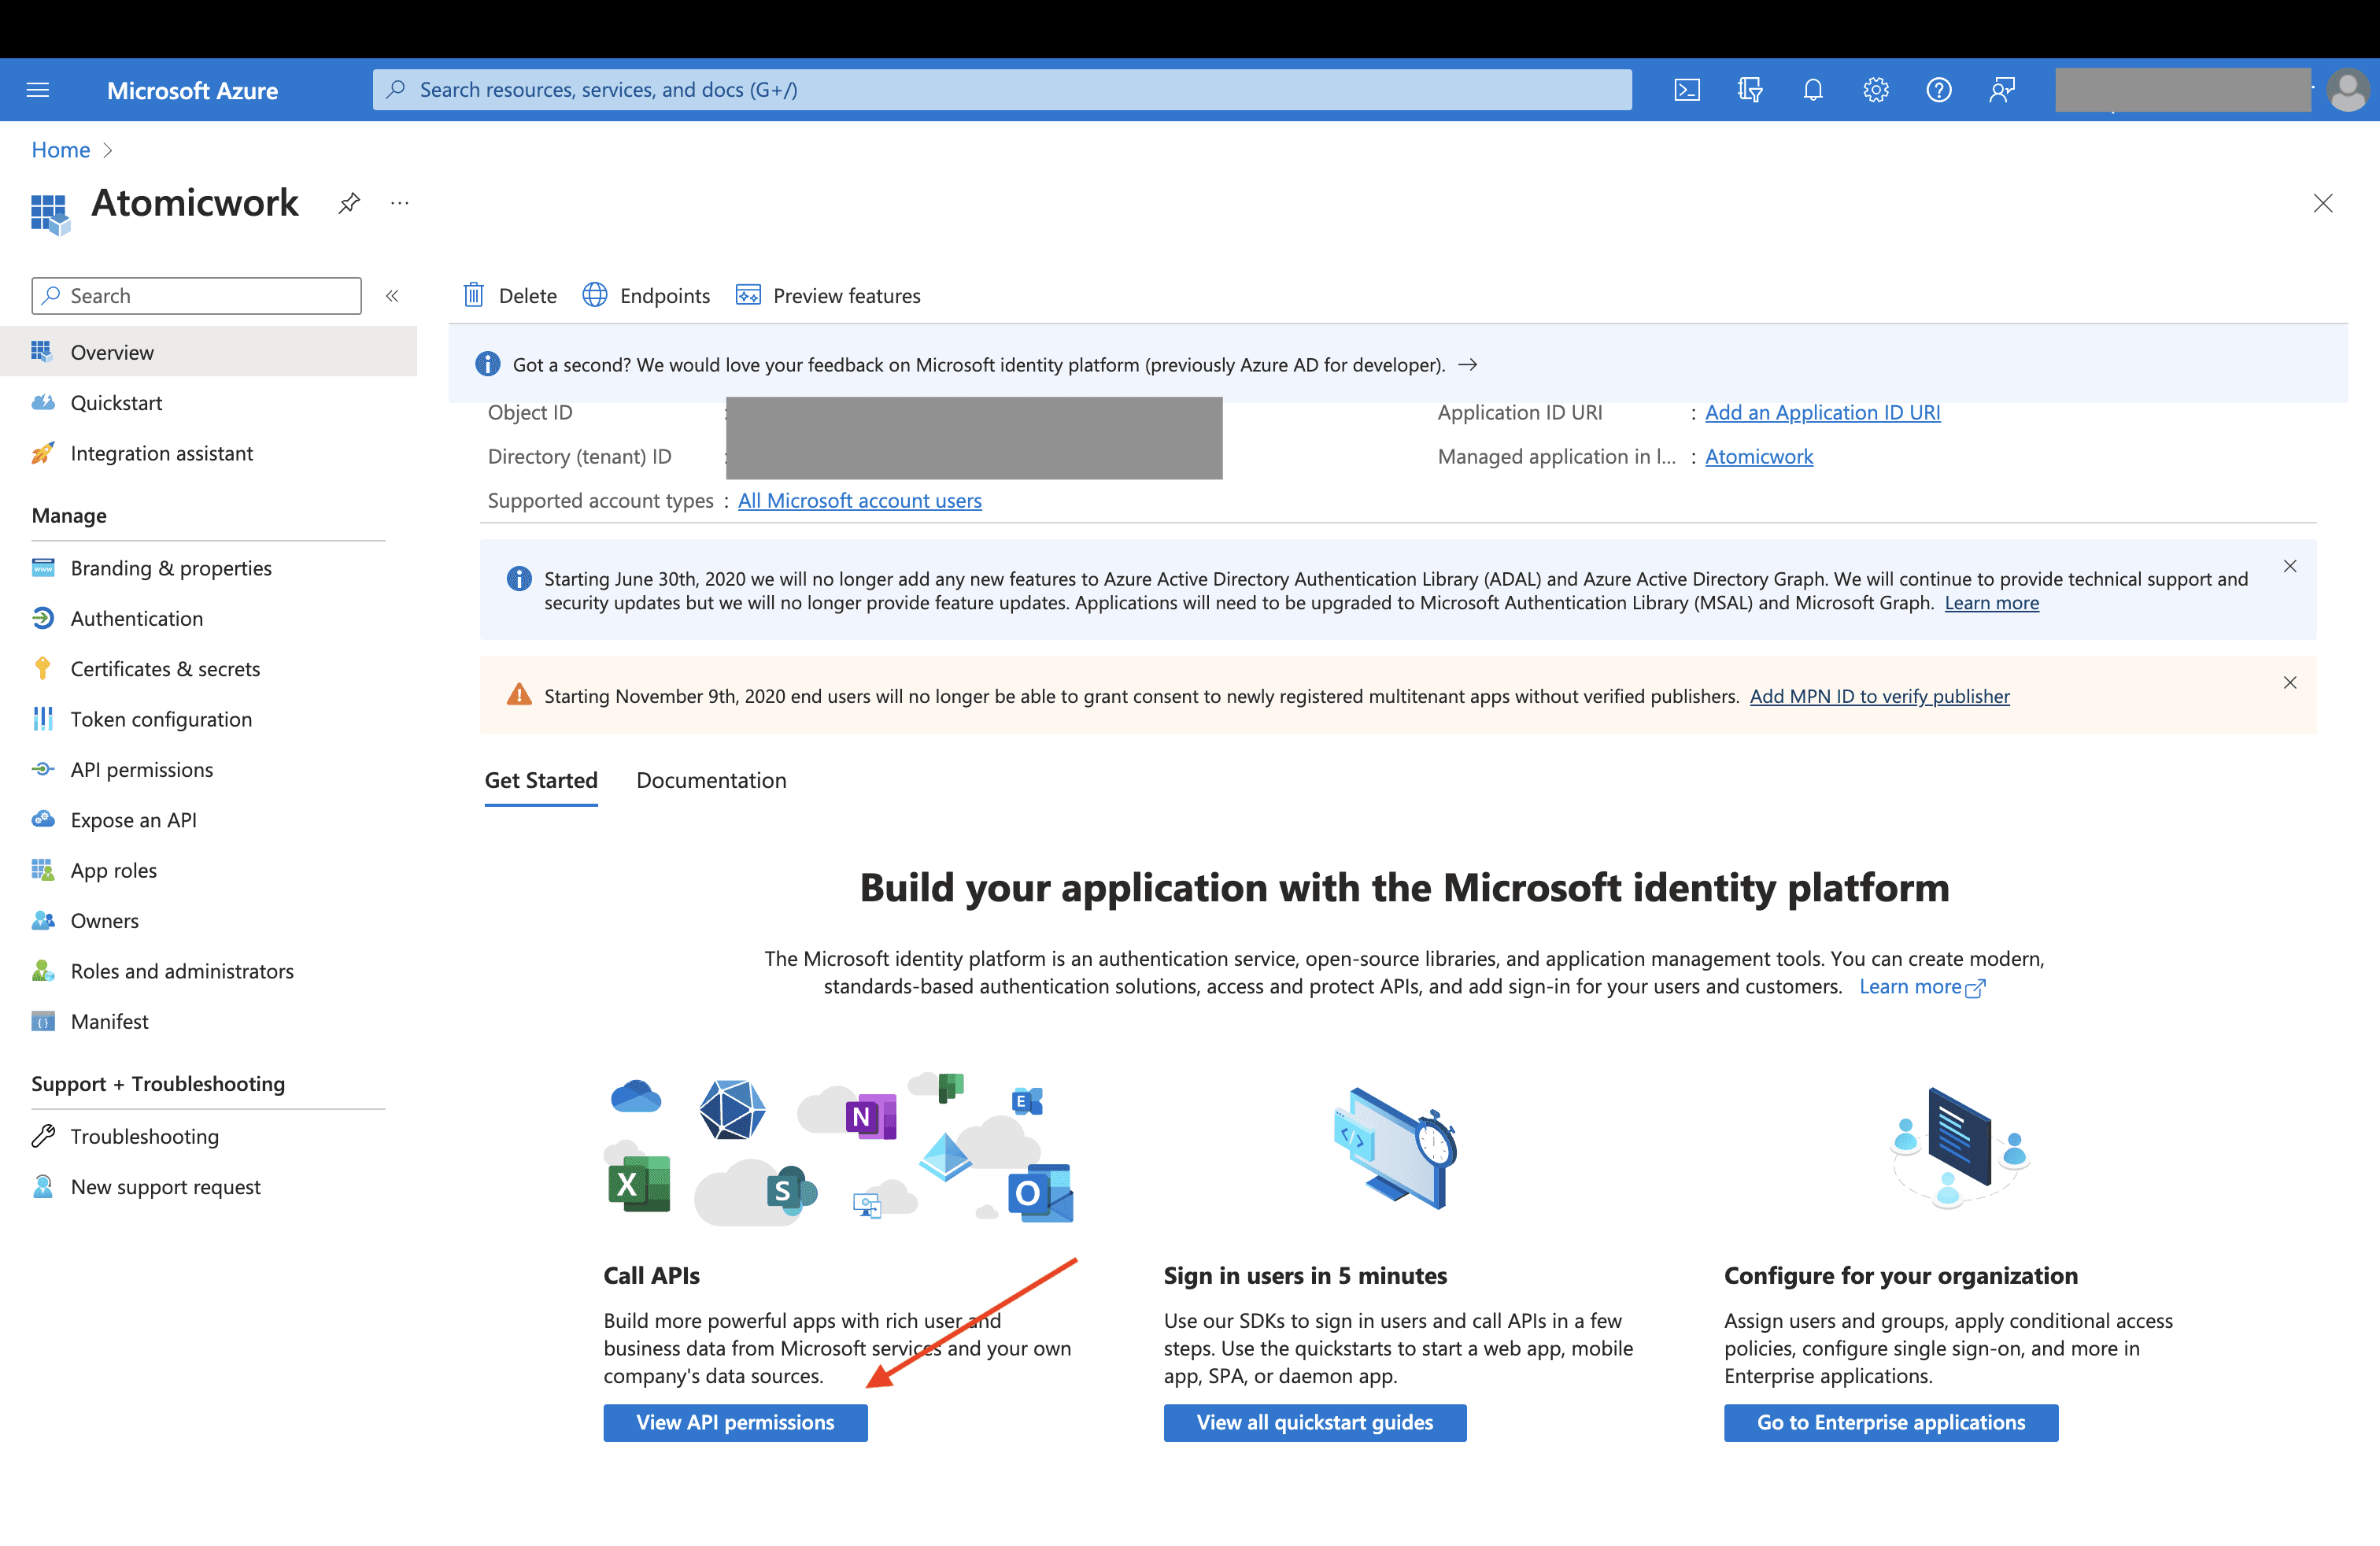
- Once you've registered the application, click on View API permissions
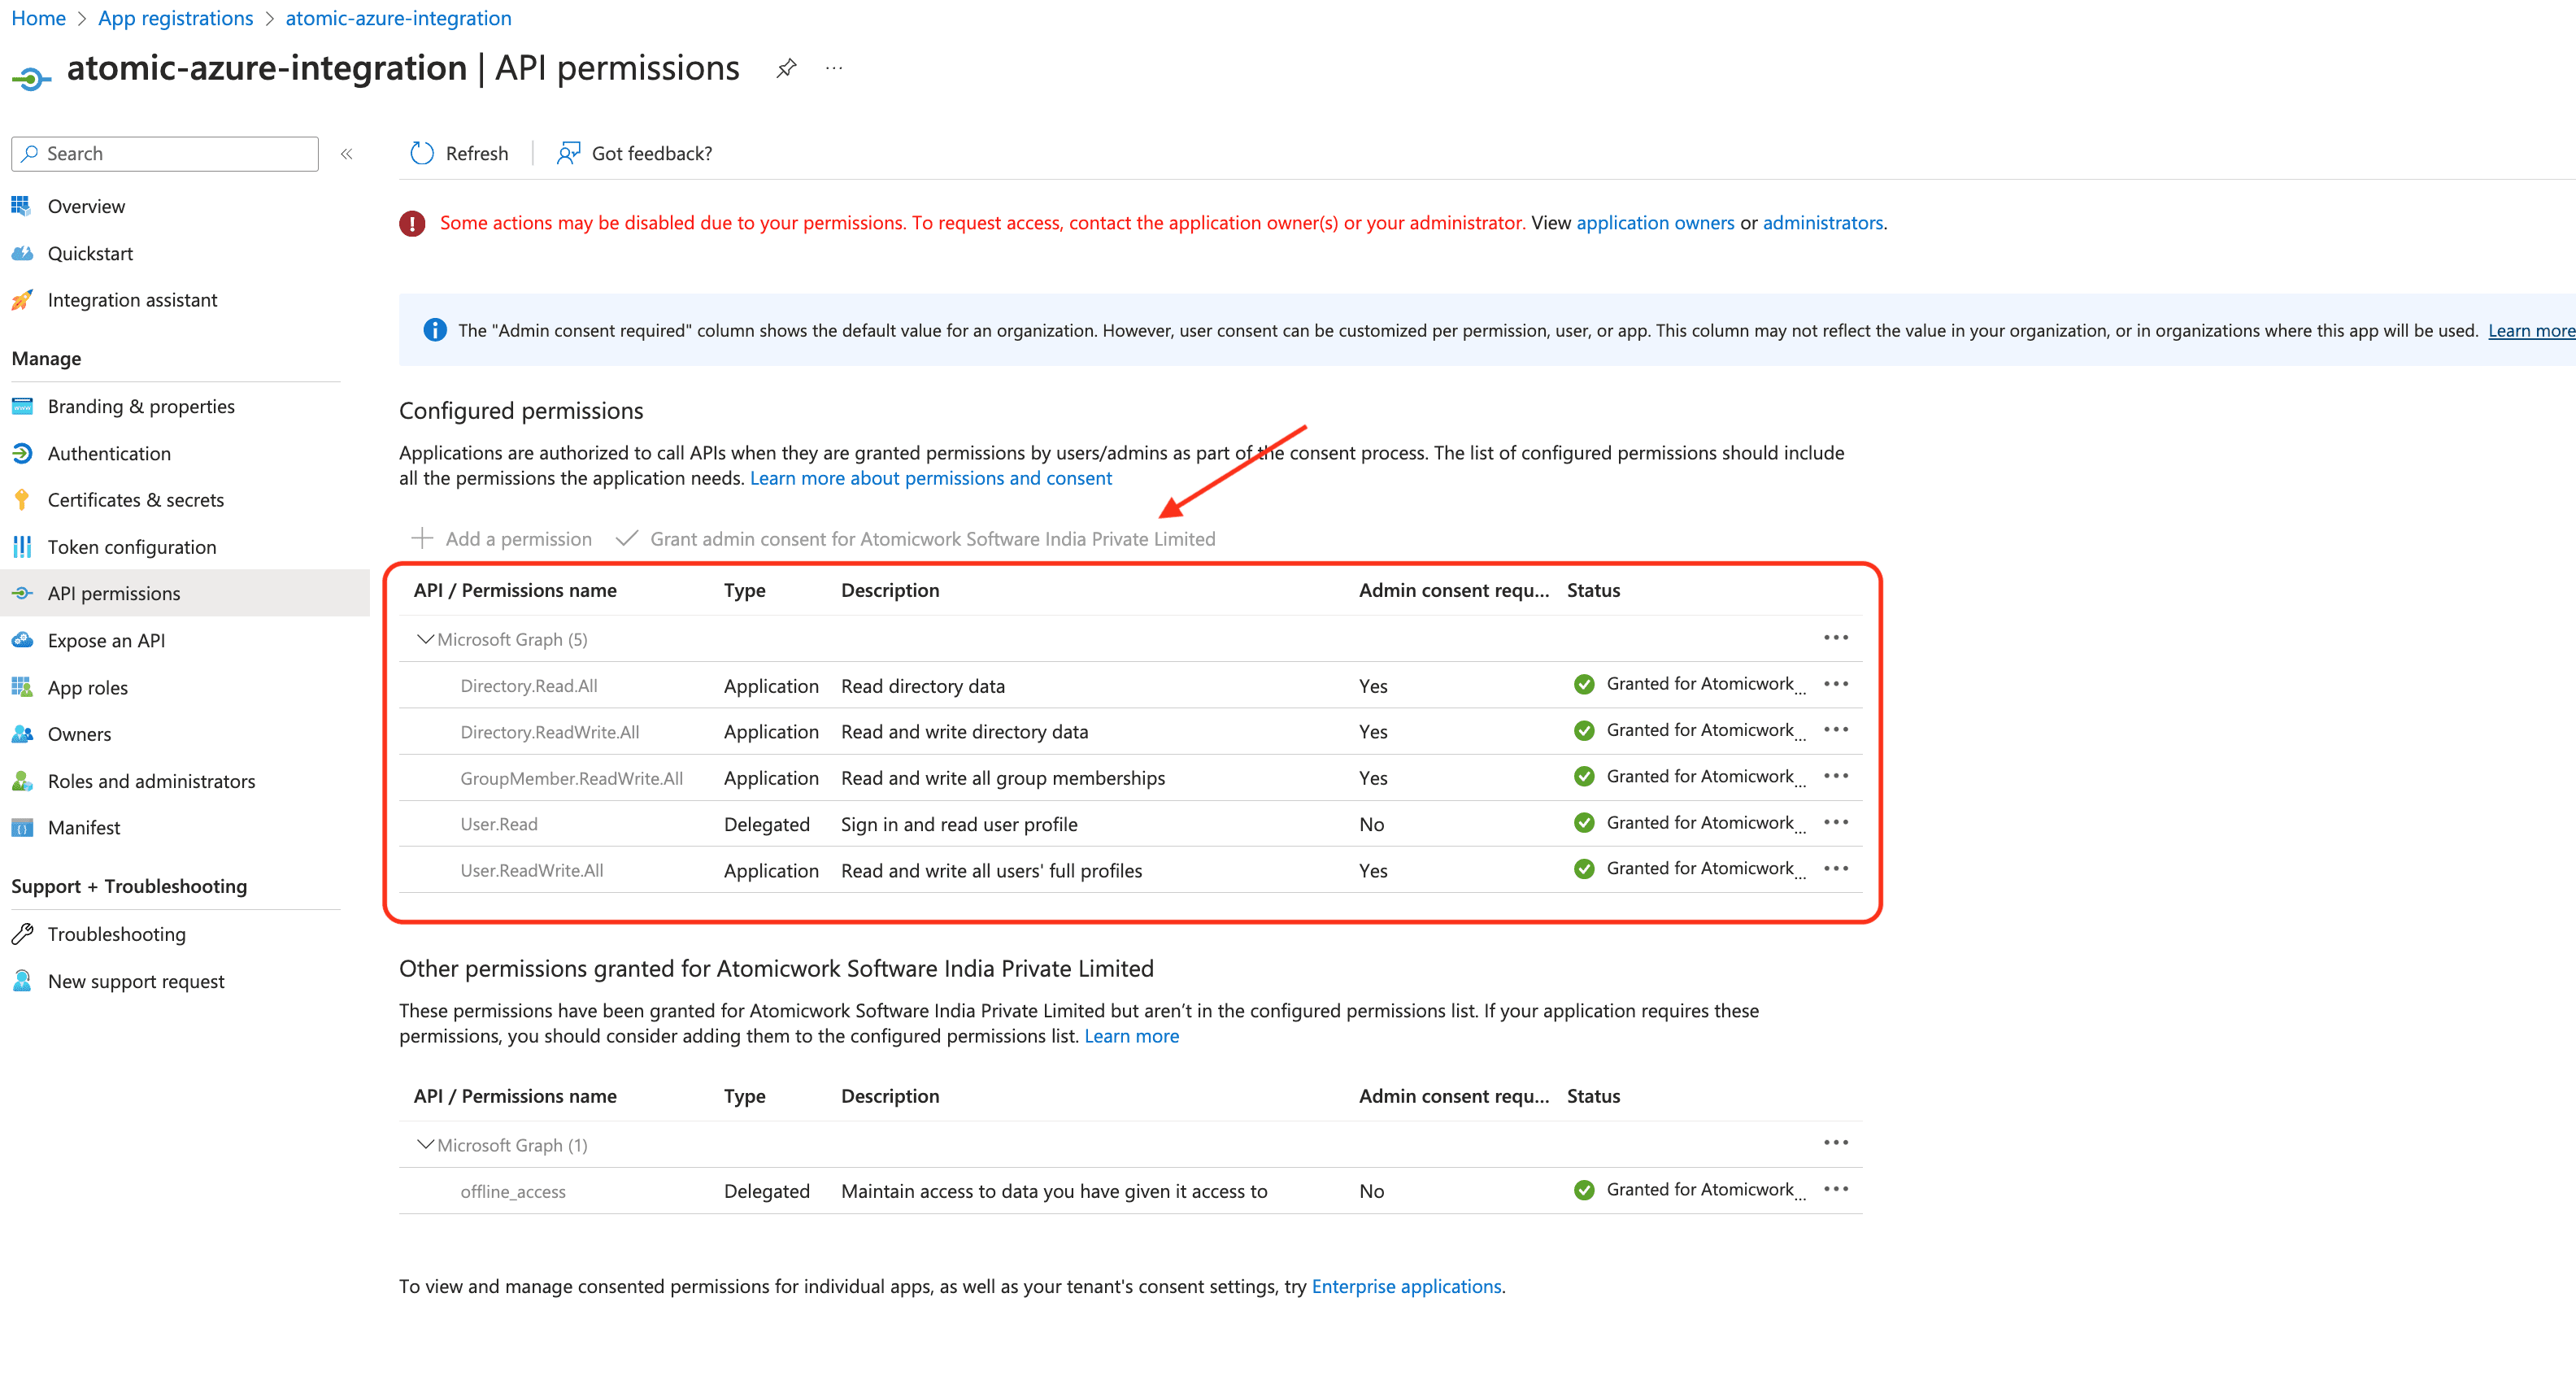
- Select Add a permission > Microsoft Graph > Application permissions and add the appropriate permissions you need from the table below. Once you've added the permissions, make sure to select the Grant admin consent for <Tenant name> button, where <Tenant name> will be the name of your Azure tenant.
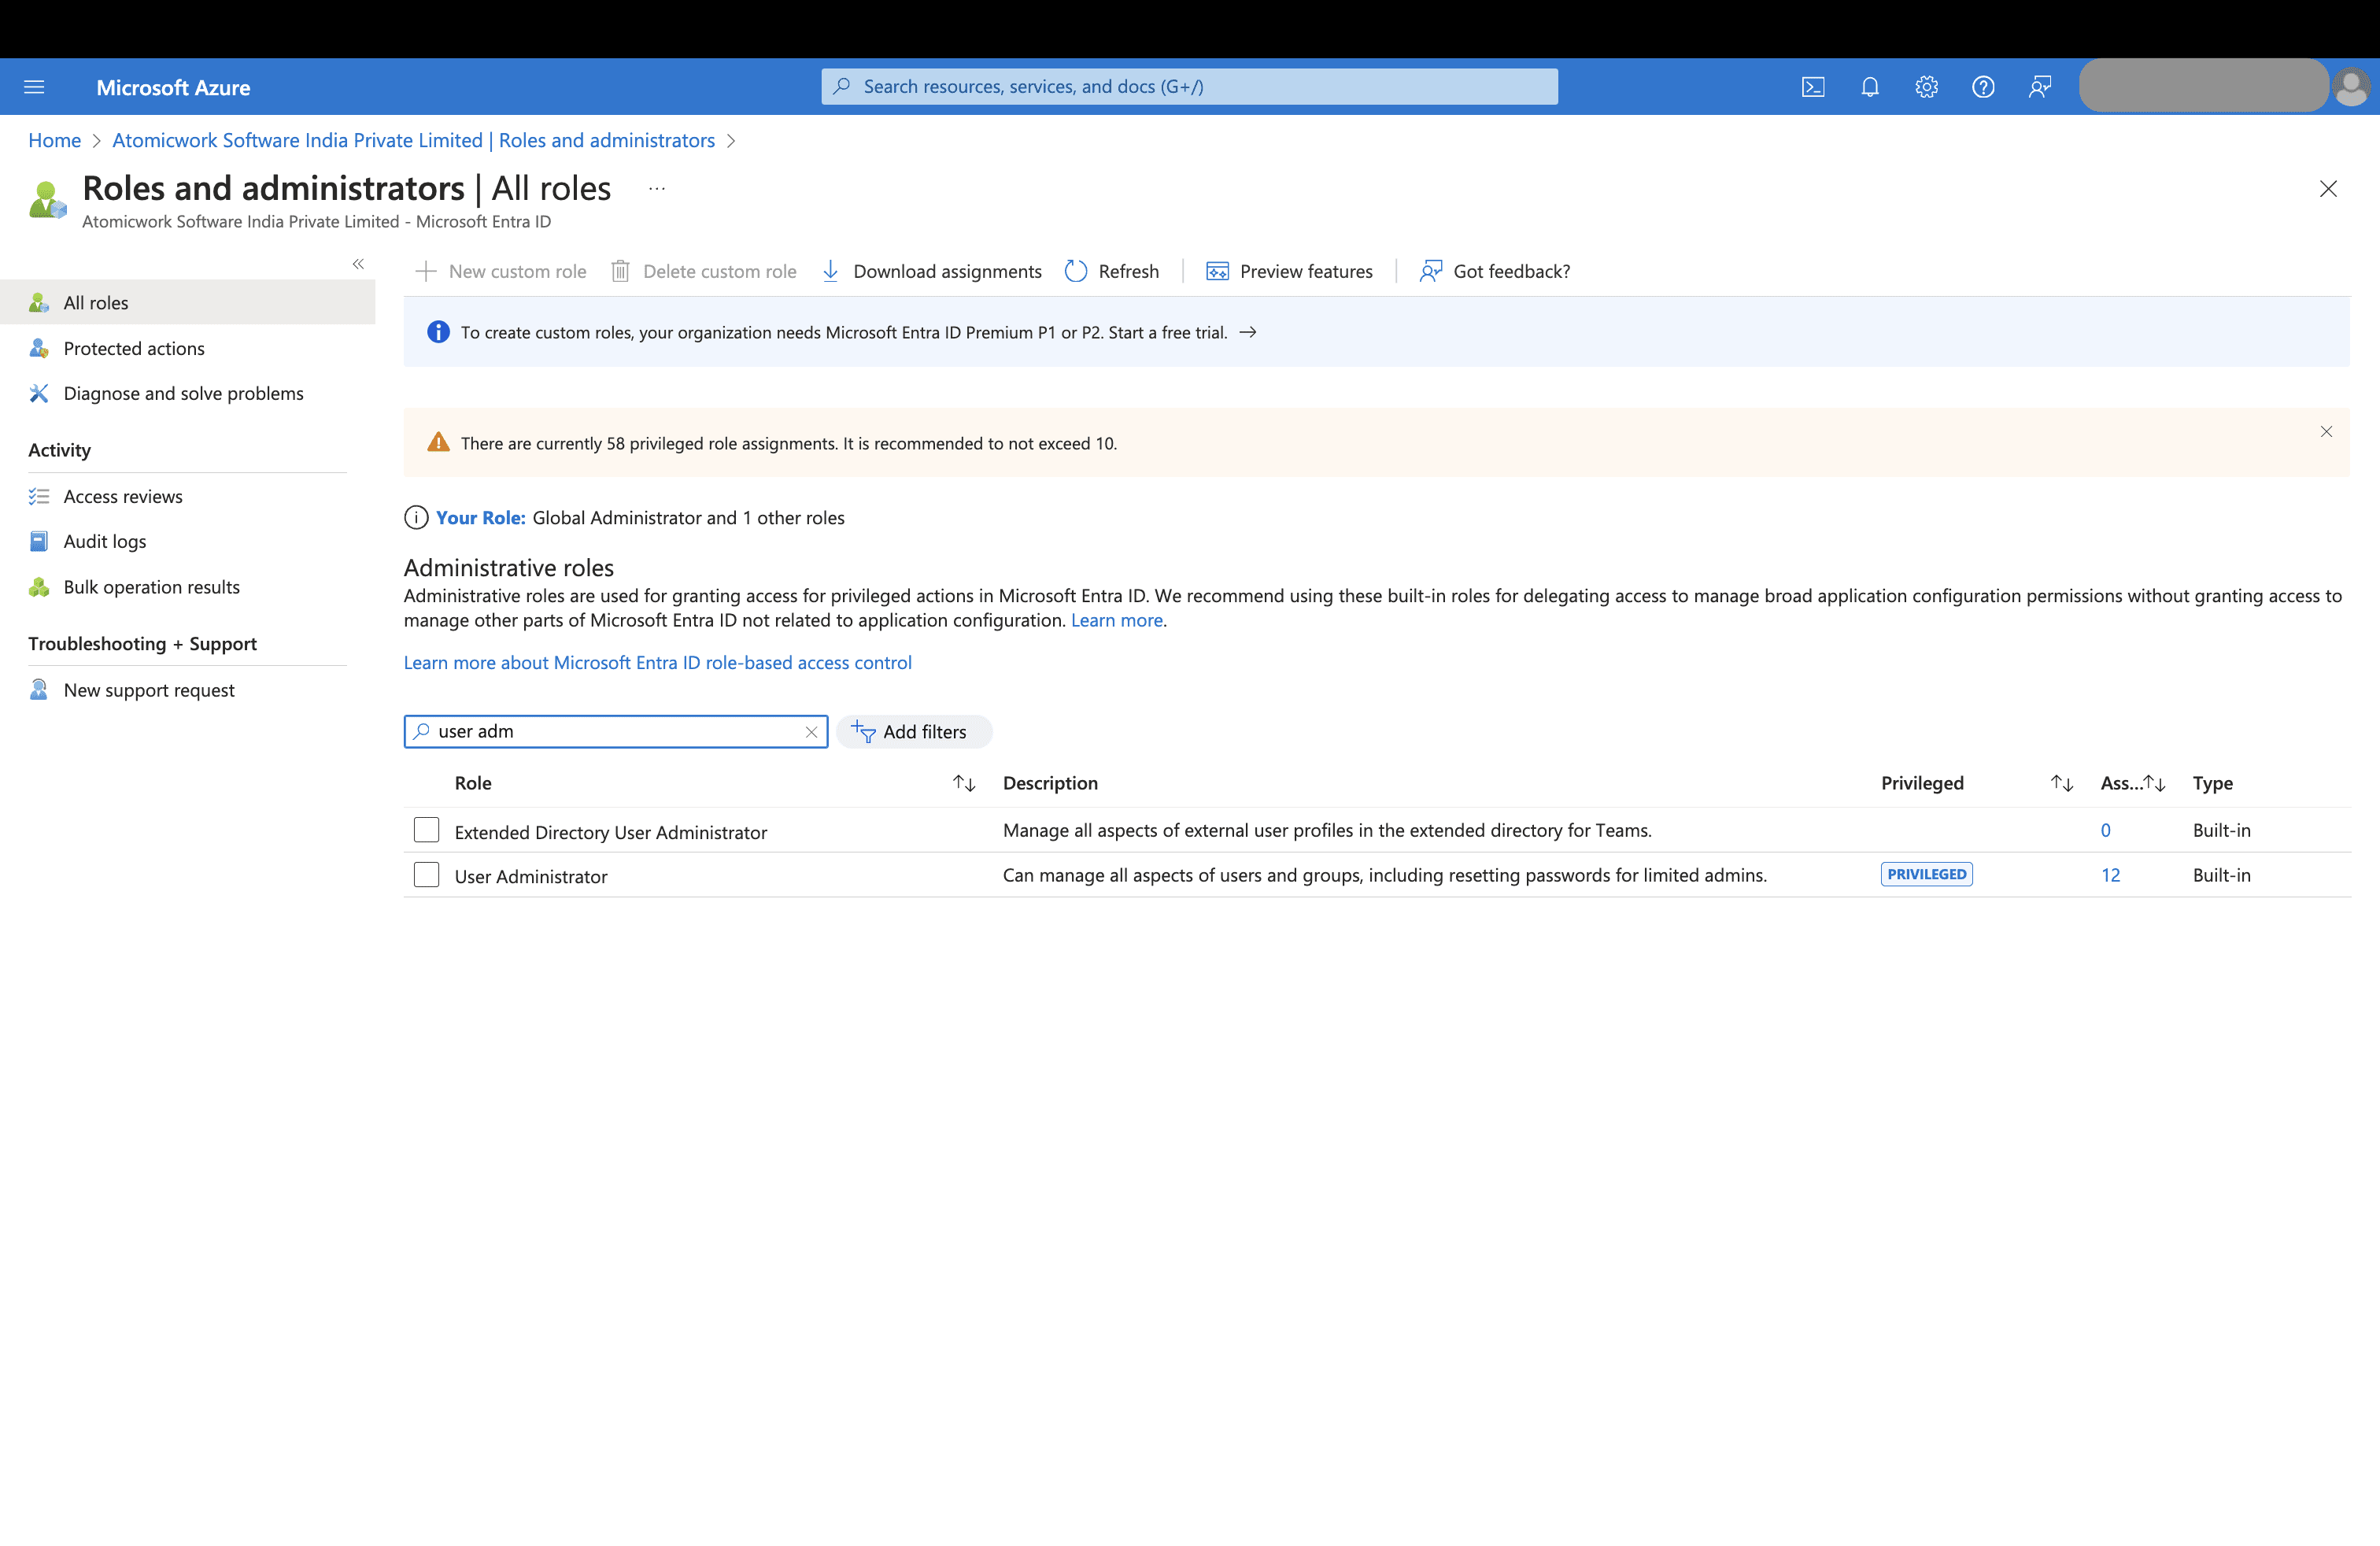
- To enable the password reset skill, you also have to give Atomicwork the user admin role. Go to Roles and Administrators> Search for User Administrator and click through.
-
In the Add assignments modal, search for Atomicwork and click on Add to assign the right privilege to the app.
-
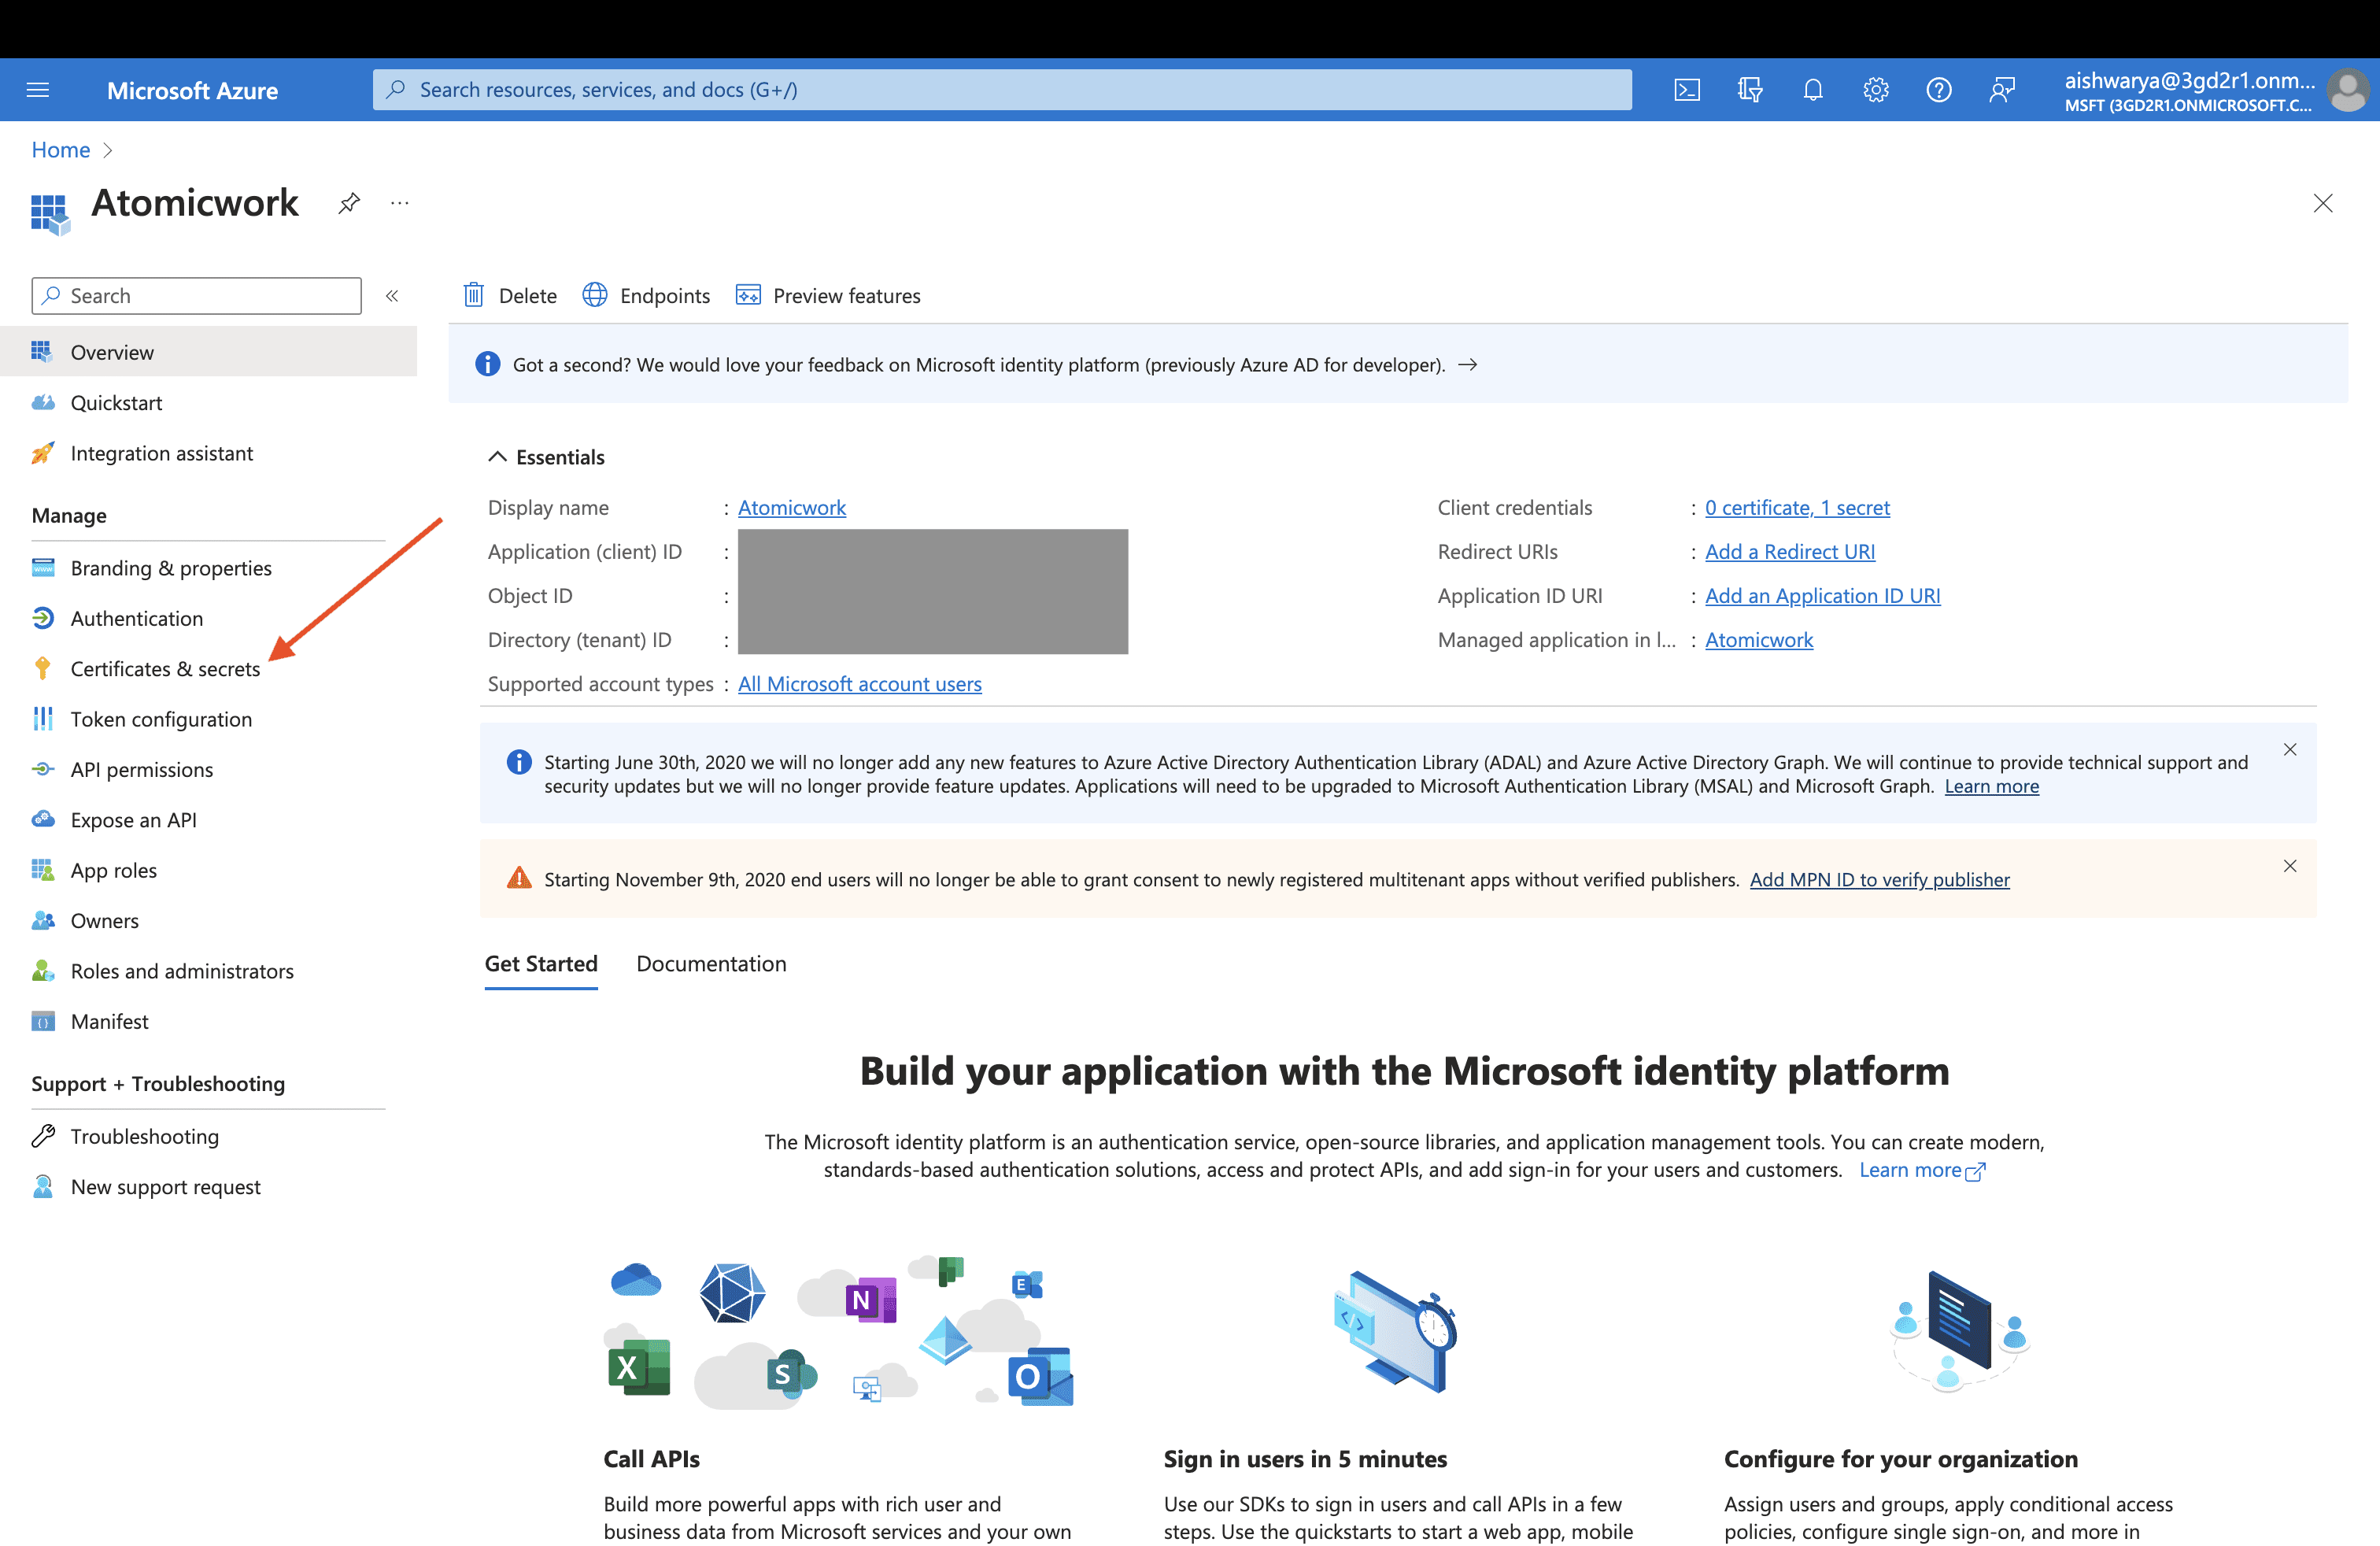
Click Certificates and secrets in the left pane.
-
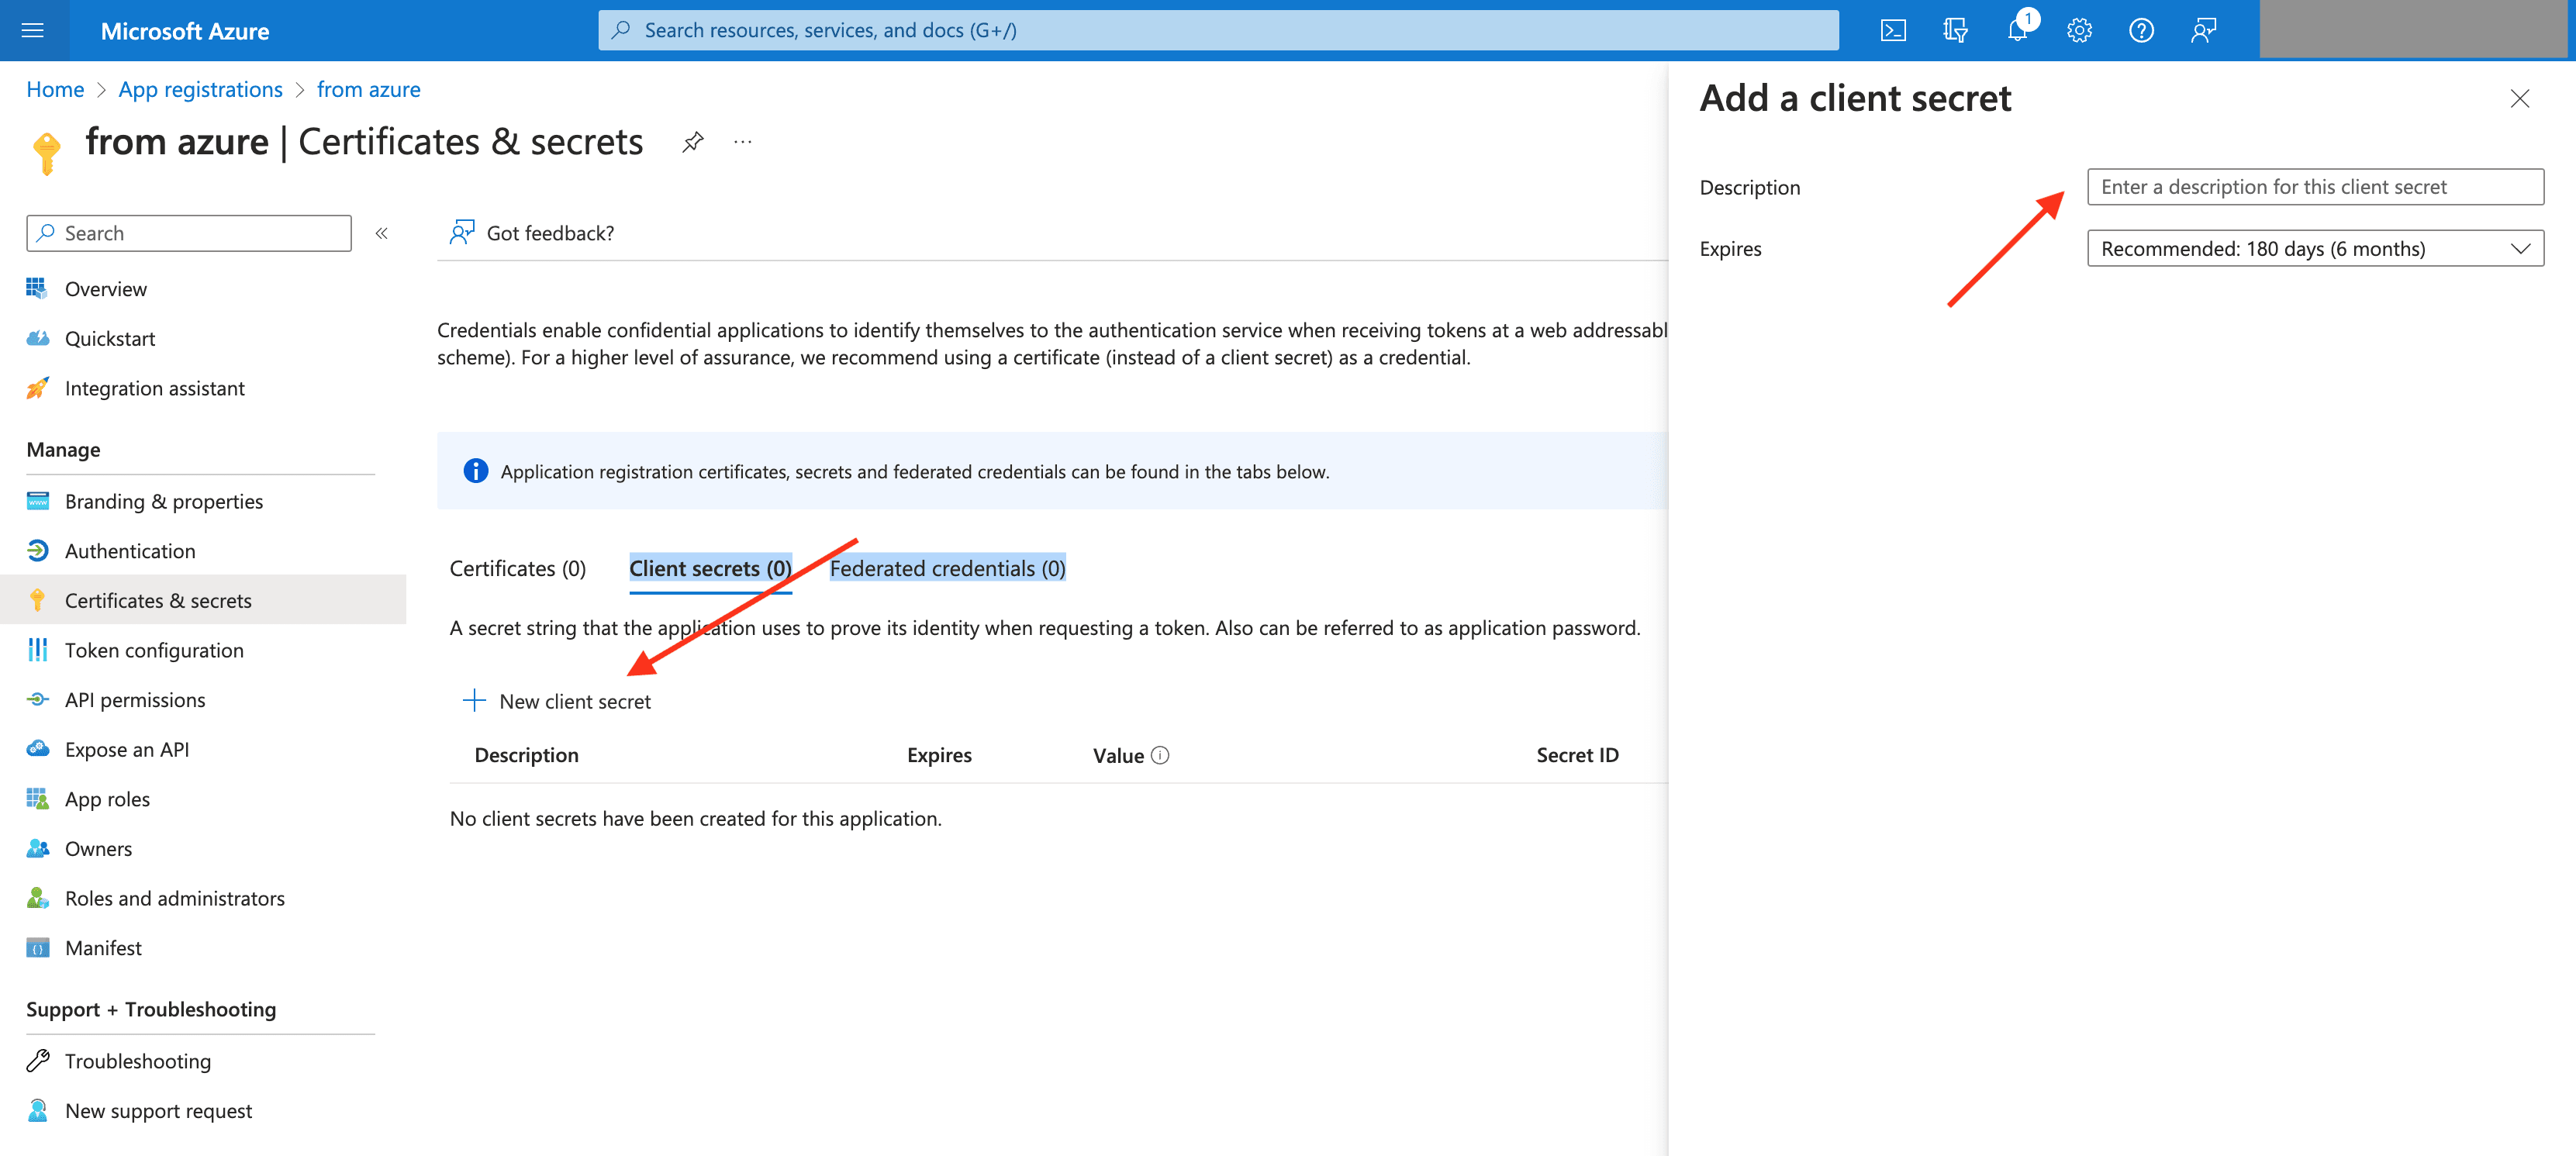
Select the New Client Secret button. Provide a description for the client secret, the duration for which the client secret will be valid, and click Add.
-
Copy the string under the column Value once you add a client secret. You won't be able to retrieve it after you perform another operation or leave this page.
-
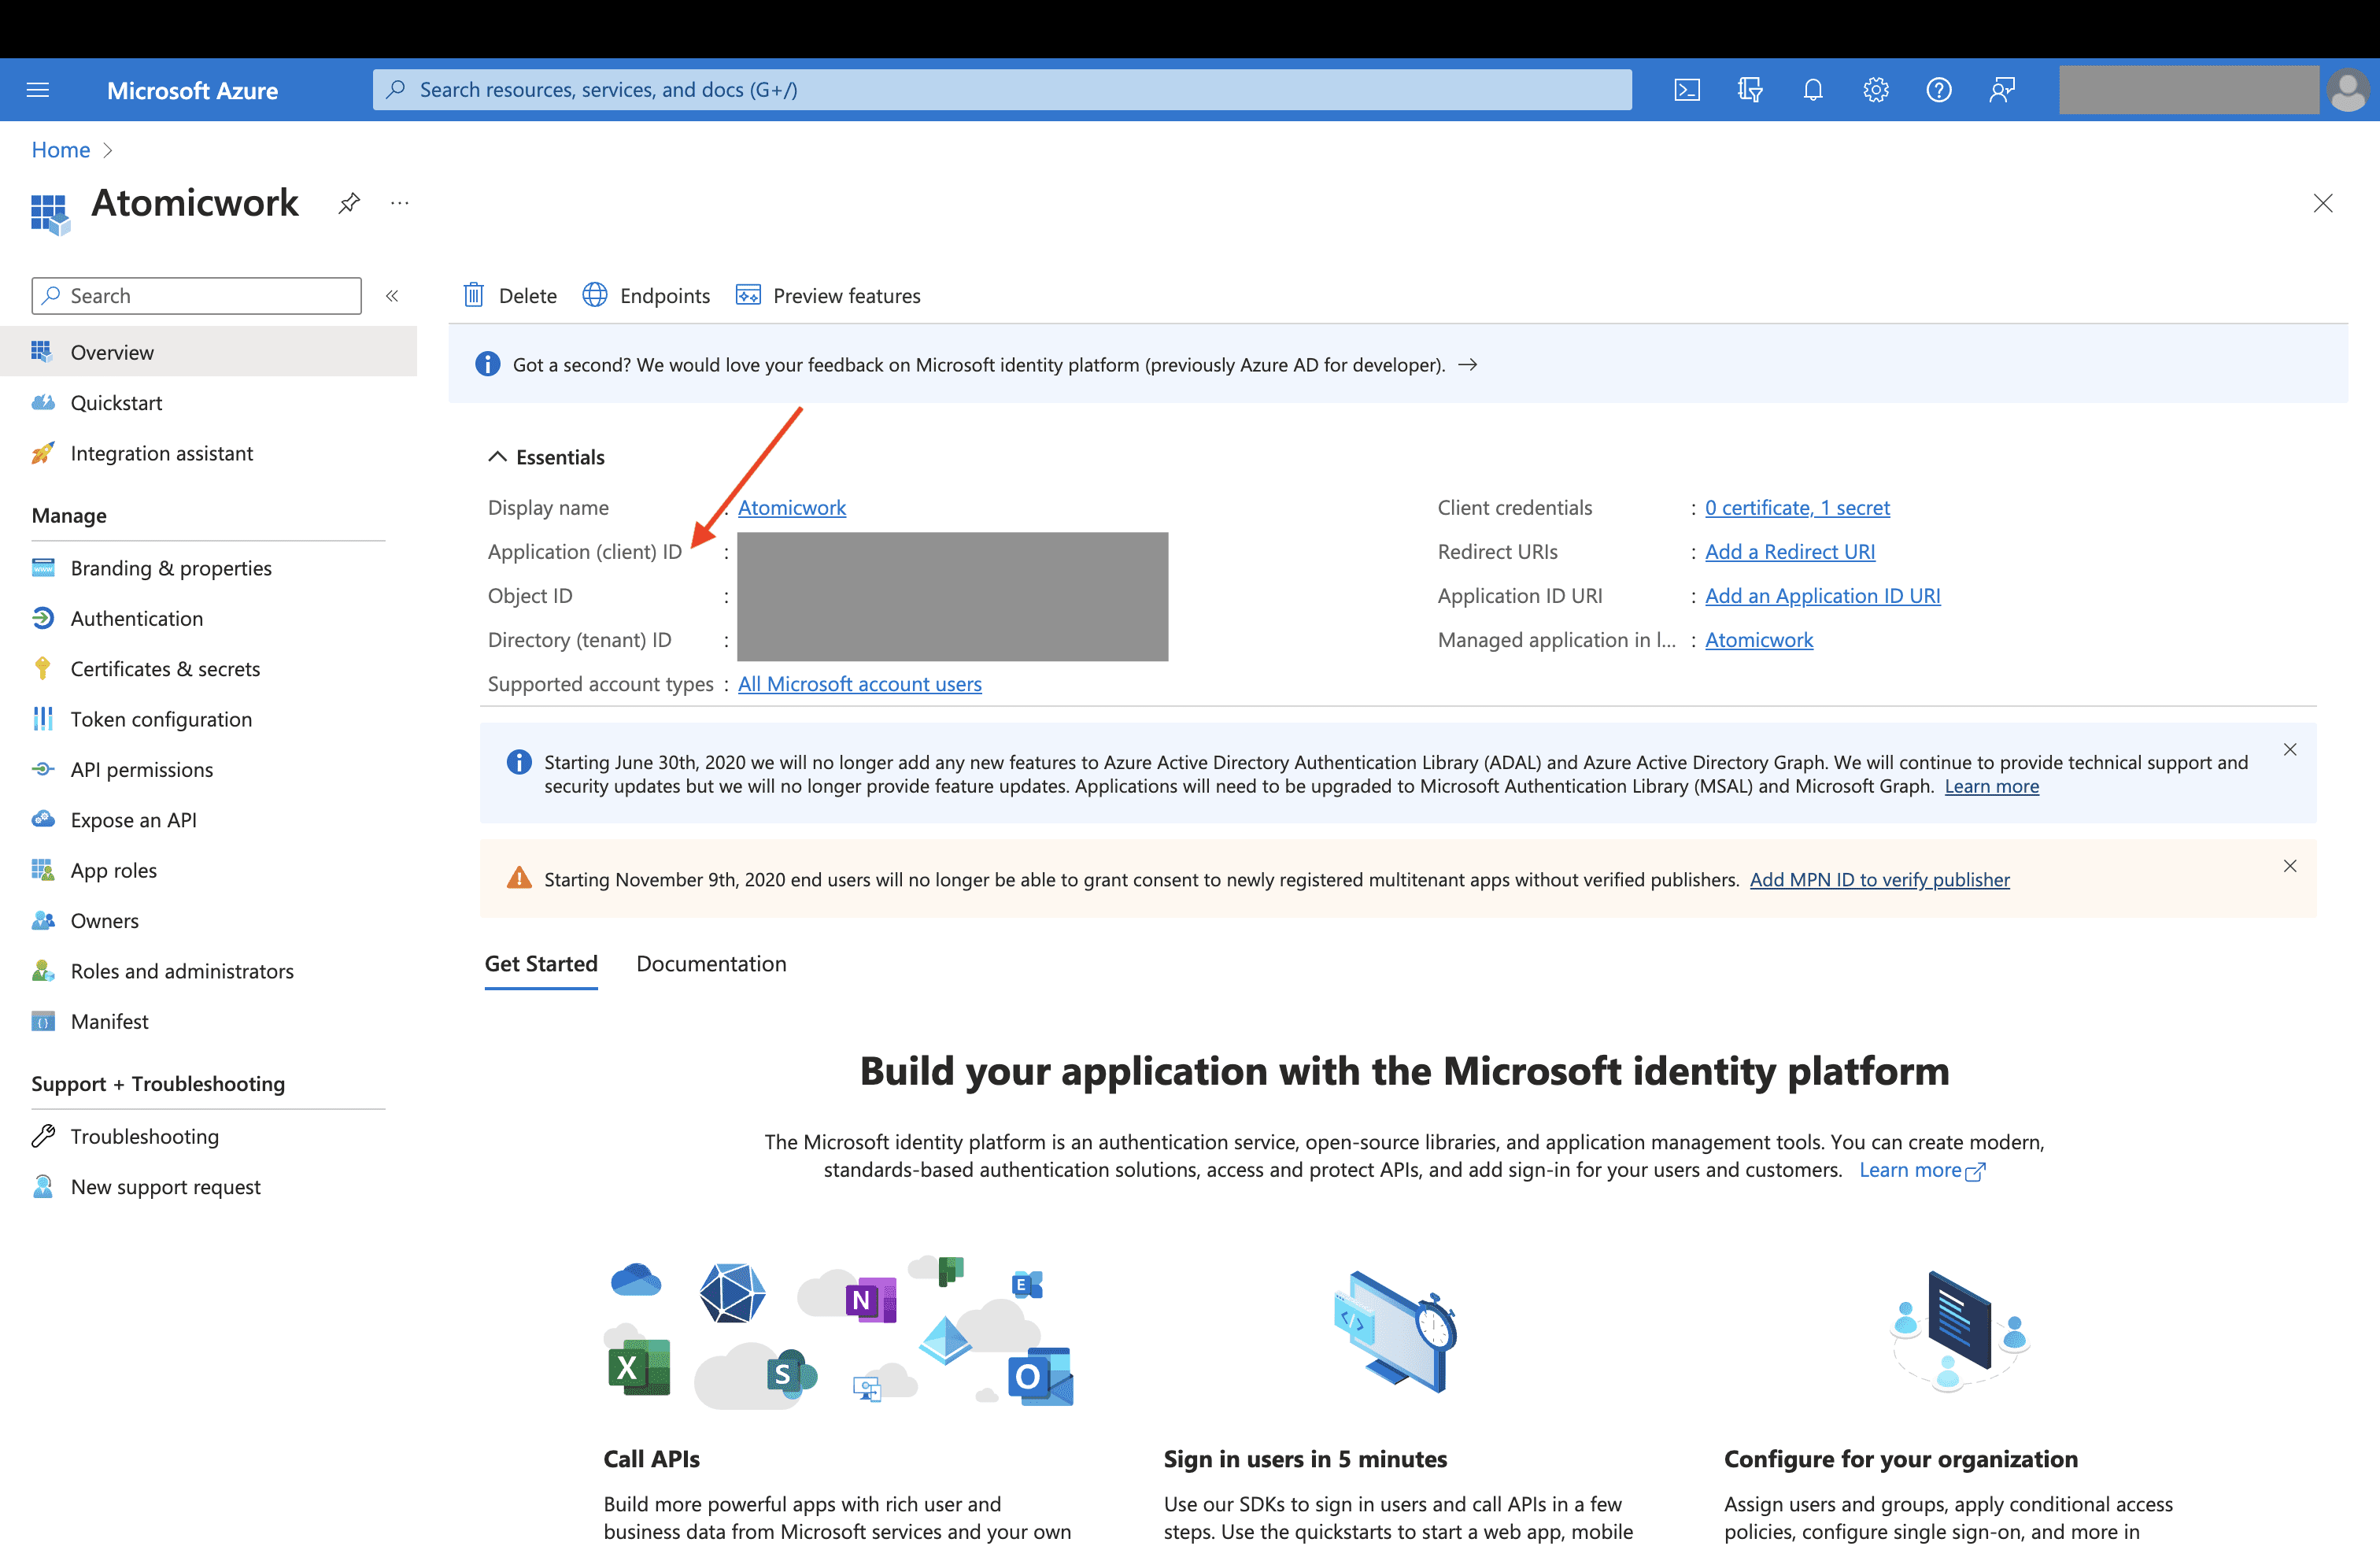
Copy the Client ID from the Overview tab. You can now use the client ID and secret for the duration specified in the expiration field, after which you’ll have to repeat the process.
Phase 2: Connecting Azure AD and Atomicwork
- Log into Atomicwork. Go to Settings> App store >Azure
- Enter your Tenant ID. You can find the Tenant ID by logging into the Entra Admin center and accessing Identity > Overview > Properties. Scroll down to the Tenant ID section to find your tenant ID in the box. Read more here.
- Enter your Client ID and Client Secret.
- Click on Connect.
Note: For Azure AD asset, device, and identity-layer data sync, Atomicwork automatically ingests the attributes exposed by Azure AD and handles field mapping centrally. Admins do not manually select Azure AD asset fields or map remote fields to Atomicwork attributes.
Permissions
To integrate Azure with Atomicwork, you need:
- Atomicwork admin access: You need to have org admin access in Atomicwork
- Azure admin access: You need to have the User Administrator role assigned to you in Microsoft Entra/Azure. This is required to enable the password reset skill.
Password reset permissions
Currently, there are three ways to automate resetting passwords:
- Through skills
- by sending a link from Microsoft to your employees to reset their password when they ask for it
- by asking them to verify their date of birth and sharing a new password through Microsoft Teams or Slack, as soon as the verification is complete.
- Through workflows, by using the Reset password action.
If you plan to automate resolutions to password resets by asking for the date of birth as verification or using the Reset password action in workflows, you will need to ensure that the Atomicwork app on Microsoft has the User administrator Role assigned.
These are the required permissions for the User Administrator role must be subscribed to:
| User. Read/User.ReadWrite.All | Read directory data | Workflows: Required for adding and deleting users. For adding or removing licenses, either this permission or Directory.ReadWrite.All is required. |
|---|---|---|
| GroupMember.ReadWrite.All | Read and write all group memberships | Workflows and skills: Required for reading information about groups and adding or deleting users from groups |
| Audit log | Required for link-based reset password skill and action | |
| Directory.Read.All / Directory.ReadWrite.All | Read and write directory data | Workflows: Required for creating users, groups through workflow actions. |
Additional permissions for the Assistant
If you are connecting the Assistant to your Microsoft Teams account, you will need to grant admin consent for the following permissions in order to effectively set up and use the Assistant app.
| Permission | Description | Usecase |
|---|---|---|
| Directory.Read.All | Read directory data | Workflows and skills: Required for listing users, groups, license, domain in actions. |
| Directory.ReadWrite.All | Read and write directory data | Workflows: Required for creating users, groups through workflow actions. |
| GroupMember.ReadWrite.All | Read and write all group memberships | Workflows and skills: Required for reading information about available groups and adding or deleting users from groups |
| User.Read | Sign in and read user profile | It’s a basic permission granted by Azure by default. |
| User.ReadWrite.All | Read and write all users' full profiles | Workflows: Required for deleting users. For adding or removing licenses, either this permission or Directory.ReadWrite.All is required. |
| Channel.Create | Create channels | Workflows: Required to create a channel in teams. |
| Channel.ReadBasic.All | Read the names and descriptions of all channels | Assistant: Required for reading conversations when Assistant is configured to learn from a channel. Workflows: Either this permission or Directory.Read.All is required for posting to a channel. |
| ChannelMember.ReadWrite.All | Add and remove members from all channels | Workflows: Required for adding users to channels in teams. |
| ChannelSettings.ReadWrite.All | Read and write the names, descriptions, and settings of all channels, without a signed-in user. | ChannelSettings.ReadWrite.All enables the Assistant to learn from channels and update its knowledge graph |
| View users' email address | It’s a basic permission granted by Azure by default. | |
| Team.ReadBasic.All | Get a list of all teams | Workflows: Required to list teams in actions |
| TeamMember.ReadWrite.All | Add and remove members from all teams | Workflows: Required for adding members to teams. |
| TeamsAppInstallation.ReadForChat.All | Read installed Teams apps for all chats | TeamsAppInstallation.ReadForChat.All enables the Assistant to learn from channels and update its knowledge graph |
| TeamsAppInstallation.ReadForTeam.All | Read installed Teams apps for all teams | TeamsAppInstallation.ReadForTeam.All enables the Assistant to learn from channels and update its knowledge graph |
| TeamSettings.Read.All | Read all teams' settings | Workflows: Required to list teams in actions. |
| TeamSettings.ReadWrite.All | Read and change all teams' settings | Workflows: Required to list teams in actions |
| Teamwork.Migrate.All | Allows the app to create chat and channel messages, without a signed in user. The app specifies which user appears as the sender, and can backdate the message to appear as if it was sent long ago. The messages can be sent to any chat or channel in the organization. | Optional permission |
| User-LifeCycleInfo.Read.All | Read all users' lifecycle information | Optional permission |
| User.Read.All | Read all users' full profiles | Workflows and sync: Required for listing and getting user information. Either this or Directory.Read.All is required |
| user_impersonation | Create and access protected content for users | Workflows and requests: Required for sending replies as the agent to an employee request and for sending DMs/posting to channels on behalf of any employee |
| ChannelMessage.Read.All | Read all channel messages | Enables the Assistant to learn from channels and update its knowledge graph |
| Teams.ManageChats | Manage chats in Teams | Workflows: Required ro perform actions such as sending, updating, or deleting messages within Microsoft Teams |
Permissions for Azure Resource Manager
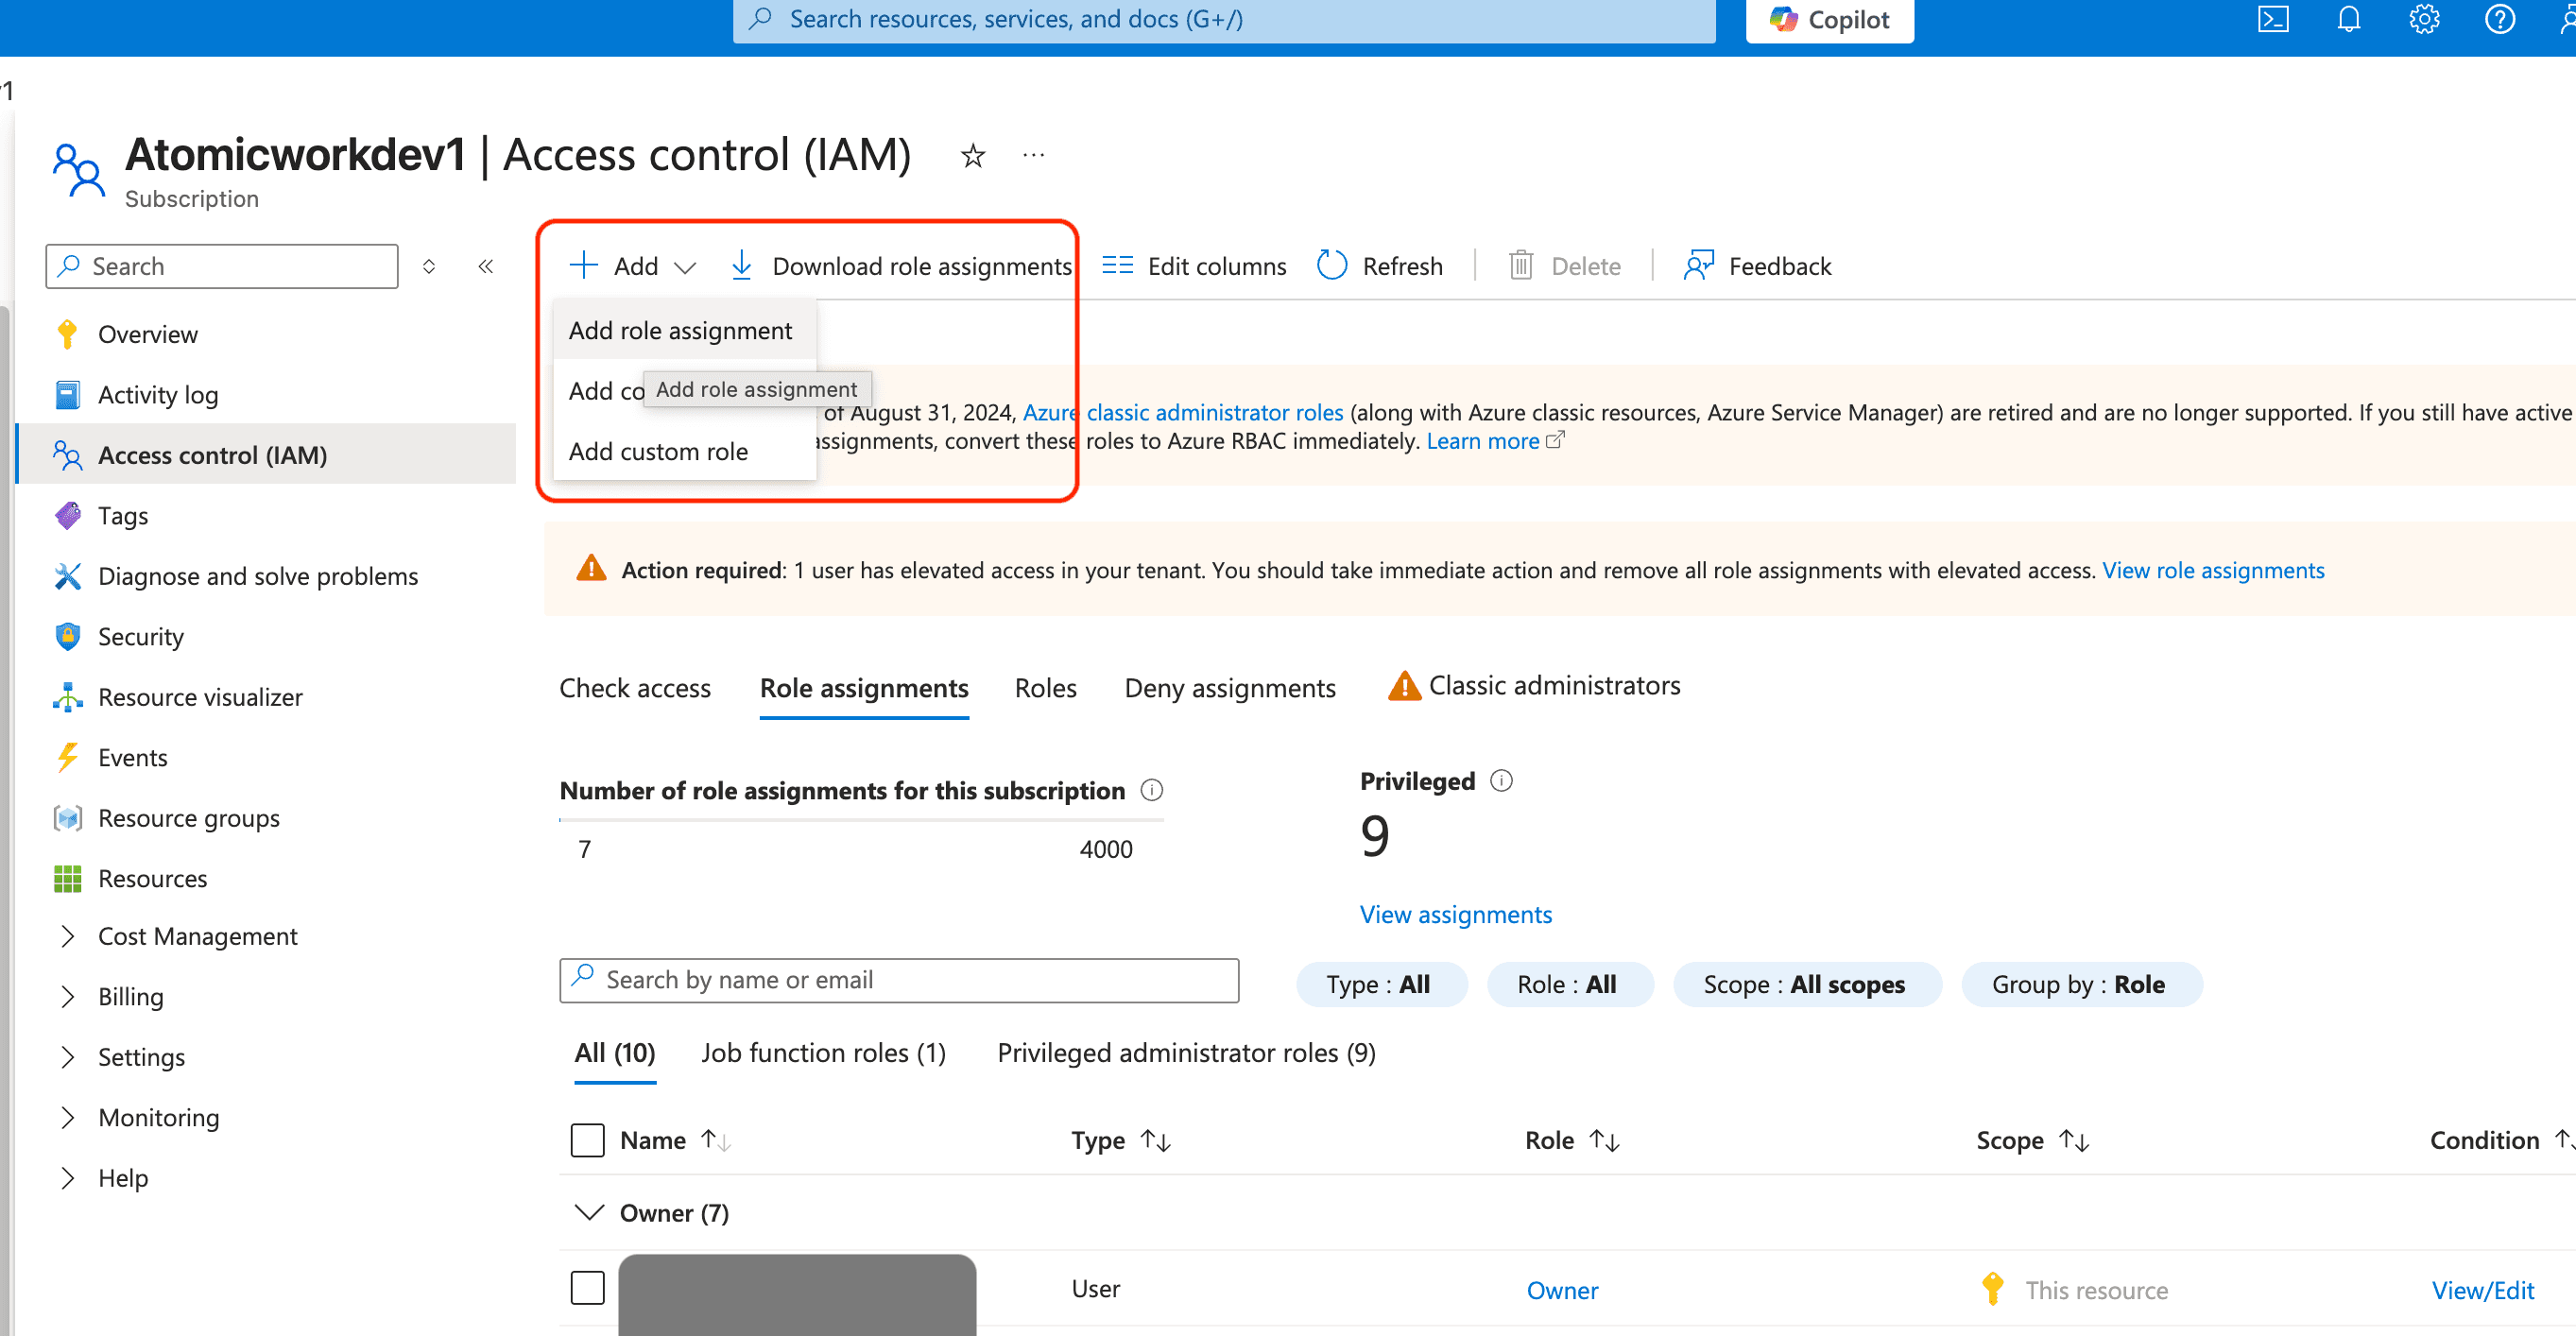
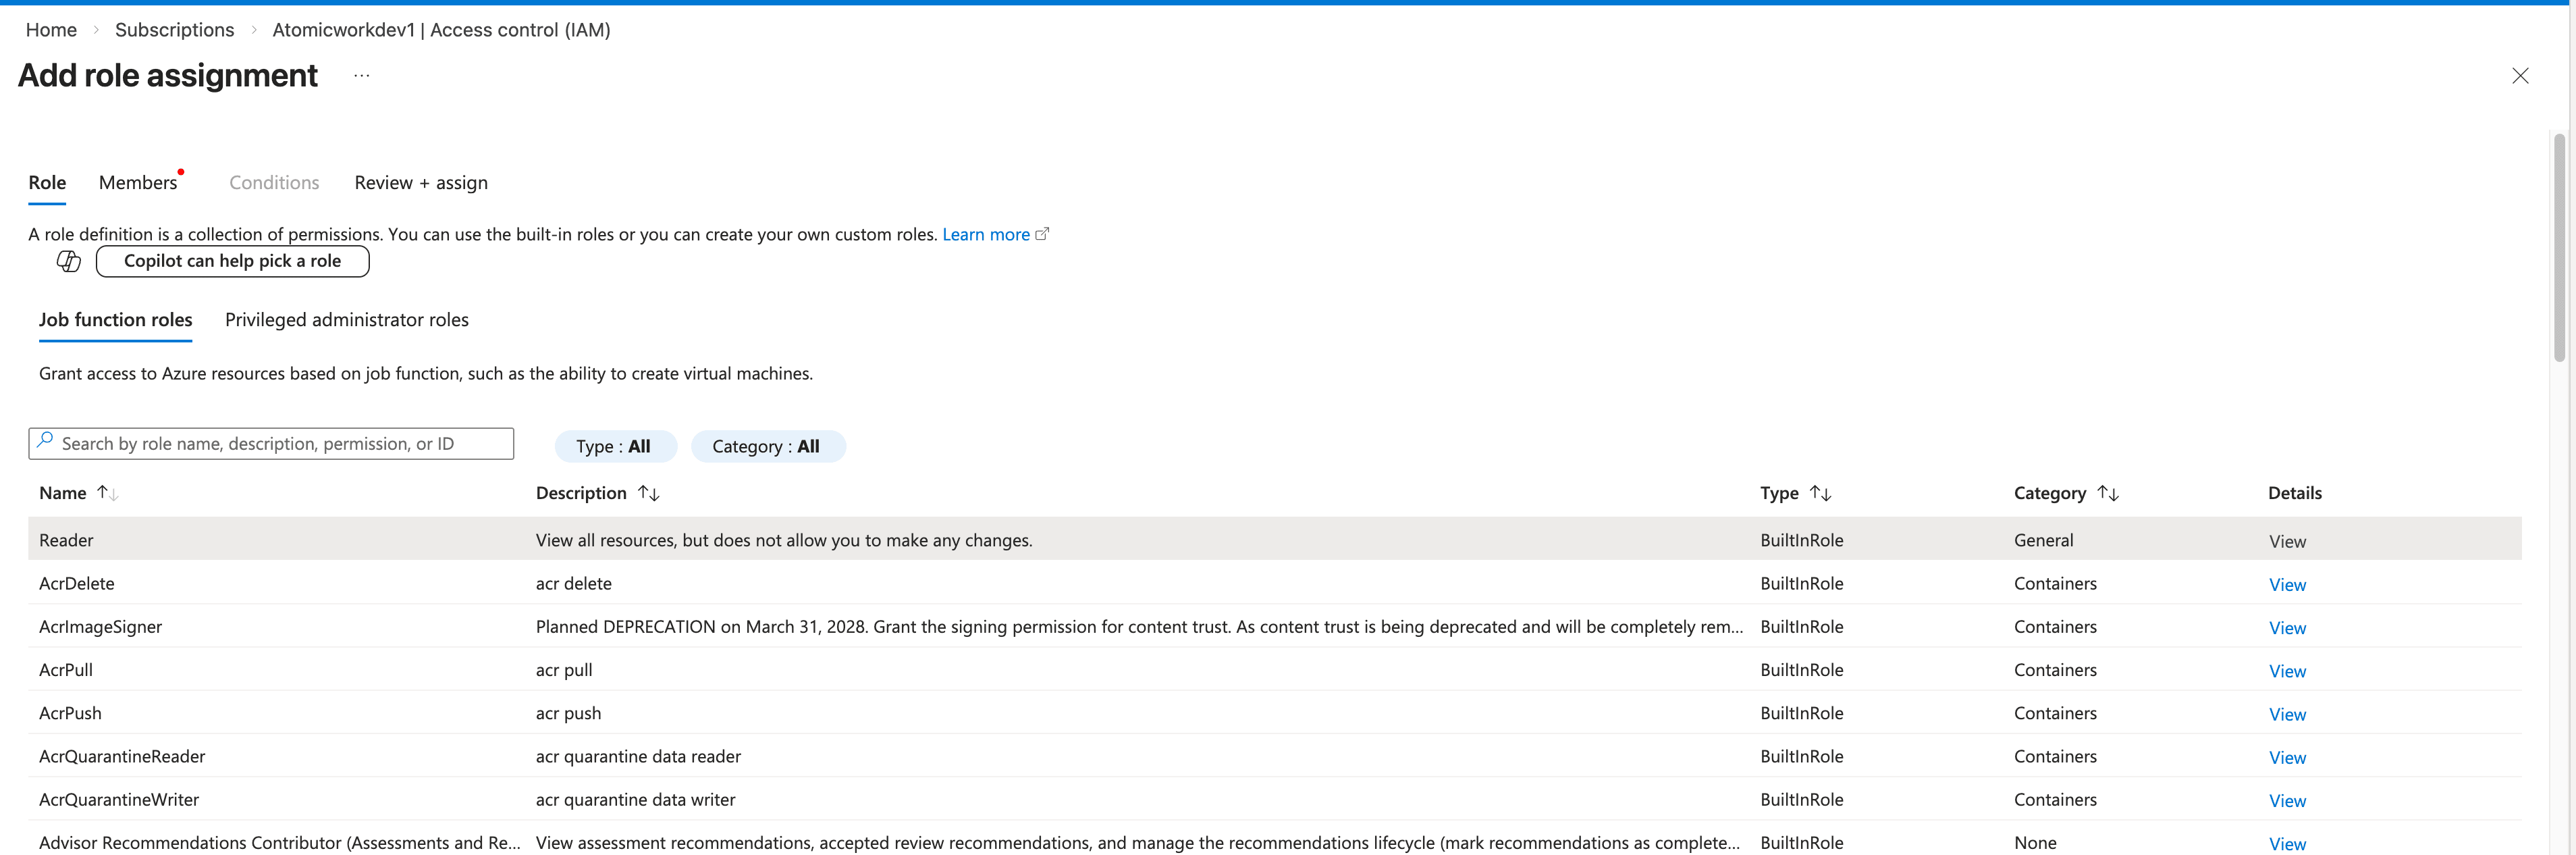
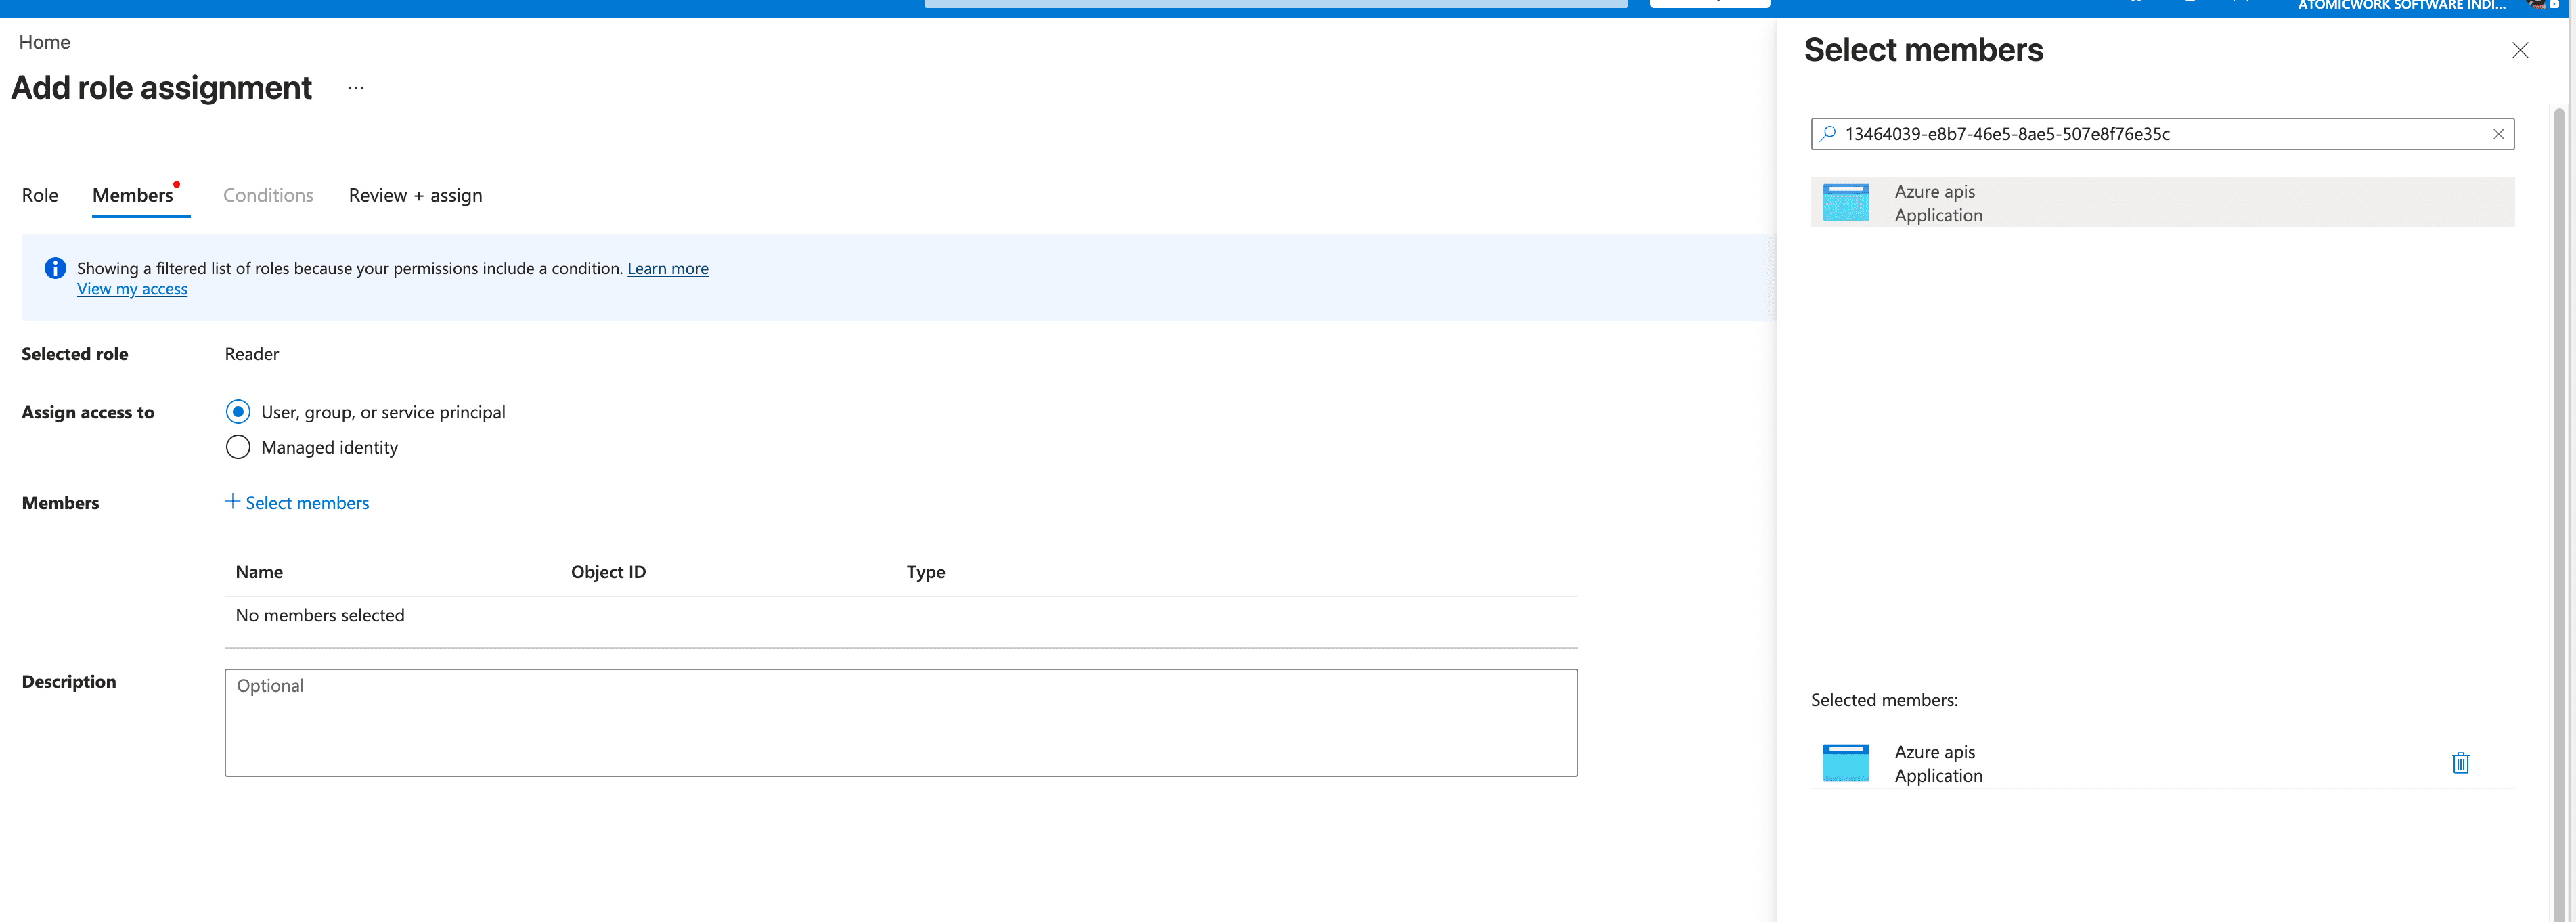
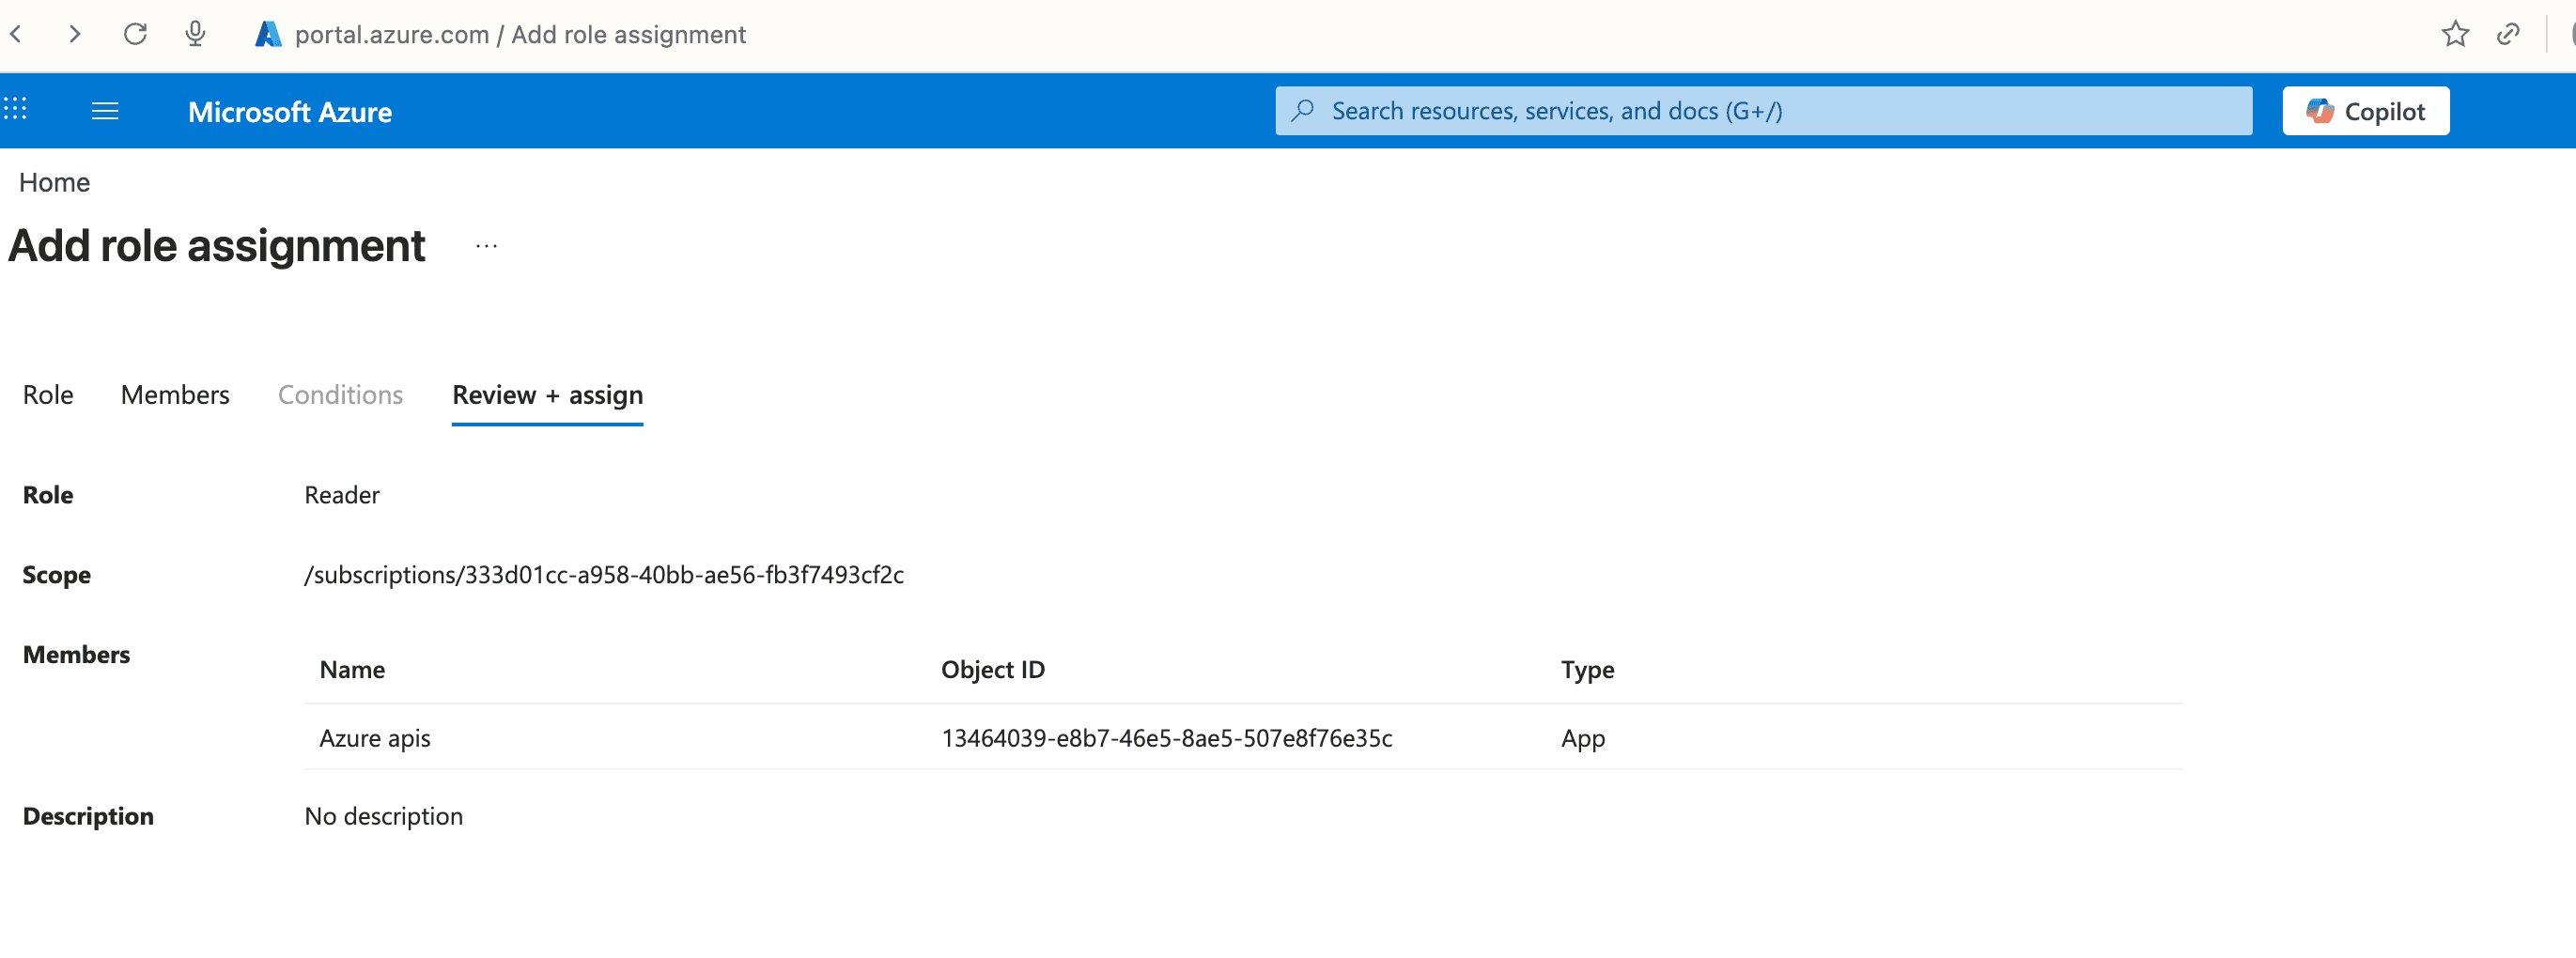
If you plan to sync your Azure Resource Manager assets with Atomicwork, you will need to ensure that the Atomicwork app on Microsoft has the Reader Role assigned.

- Navigate to the Azure admin portal > Subscriptions.
- Choose the subscription that you want to sync to Atomicwork and open it.
- Navigate to Access Control > Add role > Select reader role. Click next and choose user, group or service principal (select the service principal of the app you created).
Microsoft Entra ID: SAML Single sign-on (SSO)
Allow users to sign in with their Microsoft credentials using SAML SSO.
Configure Single Sign-On between Microsoft Entra ID (formerly Azure AD) and Atomicwork using SAML 2.0. Once complete, your users sign in to Atomicwork with their existing Microsoft credentials.
Why use Microsoft Entra ID SAML SSO
Enabling Microsoft Entra ID SAML SSO offers:
- Single sign-on: Users log in with their Microsoft Entra ID credentials, removing the need for a separate Atomicwork password.
- Both IdP-initiated and SP-initiated SSO: Users can sign in from the Microsoft My Apps portal or directly from the Atomicwork login page.
- Improved security: Authentication is handled by Entra ID, so passwords stay inside Microsoft — Atomicwork never sees or stores them.
- Simplified user management: Onboarding and offboarding employees is as easy as updating access in your Entra directory.
- Conditional Access support: Extend your existing Conditional Access policies (MFA, device compliance, sign-in risk) to Atomicwork by scoping an access policy to the created Atomicwork Enterprise Application.
Prerequisites
To set up Microsoft Entra ID SAML SSO in Atomicwork, you need:
- A Microsoft Entra ID tenant with Global Administrator or Cloud Application Administrator rights.
- Organization admin access on Atomicwork
Note: In your Atomicwork tenant, navigate to Settings > Security (under Organization) and click on Enable next to Microsoft Entra ID SSO (SAML). Keep this page open in another browser tab before you start. Atomicwork pre-populates the Identifier and Reply URLs for you, which you will copy into Azure.
[!NOTE] How the values flow
Atomicwork → Azure Copy the following values from the Microsoft Entra ID SSO (SAML) page under Security into Azure:
- Identifier
- Default Reply URL (the one ending in
/clients/saml-client)- Additional Reply URL for SP-initiated SSO
Azure → Atomicwork Copy the App Federation Metadata URL from Azure and paste it into Atomicwork.
Set up Microsoft Entra ID SAML SSO
Step 1: Create a new Enterprise Application in Azure
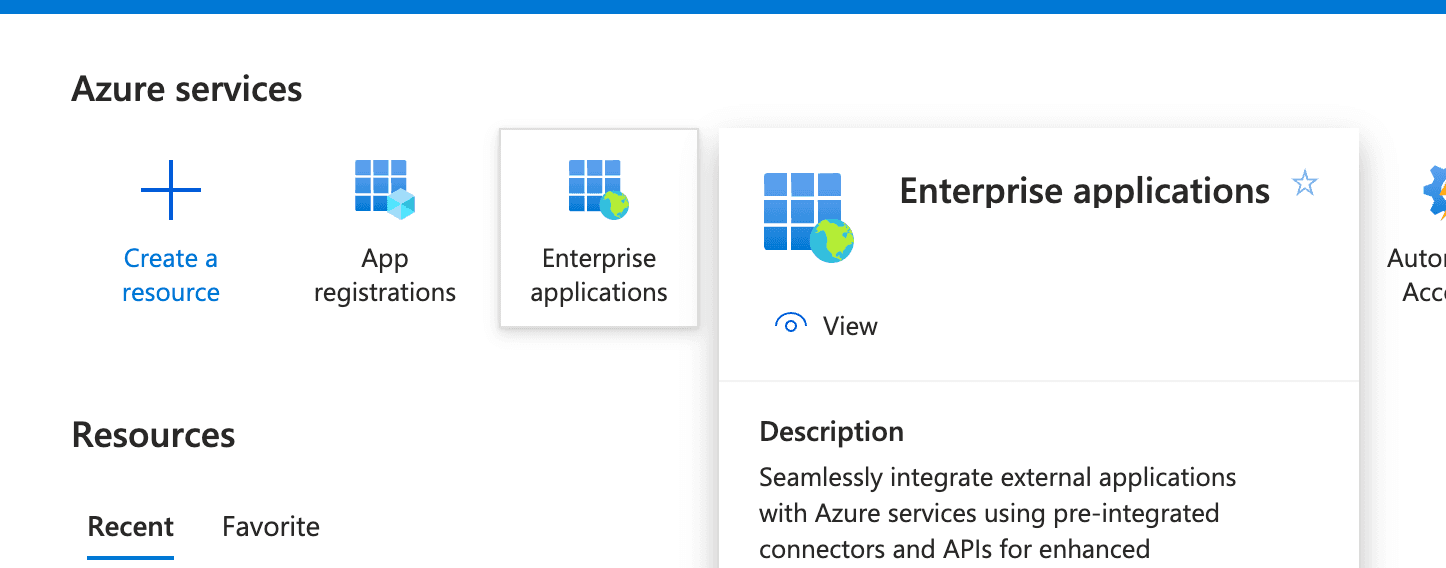
- Sign in to the Azure portal at portal.azure.com and navigate to Microsoft Entra ID.
- From the left navigation, click on Enterprise applications > All applications.
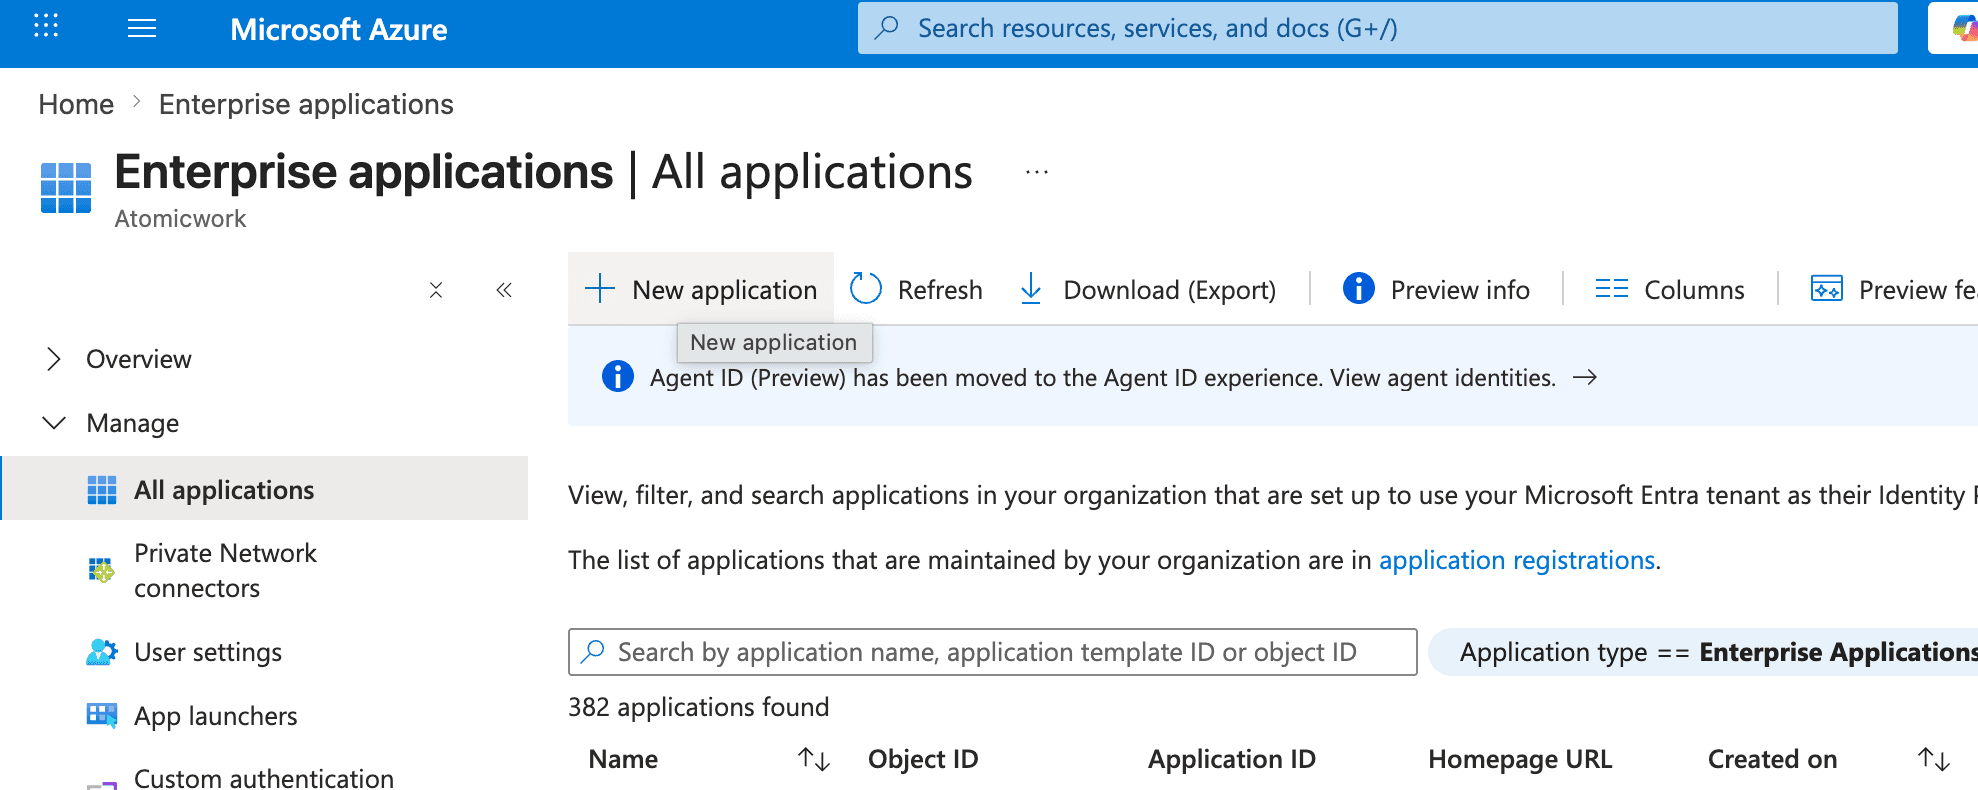
- In the top action bar, click on + New application.
- On the Browse Microsoft Entra App Gallery page, click on + Create your own application.
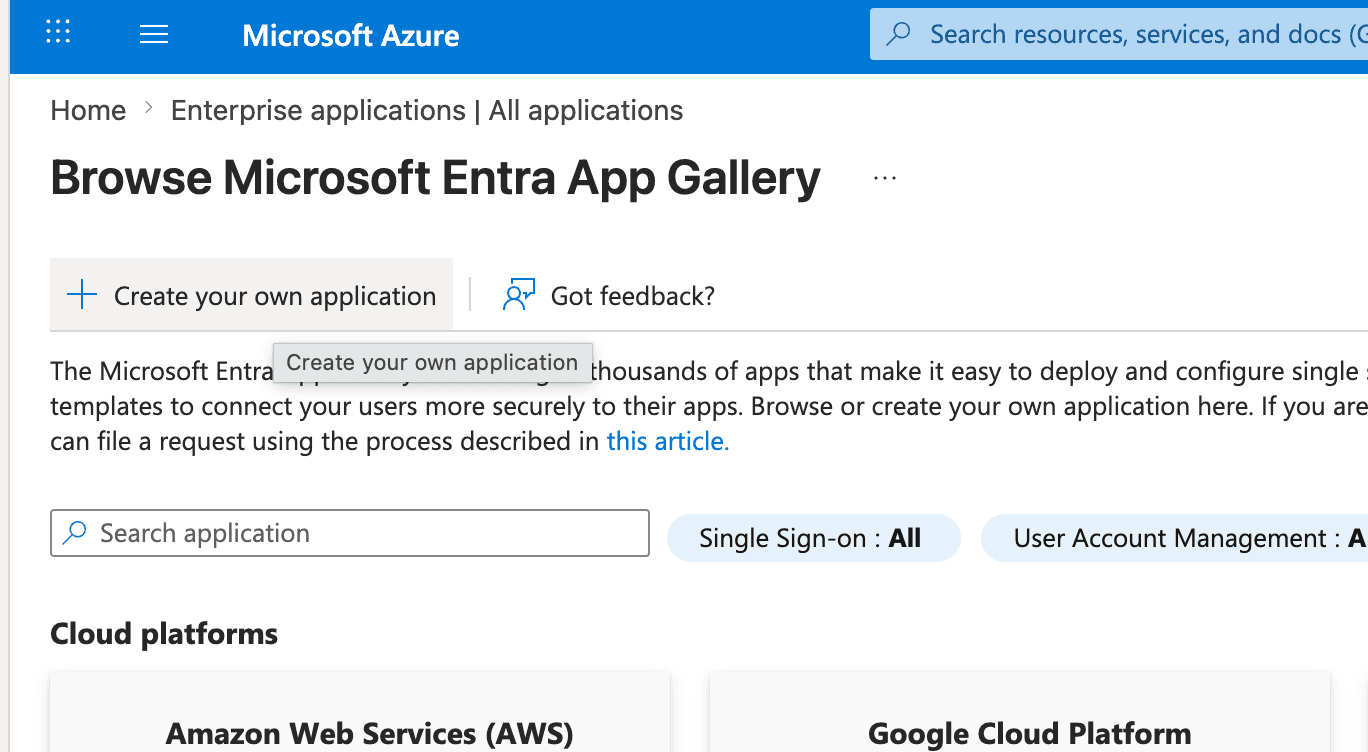
Note: Atomicwork is not in the Entra app gallery, so you'll register it as a non-gallery application.
Step 2: Name your application and select Non-gallery
In the Create your own application panel, enter a recognizable display name and choose the integration type.
- Name your app — we'd recommend "Atomicwork SAML SSO". You can append your environment (for example "Atomicwork SAML SSO – Production") if you maintain multiple Atomicwork tenants.
- Choose Integrate any other application you don't find in the gallery (Non-gallery).
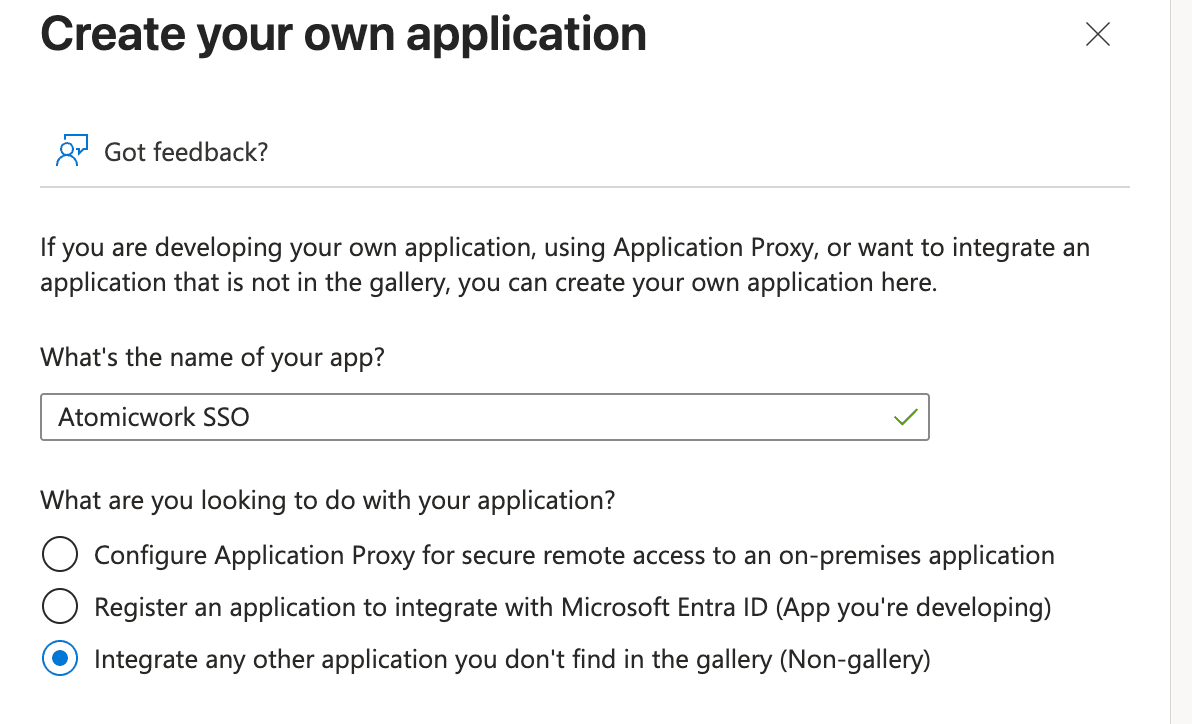
- Click Create. Azure will provision the application and you'll land on the application's overview page.
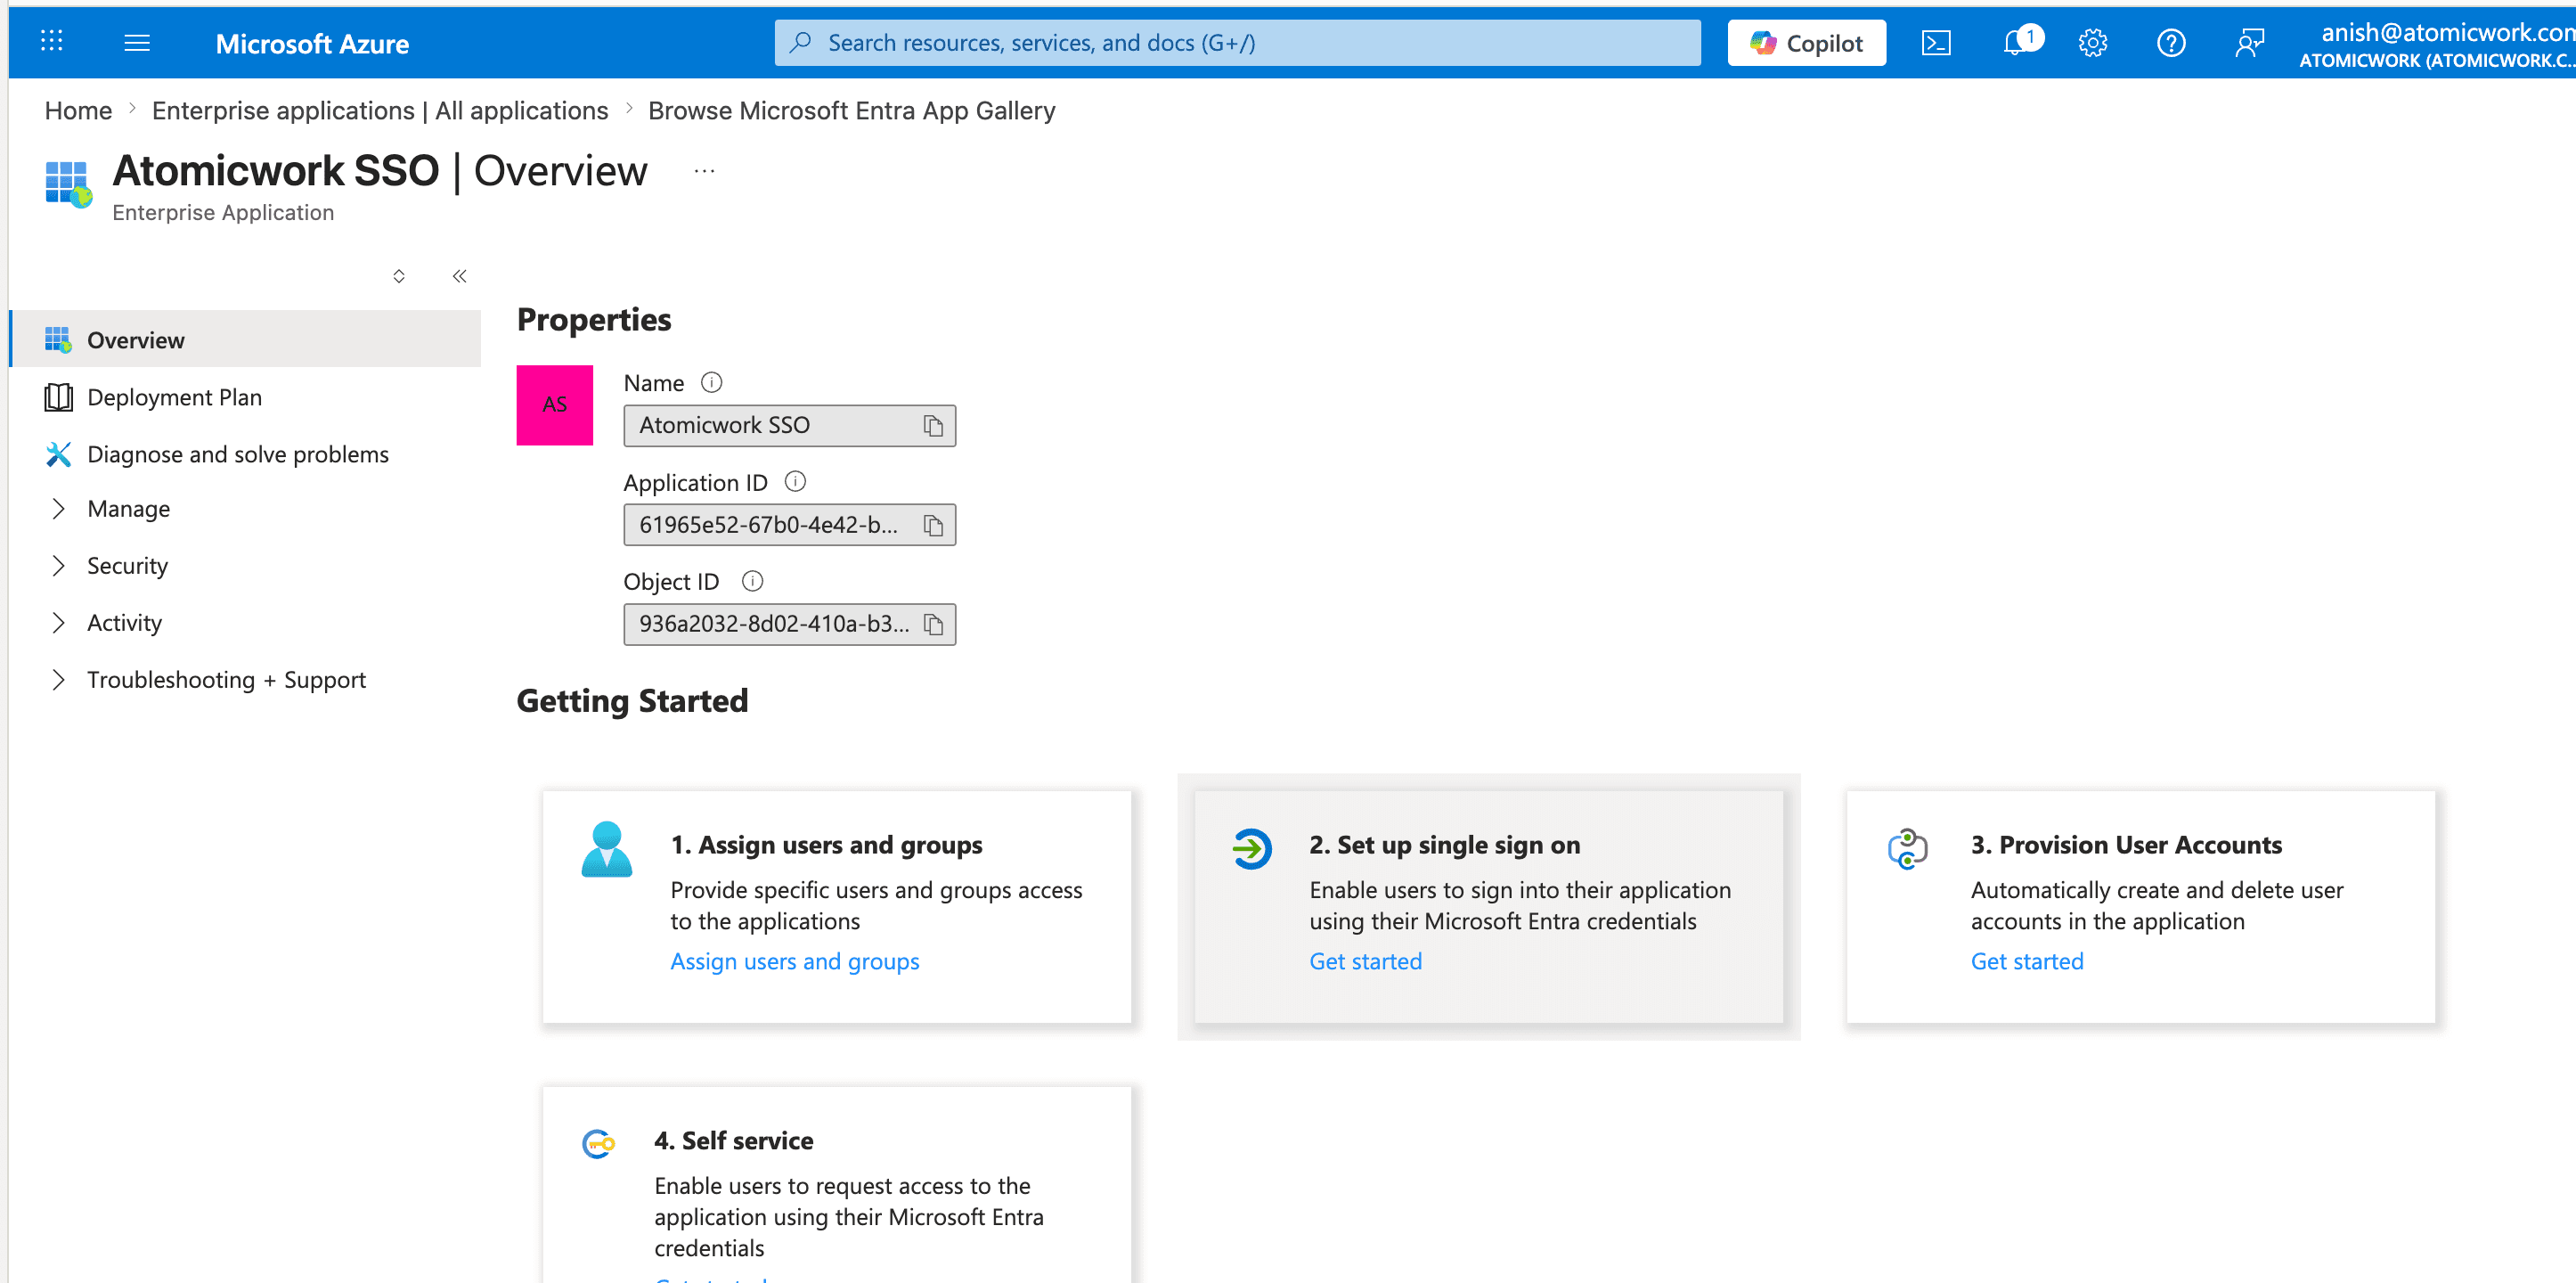
Step 3: Enable SAML as the single sign-on method
- On the application's overview page, click on Manage > Single sign-on from the left navigation.
- Select the SAML tile from the dispayed sign-on methods.
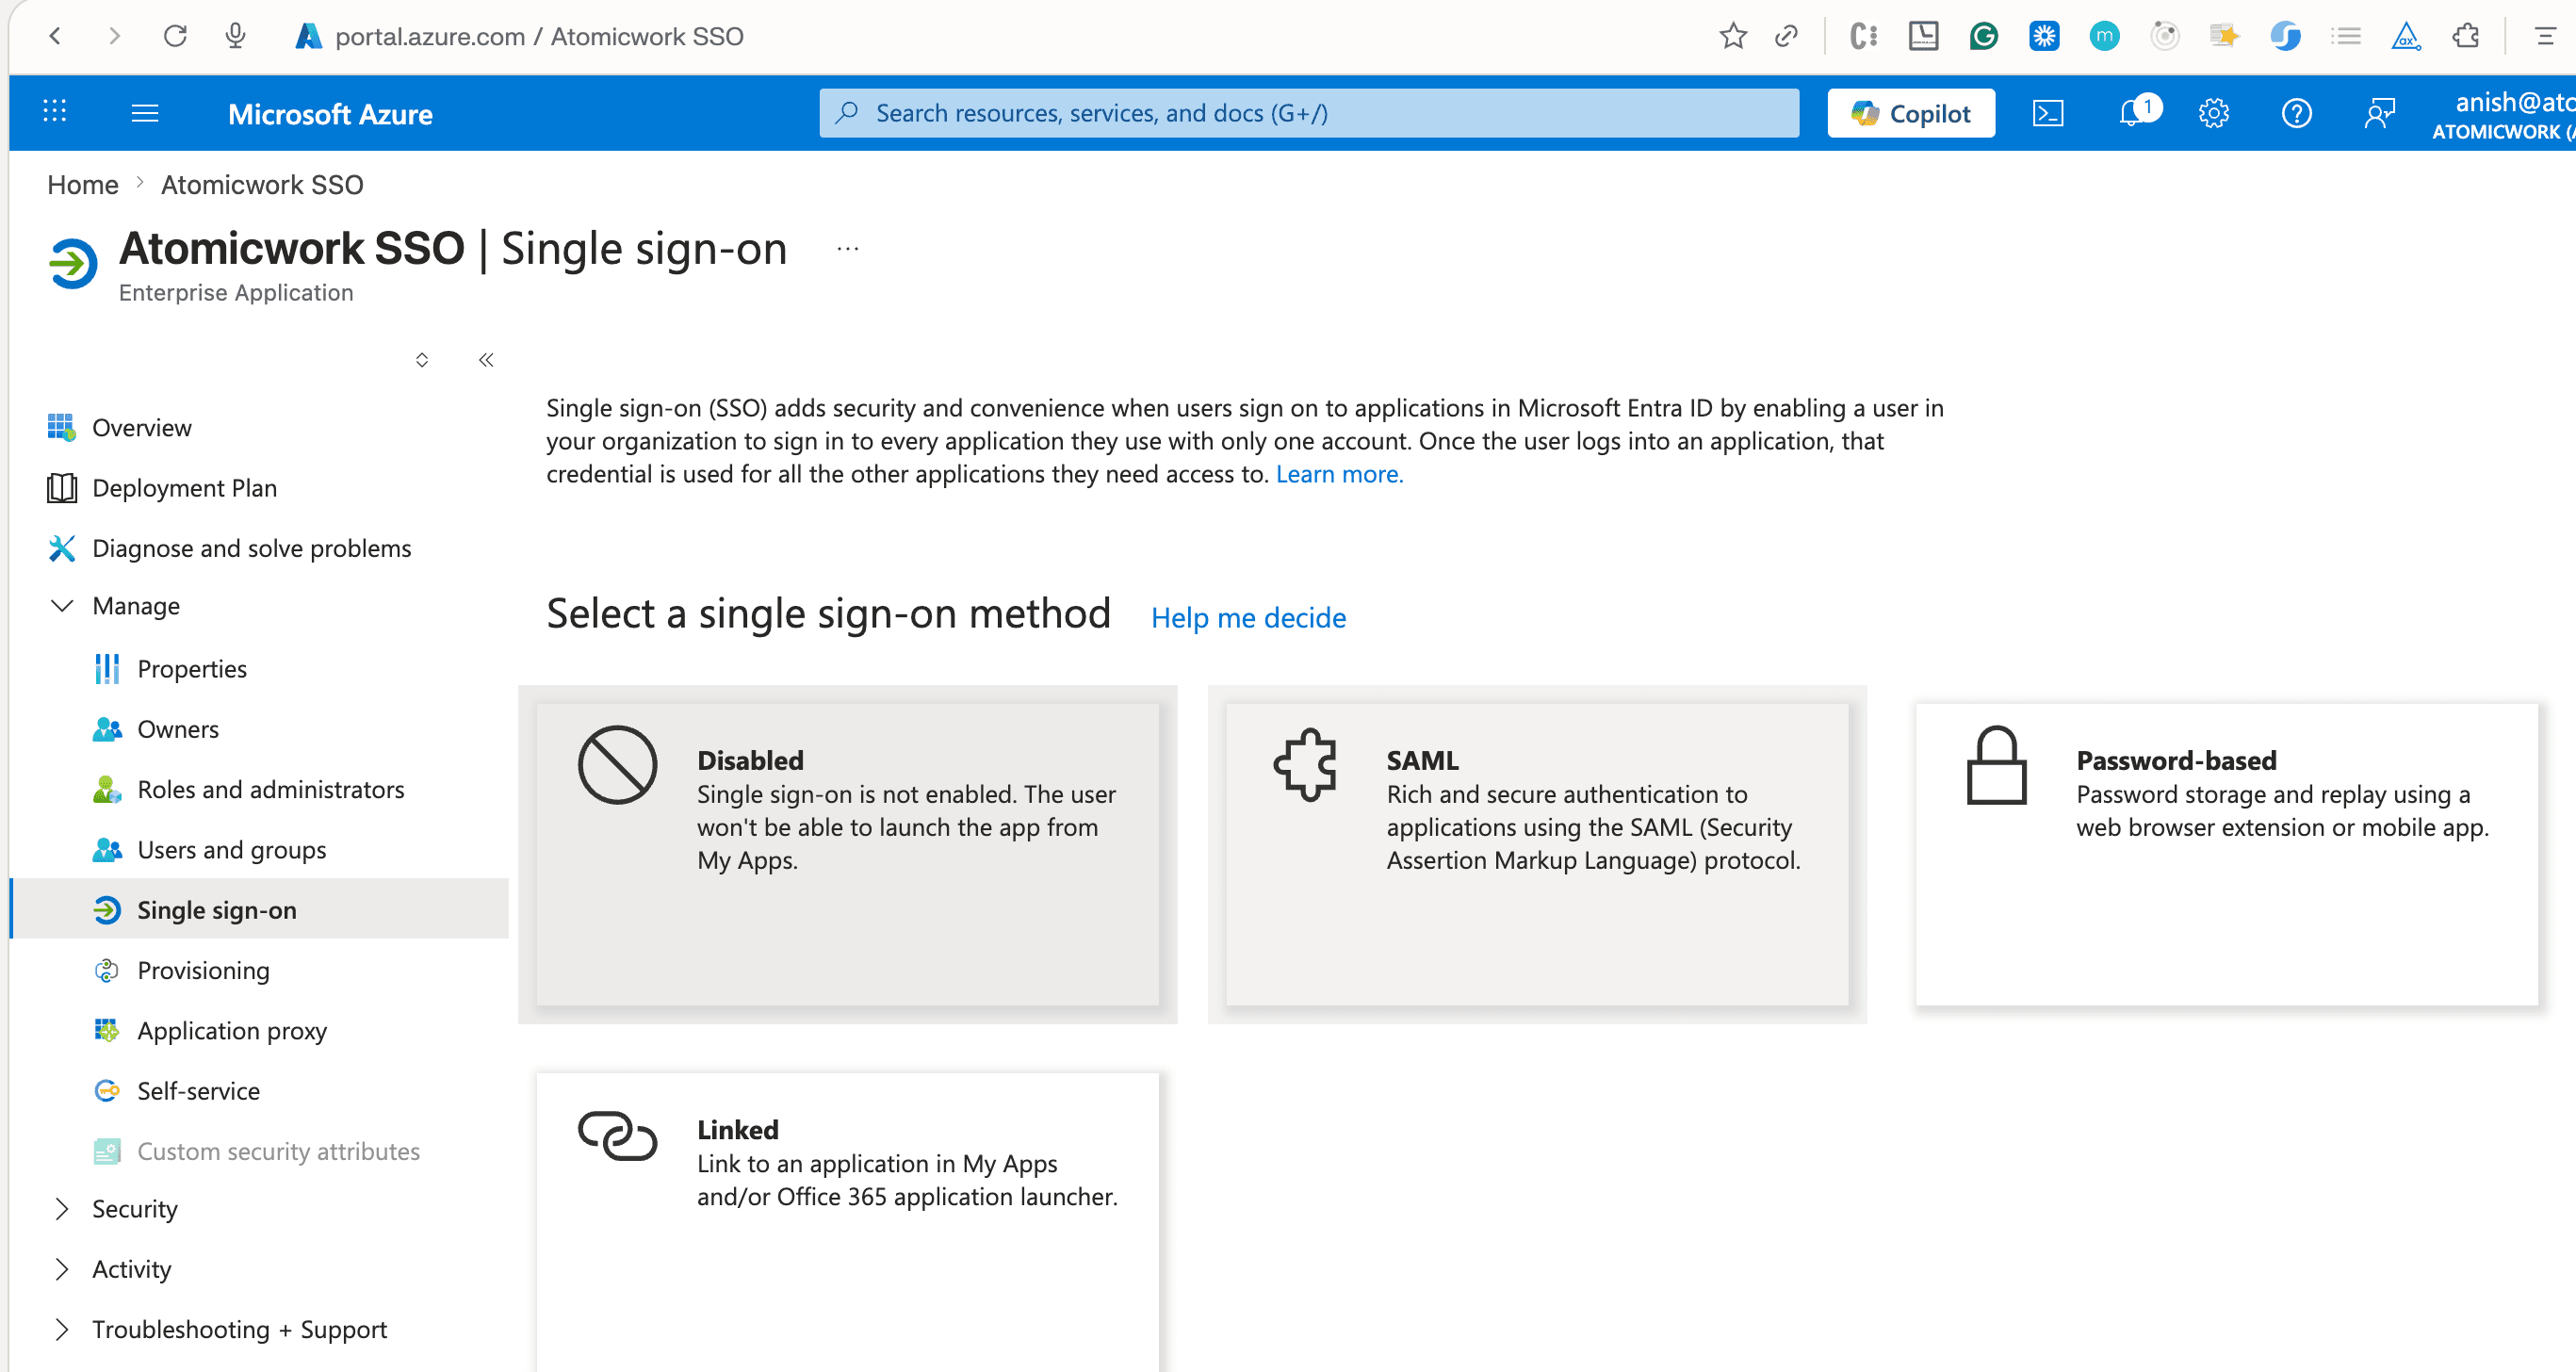
Step 4: Fill in the Basic SAML Configuration
- Azure will open the Set up Single Sign-On with SAML page.
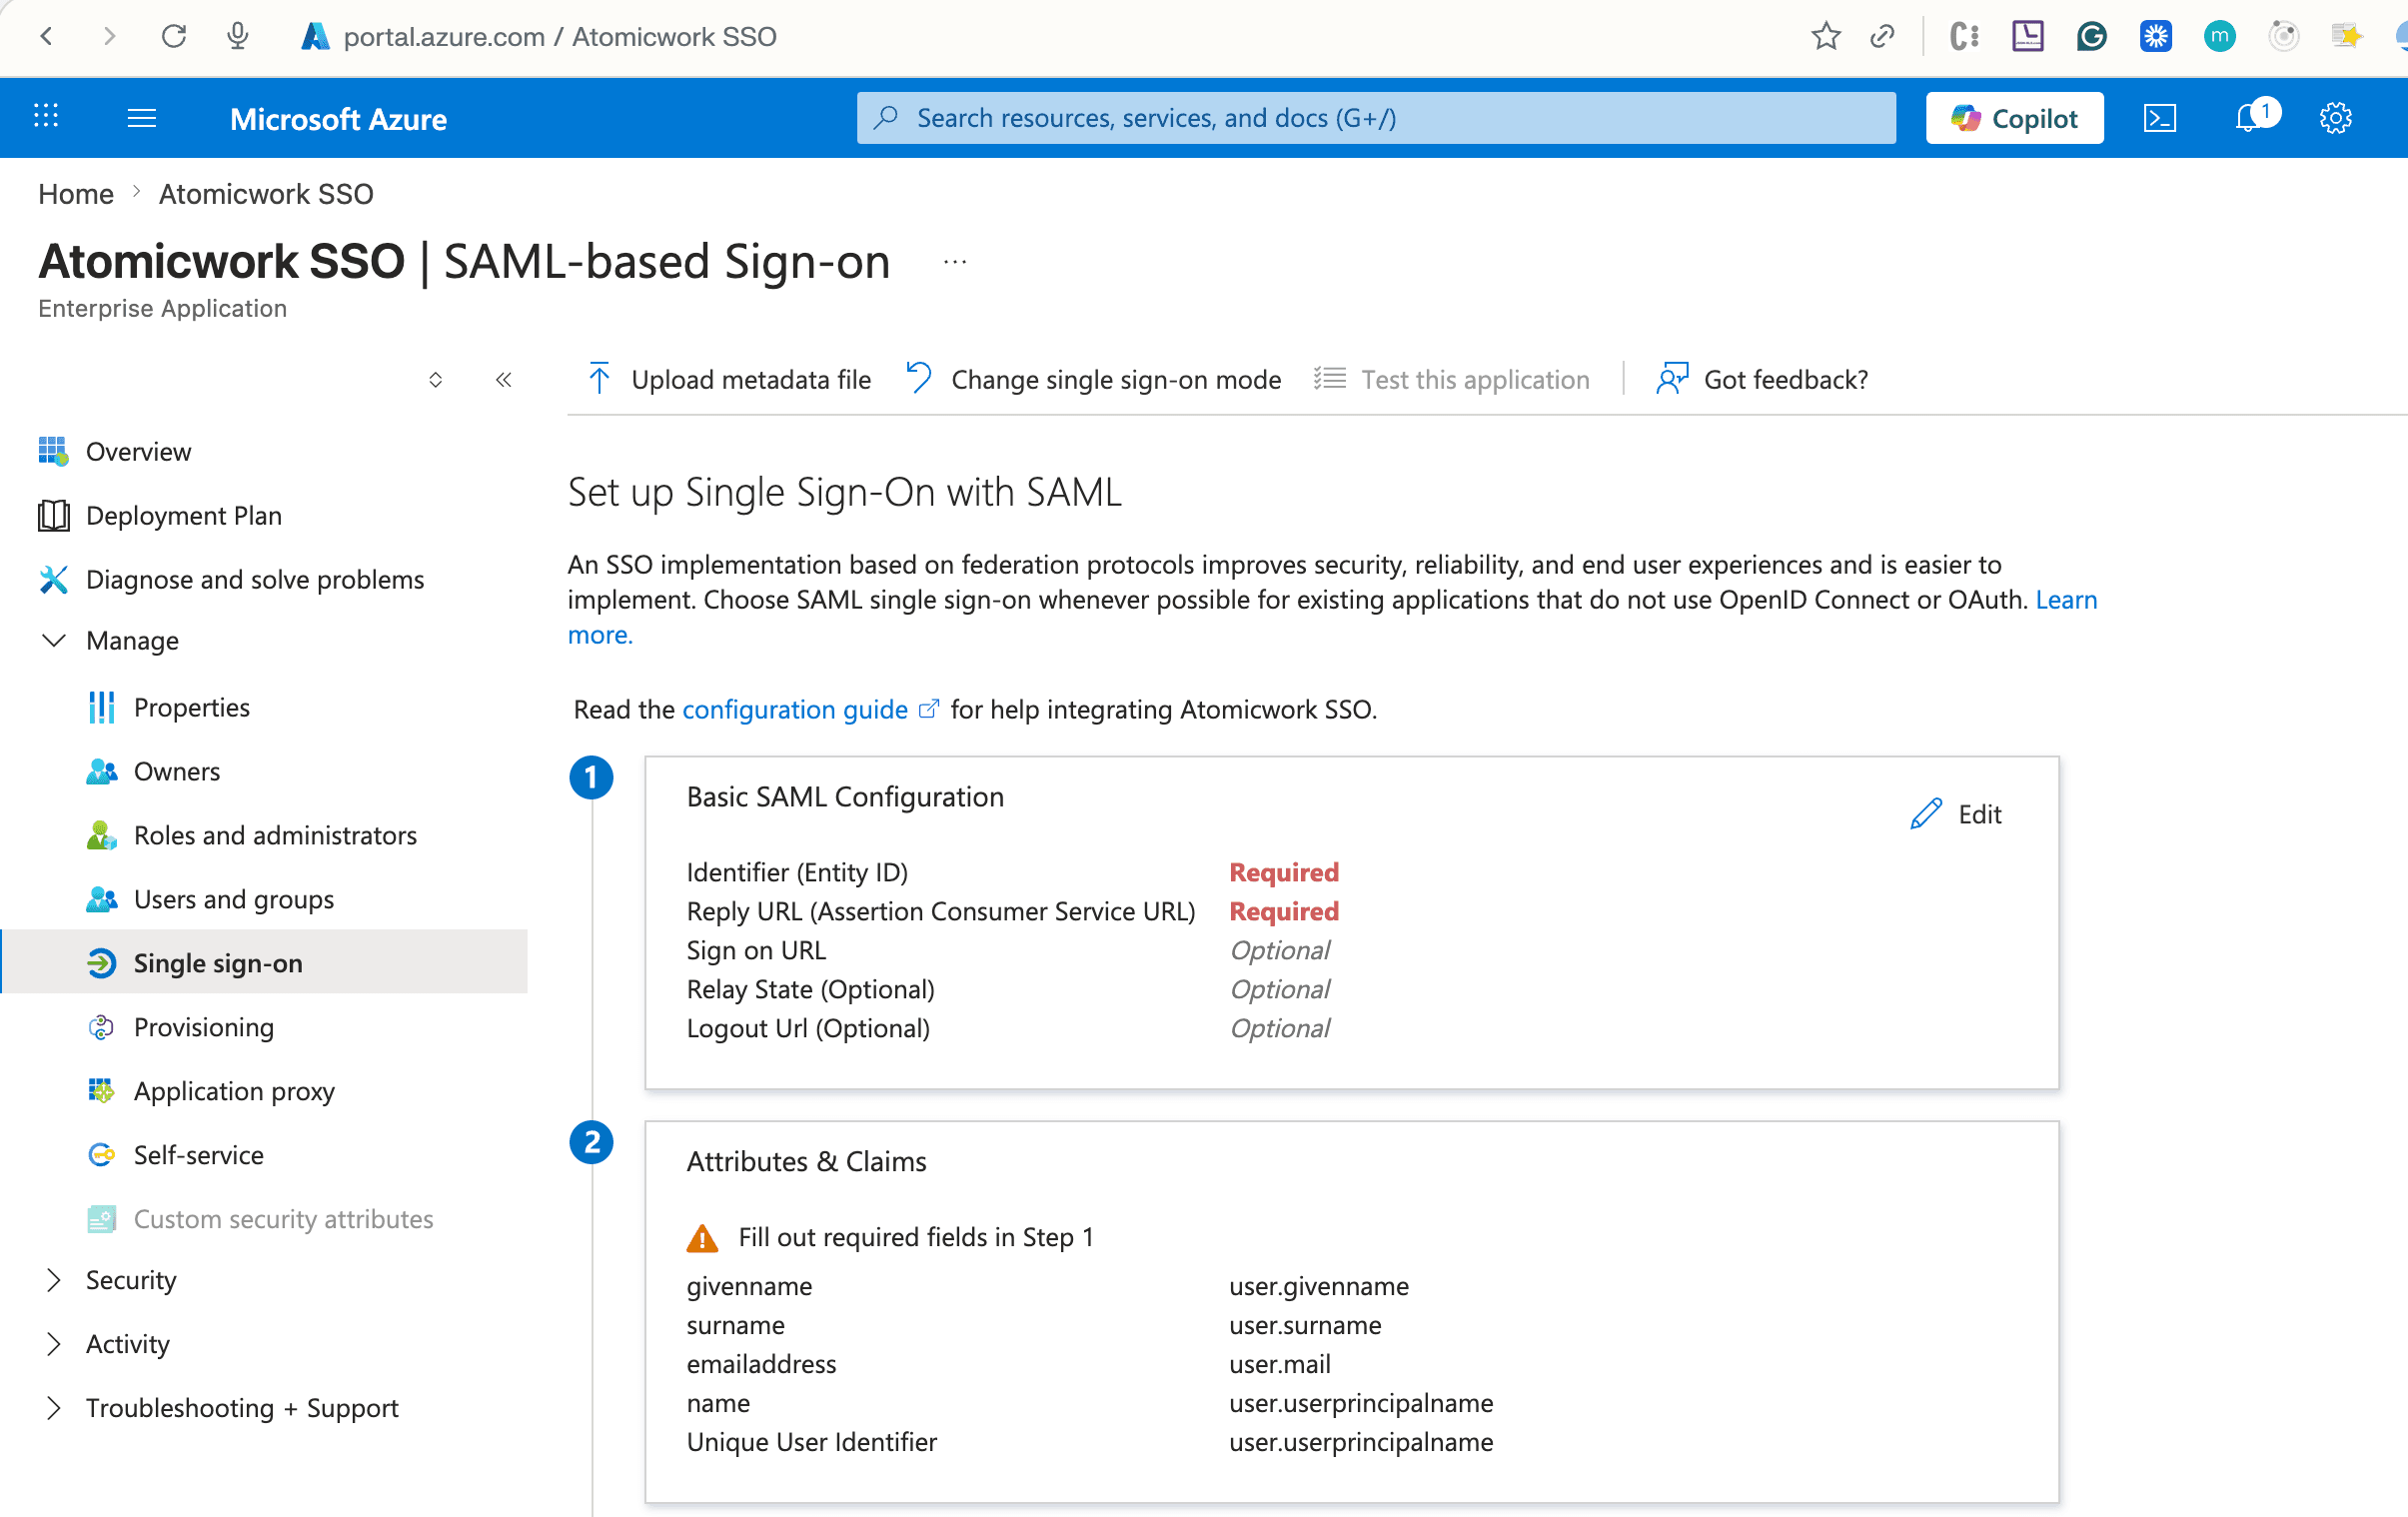
- In section 1 (Basic SAML Configuration), click on Edit and provide the three Atomicwork endpoints listed below. Note: Azure expects two Reply URLs — one marked as Default (used for IdP-initiated SSO) and an additional one (used for SP-initiated SSO). Both are available from Atomicwork.
| Azure field | What to paste |
|---|---|
| Identifier (Entity ID) | Paste the Identifier (Entity ID) from Atomicwork — https://accounts.atomicwork.com/realms/{realmId}-{domain} |
| Reply URL (ACS) — Default | Paste the Reply URL (ACS) — set as Default in Azure from Atomicwork — …/broker/azure-saml/endpoint/clients/saml-client. Tick the Default checkbox next to this row in Azure. |
| Reply URL — additional | Click + Add reply URL in Azure and paste the Reply URL — additional value from Atomicwork — …/broker/azure-saml/endpoint. Leave the Default checkbox unticked. |
| Sign on URL | Leave blank. |
| Relay State | Leave blank. |
| Logout URL | Leave blank. |
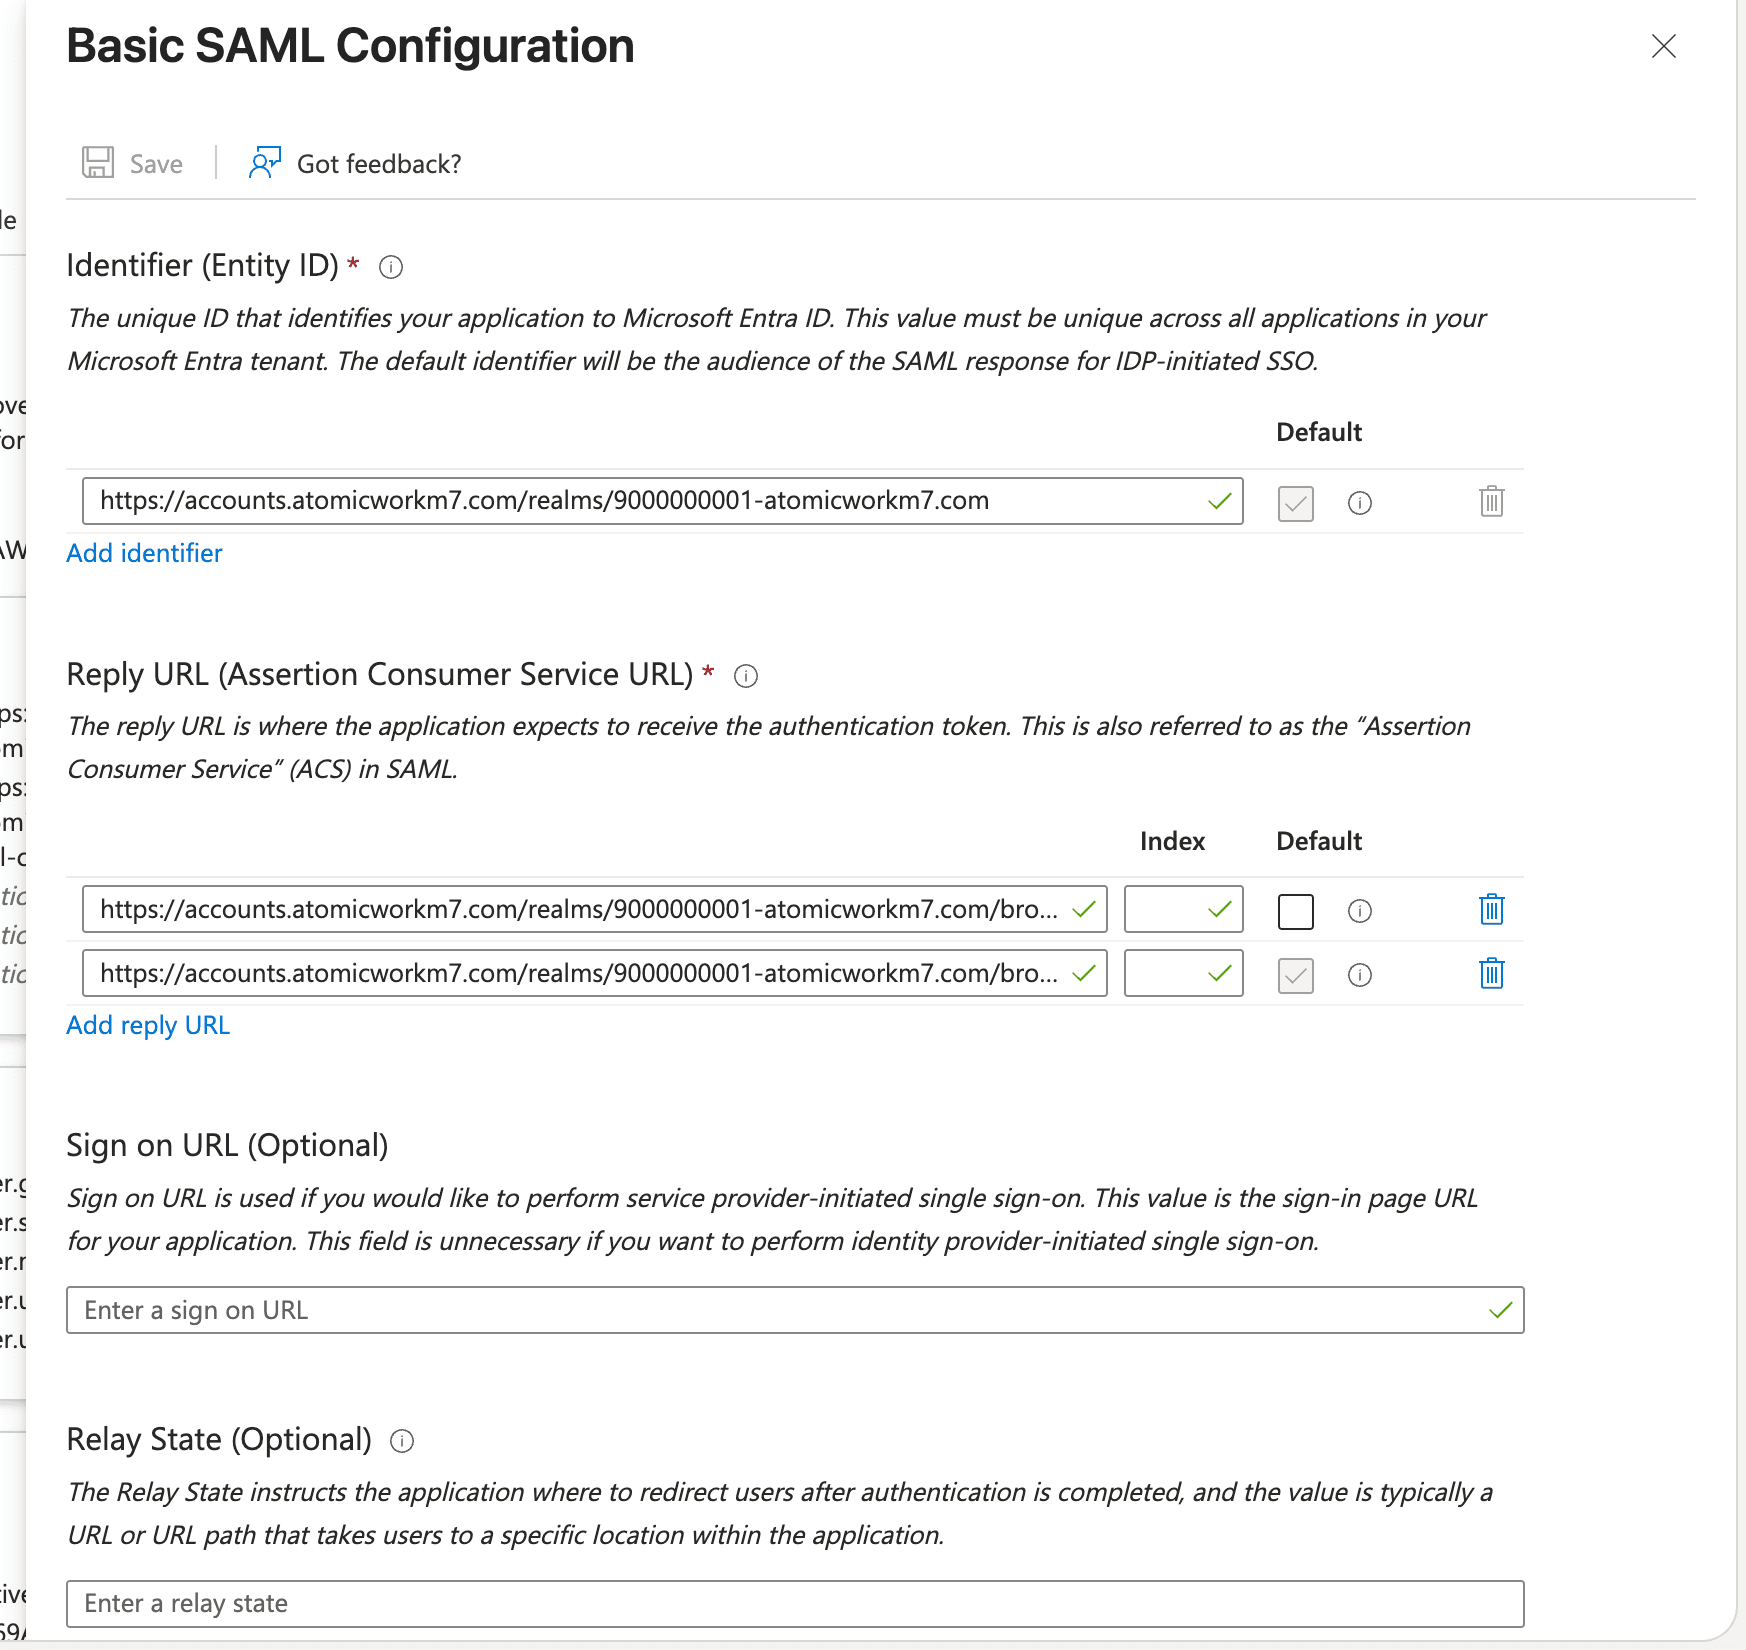
[!NOTE] Important: Make sure the Default checkbox is enabled on the row that ends with
/clients/saml-client. The second Reply URL (without/clients/saml-client) is what enables SP-initiated SSO — both are required.
- Click on Save once all fields have been populated.
Step 5: Verify the Attributes & Claims
Azure pre-populates a set of default claims that Atomicwork can consume as-is. Open section 2 (Attributes & Claims) and confirm the mapping below.
| Claim | Source attribute |
|---|---|
| givenname | user.givenname |
| surname | user.surname |
| emailaddress | user.mail |
| name | user.userprincipalname |
| Unique User Identifier | user.userprincipalname |
[!NOTE] Customization: If your organization stores user email in
user.mail, leaveemailaddressmapped touser.mail. If you publish primary email only viauser.userprincipalname, remap accordingly. The default mapping works for the majority of Microsoft 365 tenants.
Step 6: Copy the SAML signing details
- Scroll to section 3 (SAML Certificates). Azure auto-generates a token signing certificate the moment the application is created.
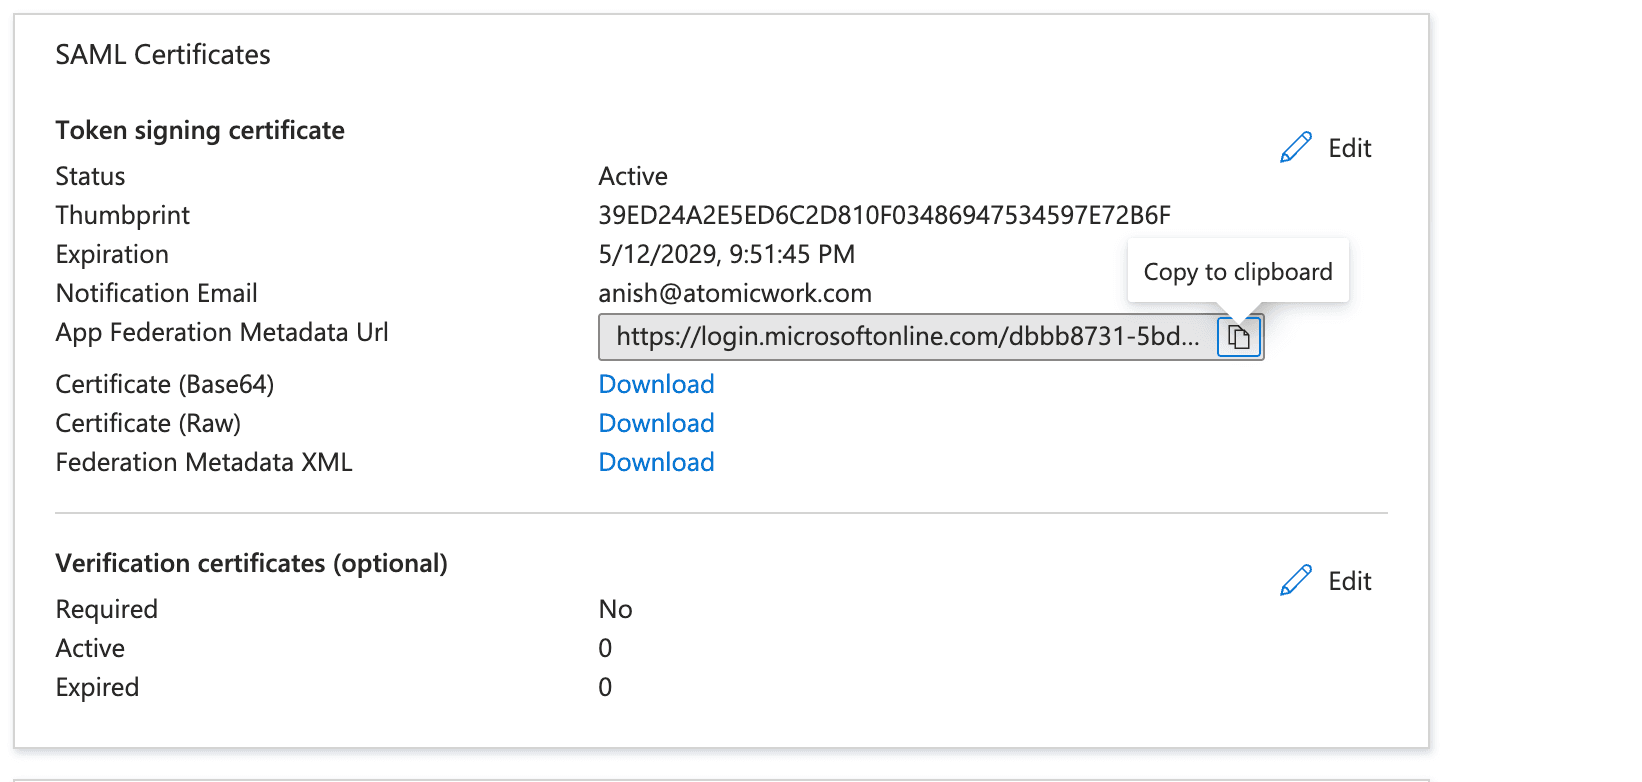
- Locate App Federation Metadata Url. Click the copy icon to put the URL on your clipboard.
- Optionally, download Certificate (Base64) as a backup.
[!NOTE] Why the metadata URL? The federation metadata URL is a live, signed XML document that contains Azure's issuer identifier, sign-in endpoints, and the public signing key. Pointing Atomicwork at the URL — rather than uploading a static certificate — means key rotations performed by Azure are picked up automatically without service interruption.
Step 7: Paste the metadata URL into Atomicwork
- Navigate to your Atomicwork tenant and go to Settings > Security (under Organization) > Microsoft Entra ID SSO (SAML).
- Paste the App Federation Metadata URL from the previous step here.
- Click Test to verify the configuration.
- Click Connect to activate SSO for your organization. The status indicator at the top of the panel will change to Connected once setup is complete.
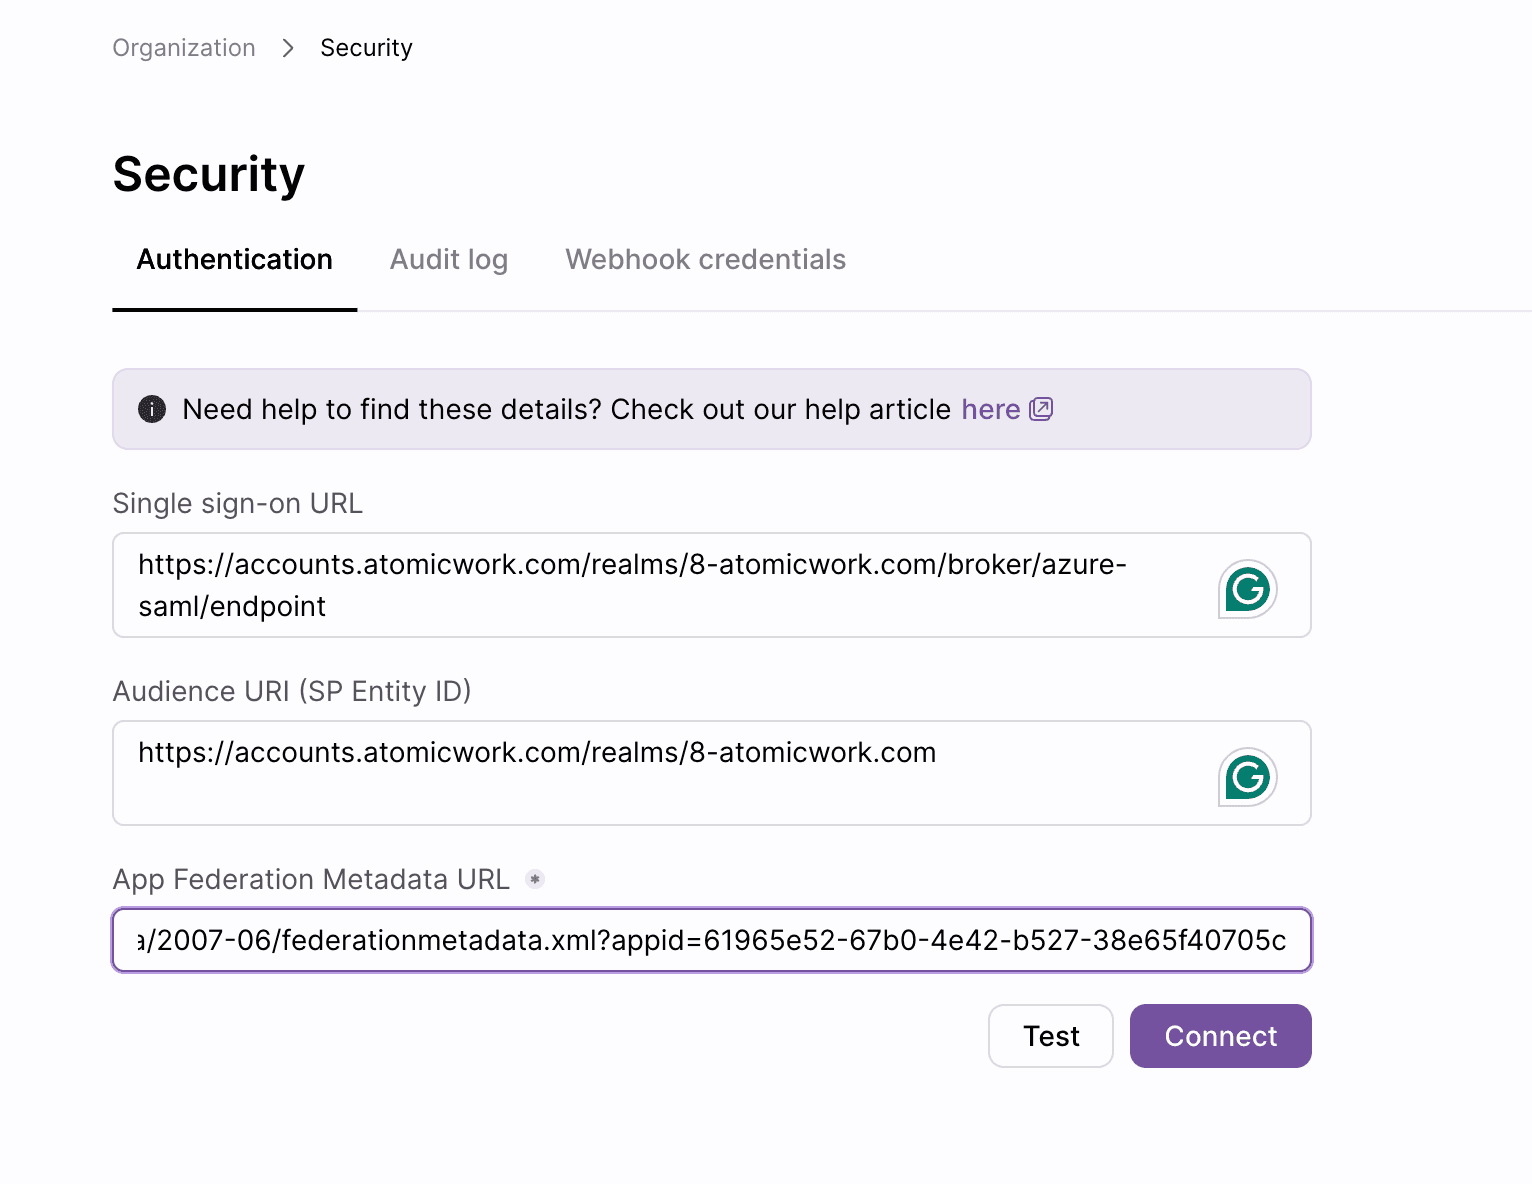
[!NOTE] Always Test first before you Connect. The Test button performs a non-disruptive authentication round-trip and reports any misconfiguration before SSO is enforced organization-wide. Only click Connect once the test passes.
Step 8: Assign users and validate
- In Azure, return to the application's overview page and open Users and groups from the left navigation.
- Click + Add user/group and assign the Microsoft Entra users or groups who should have access to Atomicwork.
- Navigate to your Atomicwork tenant in an incognito browser tab.
- Click Continue with SSO (or equivalent) and enter your work email. You should be redirected to the Microsoft sign-in page, authenticate, and land back inside Atomicwork.
Optional — Conditional Access: If your organization uses Conditional Access policies, you can extend the same policies (MFA, device compliance, sign-in risk) to Atomicwork by scoping a policy to this Enterprise Application. No additional configuration is required on the Atomicwork side.
Troubleshooting
| Symptom | Cause | Resolution |
|---|---|---|
| AADSTS50105 — User is not assigned to a role | The user (or a group containing them) hasn't been assigned to the Enterprise Application. | Open the application in Azure > Users and groups and assign the affected user. If user assignment is not required for your tenant, you can disable the requirement in Properties > Assignment required = No. |
| Atomicwork shows "Invalid signature" after Azure sign-in | The metadata URL was copied while a certificate rotation was in flight, or only a partial URL was pasted. | Re-copy the App Federation Metadata URL from Azure and paste it again in Atomicwork. |
| Loop back to the sign-in page | A mismatched ACS URL — usually a trailing space or wrong suffix on the Reply URL in Basic SAML Configuration. | Verify that the Reply URL in Basic SAML Configuration ends exactly with /broker/azure-saml/endpoint and that there are no trailing spaces. |
| Email or name is missing in the user profile | The emailaddress claim maps to user.mail, but that attribute is empty in some hybrid tenants. | Open Attributes & Claims in Azure and remap emailaddress to user.userprincipalname instead. |
Need help?
If you get stuck, contact Atomicwork Support and include the Application ID of the Enterprise Application you created, plus a screenshot of the Atomicwork Security settings page.