
Development & IT Operations
Azure DevOps
Azure DevOps
Azure DevOps: Automating release pipelines with changes in Atomicwork
Use Atomicwork’s integration with Azure DevOps to bring automated governance to your release pipelines. With this integration, you can configure your DevOps release pipelines to:
- Automatically create a change in Atomicwork when a release is triggered
- Pause deployment until the change is approved
- Resume pipeline execution once the change reaches a specific status
This helps DevOps teams move fast while meeting audit and compliance needs, and gives change managers centralized control over what’s going out and when.
How it works
The Atomicwork-Azure DevOps integration uses a gate in DevOps to manage deployment flow based on the status of a change created in Atomicwork.
Here’s what happens:
- A release is triggered in Azure DevOps.
- The gate creates a change in Atomicwork using a pre-configured change template in the designated workspace.
- DevOps polls Atomicwork at regular intervals to check the status of the change.
- Once the change reaches the desired status (like Awaiting Implementation), the pipeline gate is cleared and deployment for the release continues.
Permissions
To integrate Atomicwork and Azure DevOps, you will need:
- Owner persmissions in your DevOps organization
- Org admin access in Atomicwork
- A pre-defined workspace and change template already set up in Atomicwork
- A service connection configured in DevOps (details below)
- The Atomicwork extension installed in Azure DevOps
Setup
To install the Atomicwork DevOps extension from the Azure marketplace and integrate Azure DevOps from the Atomicwork app store, follow the steps here.
Step 1: Create a service connection in Azure DevOps
- In your Azure DevOps organization, navigate to your Project and go to Project settings at the bottom of the left navigation menu
- Under Pipelines, click on Service Connections
 https://d3gf5wsgt7m4.cloudfront.net/FREE_LICENSE/Q0z-picture.png}}"/>
 - Click Create service connection and select Atomicwork connection from the options
 https://d3gf5wsgt7m4.cloudfront.net/FREE_LICENSE/ngI-picture.png}}"/>
 - Enter the following details:
- Your Atomicwork tenant URL (https://yourcompany.atomicwork.com)
- A public API token (you can generate this in Atomicwork by clicking on Create token under Settings > Public API token)
- Click Verify to confirm the token is valid
 https://d3gf5wsgt7m4.cloudfront.net/FREE_LICENSE/OCA-picture.png}}"/>
- Name the connection and grant access to all pipelines
- Click on Verify and save to create the connection
Step 2: Configure a release pipeline with a change gate
To configure a release pipeline to automatically trigger changes in Atomicwork, go to your DevOps project and do the following:
- Navigate to Pipelines > Releases in the left navigation menu
 https://d3gf5wsgt7m4.cloudfront.net/FREE_LICENSE/OJ8-picture.png}}"/>
 - Open an existing release pipeline or create a new one
- Create or click on the stage where you want to pause for change approval and click on Pre-deployment conditions
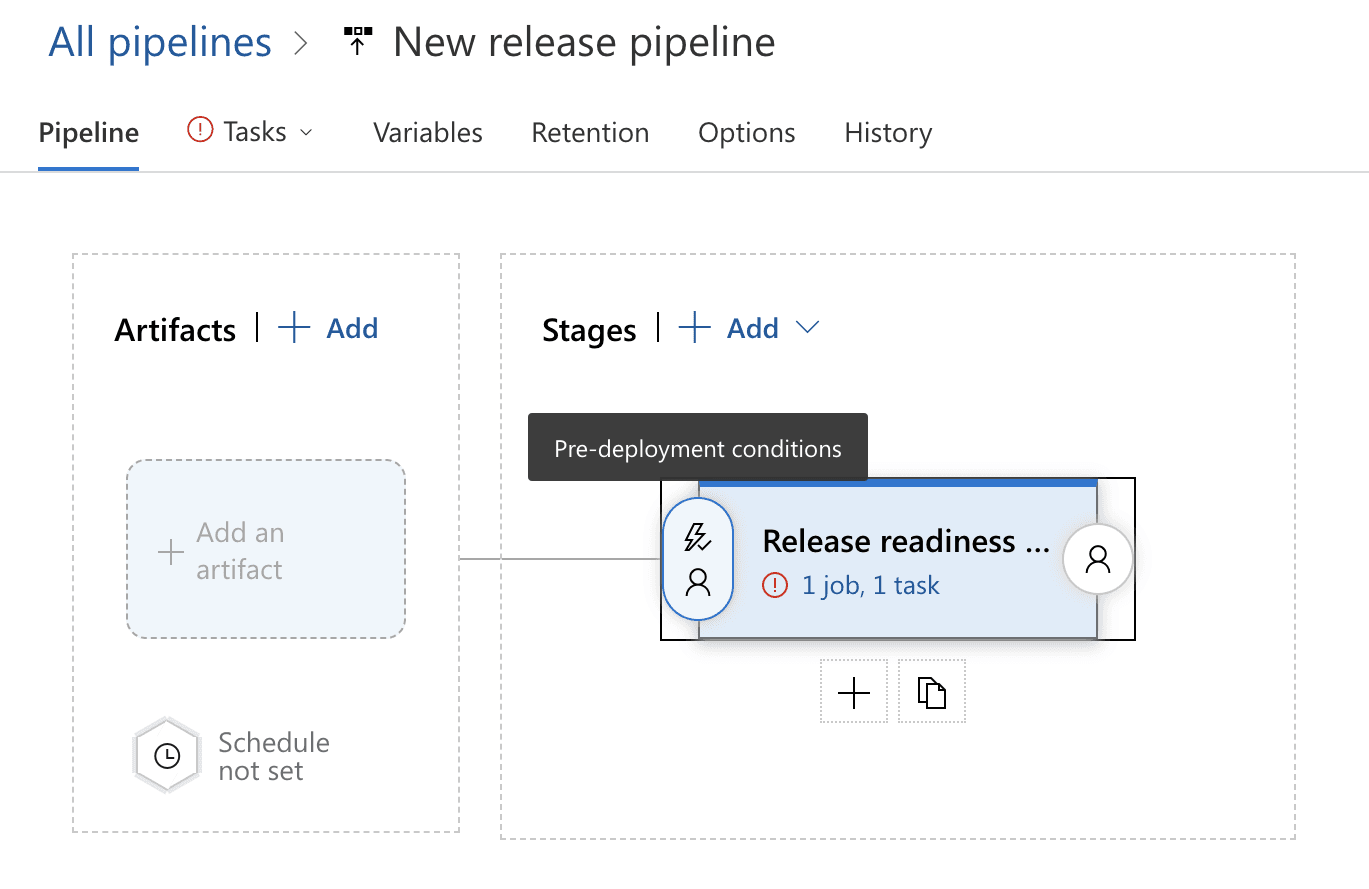
- Enable Gates and click on Add next to Deployment gates
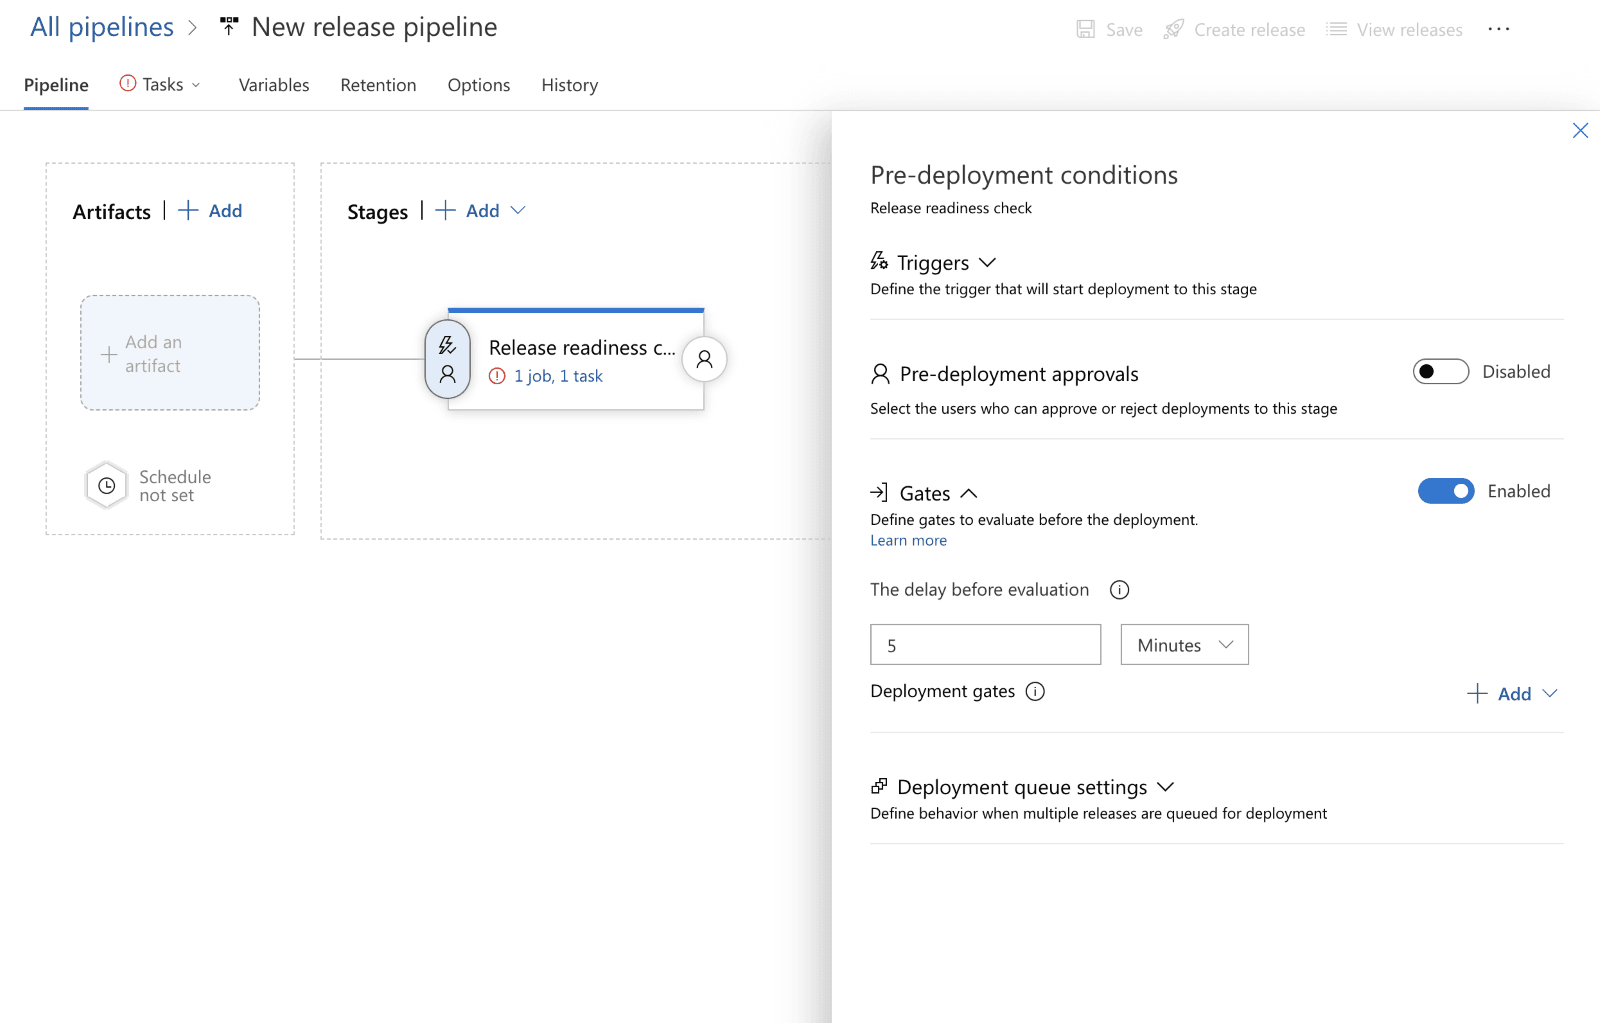
- Select Atomicwork Change Management
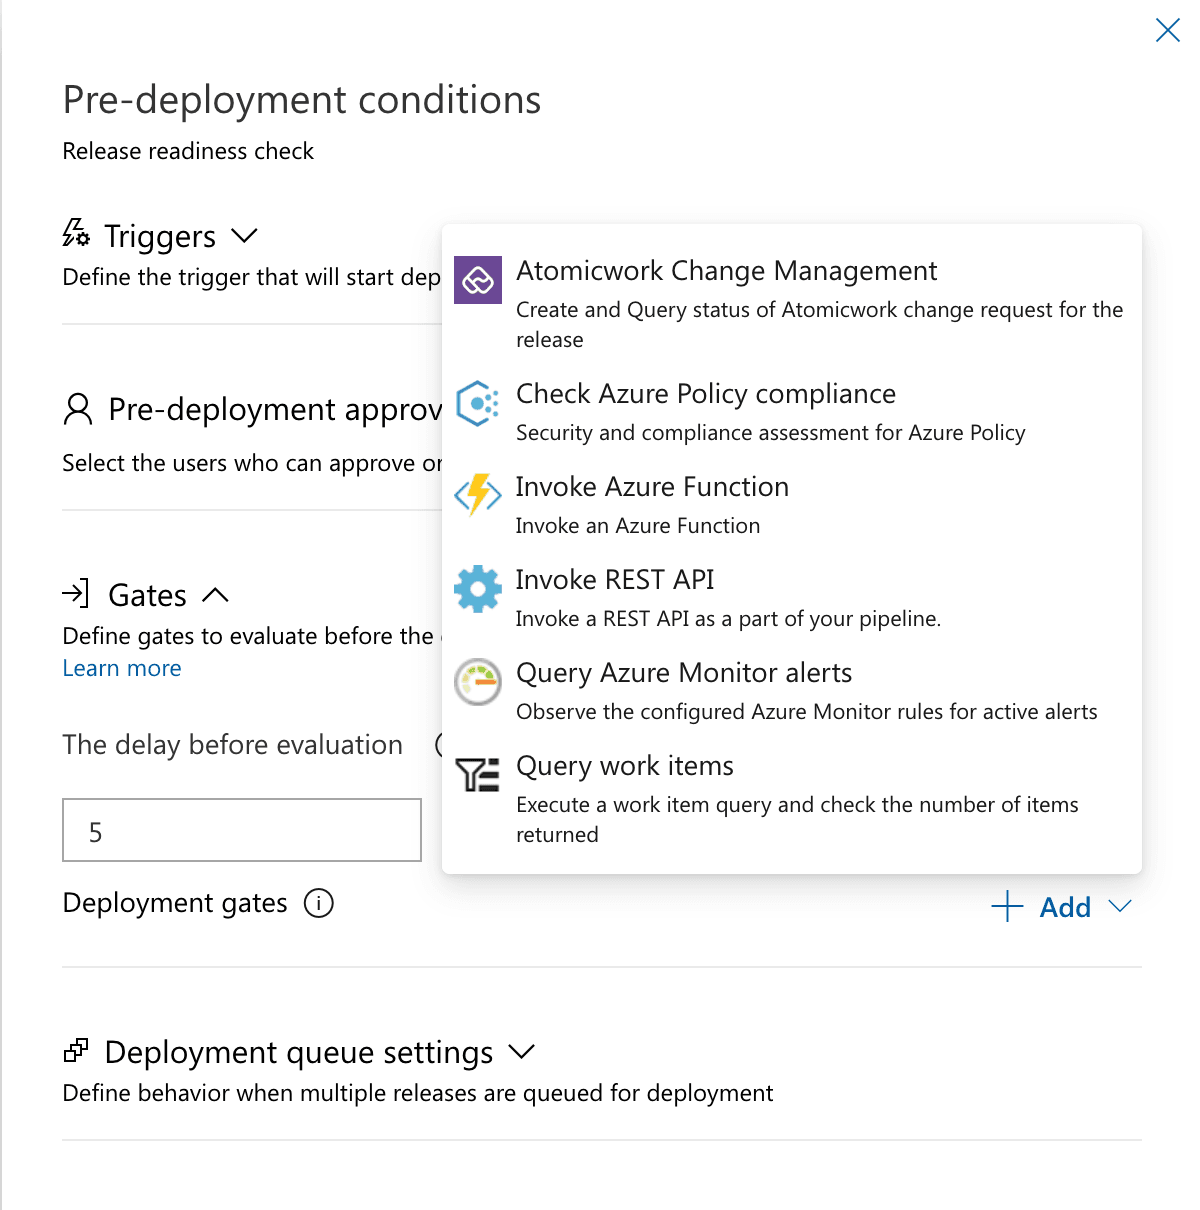
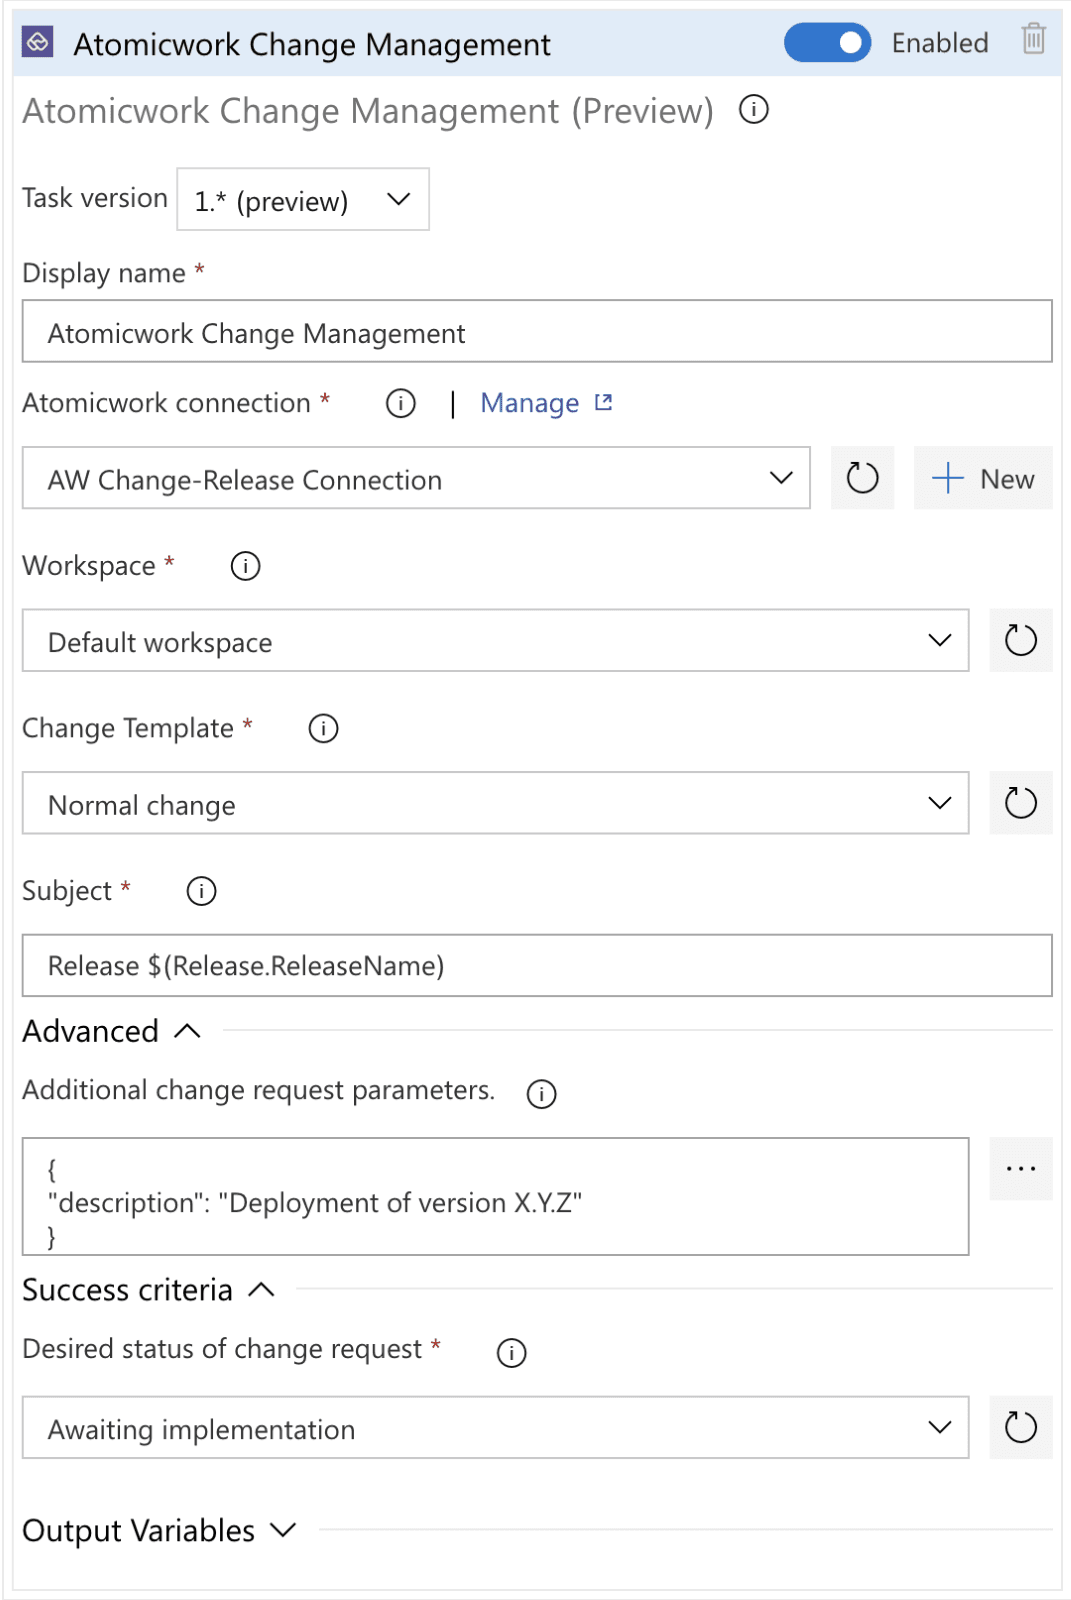
- Enter the following details:
- Service connection: Select the Atomicwork service connection you created
- Workspace: Choose from the list of workspaces available in your Atomicwork tenant
- Change template: Select the required change template
- Subject: Define a subject for the change (e.g., Release $(Release.ReleaseName))
- Advanced: Enter any additional change attributes that you want to pass to Atomicwork as key-value pairs in the JSON format (e.g., "description": "Deployment of version X.Y.Z")
- Success criteria: Set the desired status of the change request (e.g., Awaiting Implementation) — this is the status the change must reach before deployment can continue
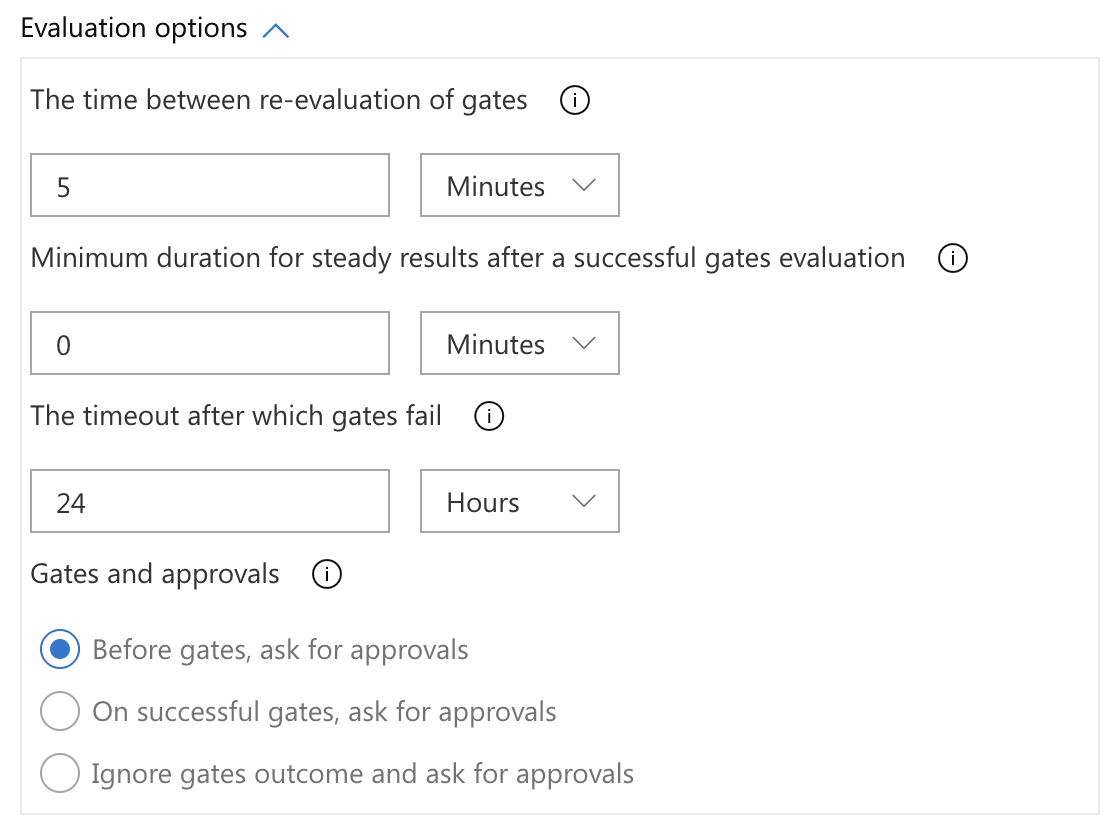
- Under Evaluation options, enter the polling interval (minimum 5 minutes) which is the duration after which the gate (i.e. the status of the change request) is checked
What happens during execution
When a pipeline runs:
- A new change is automatically created in Atomicwork with the selected template
- Atomicwork sends notifications and triggers any approval workflows as defined in the template
- DevOps will check the change status every few minutes (based on polling interval)
- Once the change is approved and reaches the desired status, the gate unlocks and the pipeline moves forward
If the change is not approved or the status doesn’t change, the pipeline will stay blocked until the next polling attempt.
Troubleshooting
| Issue | Possible cause | Resolution |
|---|---|---|
| Gate fails with ‘Invalid token’ | Incorrect API token or tenant URL | Regenerate the token in Atomicwork and update the service connection |
| Workspace or change template not showing up | Extension not fetching the metadata correctly | Reconnect the Azure DevOps integration in the Atomicwork App stor |
| Gate keeps polling without success | Change status hasn’t been updated to the desired status | Verify if approvals or required actions in Atomicwork are complete |
FAQs
Can I trigger changes for multiple pipelines? Yes, as long as each pipeline stage has the gate configured with a valid connection and workspace.
Where can I see the created change in Atomicwork? Changes appear under the configured workspace, with all standard approvals, notifications, and actions applicable as per the change template.
Azure DevOps: Permissions and setup
Permissions
To connect your Atomicwork and Azure DevOps accounts, you need:
- Atomicwork admin access: You need org admin access in Atomicwork
- Azure DevOps owner permissions: You need access to your Azure DevOps organization with Owner permissions
- Atomicwork Azure DevOps extension: You need to install the Atomicwork extension from the Azure DevOps marketplace
Setup
Installing the Atomicwork Azure DevOps extension
- Navigate to the Azure DevOps marketplace (https://marketplace.visualstudio.com/azuredevops)
- Search for Atomicwork and click on Install
Once installed, the extension will be available across all projects within your organization.
Connecting Azure DevOps from Atomicwork
- As an Atomicwork admin, navigate to Settings > App Store under Integrations
- Find Azure DevOps in the app store and click on Connect.
- Follow the OAuth prompts to authorize Azure DevOps access via your Microsoft account